
Brownie ice cream sandwiches, a delightful fusion of fudgy goodness and creamy coolness, are the ultimate treat to satisfy your sweet cravings! Imagine sinking your teeth into a chewy, rich brownie, only to be met with a burst of your favorite ice cream flavor. It’s a symphony of textures and tastes that will leave you wanting more.
While the exact origins of the brownie ice cream sandwich remain a bit of a mystery, the combination of brownies and ice cream has been a beloved pairing for decades. Brownies, with their dense, chocolatey richness, first emerged in the late 19th century in the United States. Ice cream, of course, has a much longer history, dating back centuries and enjoyed in various forms across different cultures. Bringing these two iconic desserts together was a stroke of genius!
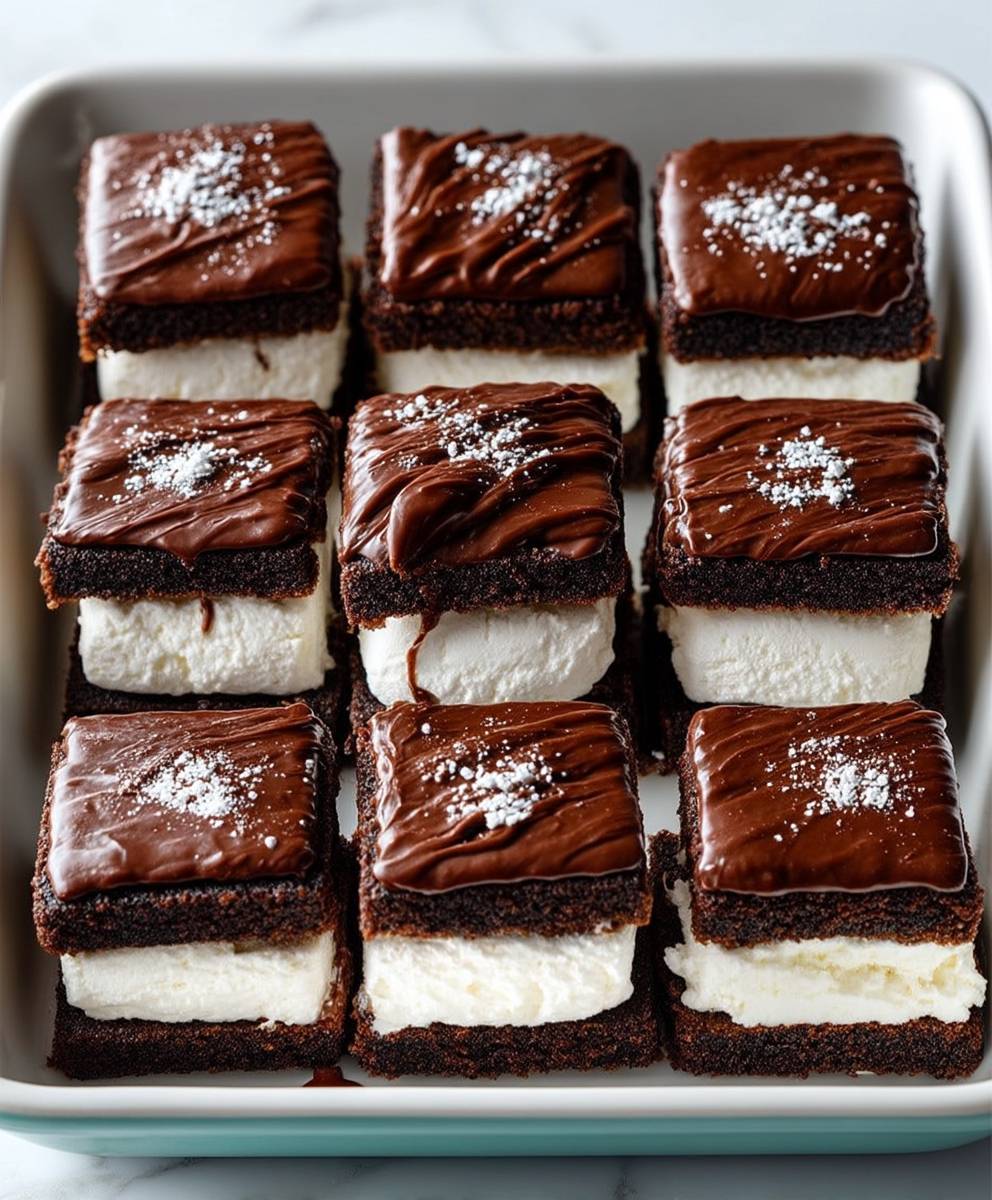
What makes these sandwiches so irresistible? It’s the perfect balance of warm and cold, soft and firm. The fudgy brownie provides a comforting, familiar base, while the ice cream adds a refreshing chill and a creamy texture that melts in your mouth. Plus, they’re incredibly convenient! No need for plates or spoons; these handheld delights are perfect for picnics, parties, or simply enjoying on a warm afternoon. Get ready to learn how to make your own batch of these crowd-pleasing treats!

Ingredients:
- For the Brownies:
- 1 cup (2 sticks) unsalted butter, melted
- 2 cups granulated sugar
- 1 cup unsweetened cocoa powder
- 1 teaspoon salt
- 1 teaspoon baking powder
- 1 tablespoon vanilla extract
- 4 large eggs
- 1 cup all-purpose flour
- 1 cup chocolate chips (optional, but highly recommended!)
- For the Ice Cream:
- 1 quart (4 cups) of your favorite ice cream, softened slightly (vanilla, chocolate, or cookies and cream are great choices!)
- Optional Toppings:
- Sprinkles
- Chopped nuts
- Mini chocolate chips
- Shredded coconut
Preparing the Brownie Batter:
Alright, let’s get started with the brownies! These are the foundation of our ice cream sandwiches, so we want them to be fudgy and delicious.
- Melt the Butter: In a large, microwave-safe bowl, melt the butter. You can do this in 30-second intervals, stirring in between, until it’s completely melted. Alternatively, you can melt it in a saucepan over low heat. Just be careful not to burn it!
- Combine Wet Ingredients: Once the butter is melted, whisk in the granulated sugar, cocoa powder, salt, and baking powder. Make sure everything is well combined and there are no lumps of cocoa powder. The mixture will be quite thick at this point.
- Add Vanilla and Eggs: Stir in the vanilla extract. Then, add the eggs one at a time, mixing well after each addition. This is important for creating a smooth and emulsified batter. Don’t overmix at this stage, just ensure each egg is fully incorporated.
- Incorporate the Flour: Gradually add the all-purpose flour, mixing until just combined. Be careful not to overmix the batter, as this can lead to tough brownies. A few streaks of flour are okay at this point.
- Add Chocolate Chips (Optional): If you’re using chocolate chips (and I highly recommend you do!), gently fold them into the batter until they are evenly distributed.
Baking the Brownies:
Now that our batter is ready, it’s time to bake these beauties!
- Prepare the Baking Pan: Preheat your oven to 350°F (175°C). Grease and flour a 9×13 inch baking pan. Alternatively, you can line the pan with parchment paper, leaving an overhang on the sides. This will make it easier to lift the brownies out of the pan later.
- Pour in the Batter: Pour the brownie batter into the prepared baking pan and spread it evenly.
- Bake: Bake for 25-30 minutes, or until a toothpick inserted into the center comes out with moist crumbs attached. Be careful not to overbake the brownies, as they will become dry. They should be fudgy in the center.
- Cool Completely: Once the brownies are baked, remove them from the oven and let them cool completely in the pan. This is crucial! If you try to cut them while they’re still warm, they’ll crumble. I usually let them cool for at least an hour, or even longer. You can even put them in the fridge to speed up the cooling process.
Preparing the Ice Cream:
While the brownies are cooling, let’s get the ice cream ready. The key here is to have slightly softened ice cream that’s still firm enough to hold its shape.
- Soften the Ice Cream: Take your ice cream out of the freezer about 15-20 minutes before you plan to assemble the sandwiches. This will allow it to soften slightly, making it easier to spread. Don’t let it get too soft, though, or it will melt everywhere! You want it to be spreadable but still hold its shape.
Assembling the Ice Cream Sandwiches:
This is the fun part! Get ready to create some delicious ice cream sandwiches.
- Cut the Brownies: Once the brownies are completely cooled, carefully lift them out of the pan using the parchment paper overhang (if you used it). Cut the brownies into squares or rectangles, depending on your preference. I usually aim for squares that are about 2-3 inches in size. You should get around 12-16 sandwiches from a 9×13 inch pan.
- Spread the Ice Cream: Take one brownie square and spread a generous layer of softened ice cream on top. Make sure the ice cream is evenly distributed.
- Top with Another Brownie: Place another brownie square on top of the ice cream, creating a sandwich. Gently press down to secure the sandwich.
- Smooth the Edges (Optional): If you want to make your ice cream sandwiches look extra professional, you can use a knife or spatula to smooth the edges of the ice cream.
- Add Toppings (Optional): This is where you can get creative! Roll the edges of the ice cream sandwiches in sprinkles, chopped nuts, mini chocolate chips, shredded coconut, or any other toppings you like.
- Freeze: Place the assembled ice cream sandwiches on a baking sheet lined with parchment paper and freeze them for at least 30 minutes to allow the ice cream to firm up again. This will make them easier to handle and prevent them from melting too quickly.
Serving and Storing:
Finally, it’s time to enjoy your homemade brownie ice cream sandwiches!
- Serve: Remove the ice cream sandwiches from the freezer and serve immediately. They’re best enjoyed cold!
- Store: Store any leftover ice cream sandwiches in an airtight container in the freezer. They should keep for several weeks, but I doubt they’ll last that long!
Tips and Tricks for Perfect Brownie Ice Cream Sandwiches:
- Use High-Quality Ingredients: The better the ingredients, the better the final product. Use good quality cocoa powder and chocolate chips for the best flavor.
- Don’t Overbake the Brownies: Overbaked brownies will be dry and crumbly, which is not what we want for ice cream sandwiches. Aim for fudgy brownies that are slightly underbaked.
- Soften the Ice Cream Properly: The ice cream should be soft enough to spread easily, but not so soft that it melts everywhere.
- Freeze the Sandwiches Before Serving: Freezing the assembled sandwiches for at least 30 minutes will help them hold their shape and prevent them from melting too quickly.
- Get Creative with Toppings: Don’t be afraid to experiment with different toppings to create your own unique ice cream sandwiches.
- Make Ahead: You can make the brownies ahead of time and store them in an airtight container at room temperature for a few days. This will save you time when you’re ready to assemble the ice cream sandwiches.
- Variations: Try using different flavors of ice cream, such as mint chocolate chip, strawberry, or coffee. You can also add other mix-ins to the brownie batter, such as chopped nuts, peanut butter chips, or caramel swirls.
Troubleshooting:
- Brownies are too dry: You may have overbaked the brownies. Be sure to check them frequently while they’re baking and remove them from the oven when a toothpick inserted into the center comes out with moist crumbs attached.
- Ice cream is melting too quickly: Make sure the ice cream is properly softened before spreading it on the brownies. Also, freeze the assembled sandwiches for at least 30 minutes before serving.
- Sandwiches are falling apart: Make sure the brownies are completely cooled before cutting them. Also, gently press down on the sandwiches to secure them.
Conclusion:
So there you have it! These brownie ice cream sandwiches are truly a must-try dessert experience. They’re the perfect combination of fudgy, chewy brownies and creamy, cold ice cream, creating a symphony of textures and flavors that will leave you wanting more. Honestly, I can’t think of a better way to satisfy a sweet tooth, especially on a warm day. The best part? They’re surprisingly easy to make, and you can customize them to your heart’s content.
Why are these brownie ice cream sandwiches a must-try? Because they’re incredibly delicious, relatively simple to prepare, and offer endless possibilities for customization. They’re a crowd-pleaser, perfect for parties, family gatherings, or just a special treat for yourself. Forget store-bought ice cream sandwiches; these homemade versions are on a whole other level! The rich, decadent brownies perfectly complement the cool, refreshing ice cream, creating a harmonious balance that’s simply irresistible.
Serving Suggestions and Variations:
Now, let’s talk about how you can take these brownie ice cream sandwiches to the next level. While they’re fantastic as is, there are so many ways to personalize them and make them your own.
* Ice Cream Flavors: Don’t limit yourself to just vanilla! Experiment with different ice cream flavors to find your perfect combination. Chocolate ice cream for a double-chocolate delight, mint chocolate chip for a refreshing twist, or even salted caramel for a sweet and salty sensation. The possibilities are endless!
* Brownie Variations: Feel free to add mix-ins to your brownie batter. Chocolate chips, nuts, peanut butter swirls, or even a sprinkle of sea salt can elevate your brownies and add extra flavor and texture. You could even try using different types of brownies, like blondies or even red velvet brownies, for a unique twist.
* Toppings: Before assembling your sandwiches, consider adding toppings to the ice cream. Sprinkles, chocolate shavings, chopped nuts, mini M&Ms, or even a drizzle of hot fudge sauce can add extra flair and flavor.
* Dipping: For an extra decadent treat, dip the assembled sandwiches in melted chocolate and then sprinkle with your favorite toppings. This will create a beautiful and delicious coating that will take your brownie ice cream sandwiches to the next level.
* Serving: Serve these immediately after assembling for the best texture. If you’re making them ahead of time, wrap them individually in plastic wrap and store them in the freezer until ready to serve. Let them sit at room temperature for a few minutes before enjoying.
I truly believe that once you try this recipe, you’ll be hooked. It’s a fun and rewarding baking project that results in a truly unforgettable dessert. The combination of warm, fudgy brownies and cold, creamy ice cream is simply divine.
So, what are you waiting for? Gather your ingredients, preheat your oven, and get ready to create some amazing brownie ice cream sandwiches! I’m confident that you’ll love them as much as I do.
And most importantly, I’d love to hear about your experience! Did you try any variations? What was your favorite ice cream flavor to pair with the brownies? Share your photos and stories in the comments below. I can’t wait to see what you create! Happy baking!
Brownie Ice Cream Sandwiches: The Ultimate Summer Treat
Fudgy homemade brownies embrace your favorite ice cream, creating delightful frozen sandwiches. Customize with toppings for a personalized dessert.
Ingredients
- 1 cup (2 sticks) unsalted butter, melted
- 2 cups granulated sugar
- 1 cup unsweetened cocoa powder
- 1 teaspoon salt
- 1 teaspoon baking powder
- 1 tablespoon vanilla extract
- 4 large eggs
- 1 cup all-purpose flour
- 1 cup chocolate chips (optional)
- 1 quart (4 cups) of your favorite ice cream, softened slightly (vanilla, chocolate, or cookies and cream are great choices!)
- Sprinkles
- Chopped nuts
- Mini chocolate chips
- Shredded coconut
Instructions
- Melt the Butter: In a large, microwave-safe bowl, melt the butter in 30-second intervals, stirring in between, until completely melted. Alternatively, melt in a saucepan over low heat.
- Combine Wet Ingredients: Whisk in the granulated sugar, cocoa powder, salt, and baking powder. Ensure everything is well combined with no lumps of cocoa powder.
- Add Vanilla and Eggs: Stir in the vanilla extract. Add the eggs one at a time, mixing well after each addition.
- Incorporate the Flour: Gradually add the all-purpose flour, mixing until just combined. Be careful not to overmix the batter.
- Add Chocolate Chips (Optional): Gently fold in the chocolate chips until evenly distributed.
- Prepare the Baking Pan: Preheat oven to 350°F (175°C). Grease and flour a 9×13 inch baking pan or line with parchment paper.
- Pour in the Batter: Pour the brownie batter into the prepared baking pan and spread it evenly.
- Bake: Bake for 25-30 minutes, or until a toothpick inserted into the center comes out with moist crumbs attached. Be careful not to overbake the brownies.
- Cool Completely: Let the brownies cool completely in the pan.
- Soften the Ice Cream: Take your ice cream out of the freezer about 15-20 minutes before you plan to assemble the sandwiches.
- Cut the Brownies: Once the brownies are completely cooled, carefully lift them out of the pan. Cut the brownies into squares or rectangles.
- Spread the Ice Cream: Take one brownie square and spread a generous layer of softened ice cream on top.
- Top with Another Brownie: Place another brownie square on top of the ice cream, creating a sandwich. Gently press down to secure the sandwich.
- Smooth the Edges (Optional): Use a knife or spatula to smooth the edges of the ice cream.
- Add Toppings (Optional): Roll the edges of the ice cream sandwiches in sprinkles, chopped nuts, mini chocolate chips, shredded coconut, or any other toppings you like.
- Freeze: Place the assembled ice cream sandwiches on a baking sheet lined with parchment paper and freeze them for at least 30 minutes to allow the ice cream to firm up again.
- Serve: Remove the ice cream sandwiches from the freezer and serve immediately.
- Store: Store any leftover ice cream sandwiches in an airtight container in the freezer.
Notes
- Use high-quality ingredients for the best flavor.
- Don’t overbake the brownies; aim for fudgy.
- Soften the ice cream properly spreadable but not melted.
- Freeze the assembled sandwiches before serving to prevent melting.
- Get creative with toppings!
- Make the brownies ahead of time to save time.
- Try different flavors of ice cream or add mix-ins to the brownie batter.
- If brownies are too dry, check them frequently while baking.
- If ice cream is melting too quickly, ensure it’s properly softened and freeze sandwiches before serving.
- If sandwiches are falling apart, ensure brownies are completely cooled before cutting.