
No Bake Key Lime Pies: the words alone conjure images of sunny beaches, refreshing breezes, and a tangy-sweet dessert that’s simply irresistible. Imagine sinking your spoon into a creamy, cool filling, bursting with the bright citrus flavor of Key limes, all nestled in a buttery graham cracker crust. Sounds heavenly, right? This isn’t just a dessert; it’s a mini-vacation for your taste buds!
Key lime pie boasts a rich history, deeply rooted in the Florida Keys. Legend has it that the recipe evolved from sailors using condensed milk (a shelf-stable ingredient) and readily available Key limes to create a delicious and practical treat. The pie quickly became a local favorite, and its popularity has since spread worldwide.
What makes no bake Key Lime Pies so universally loved? It’s a combination of factors. The vibrant, tart flavor of Key limes is perfectly balanced by the sweetness of the filling and the comforting crunch of the crust. Plus, the no-bake aspect makes it incredibly convenient, especially during warmer months when you don’t want to turn on the oven. Its the perfect make-ahead dessert for parties, potlucks, or simply a delightful treat for yourself. I find that the creamy texture and the bright, zesty flavor are simply addictive, and I’m sure you will too!

Ingredients:
- For the Crust:
- 1 ½ cups graham cracker crumbs
- 5 tablespoons unsalted butter, melted
- ¼ cup granulated sugar
- Pinch of salt
- For the Filling:
- 2 (14 ounce) cans sweetened condensed milk
- ¾ cup Key lime juice (freshly squeezed is best!)
- 8 ounces cream cheese, softened
- 1 teaspoon lime zest
- Optional: A few drops of green food coloring (for a more vibrant color)
- For the Topping (Optional):
- 1 cup heavy cream
- 2 tablespoons powdered sugar
- ½ teaspoon vanilla extract
- Lime slices or zest for garnish
Preparing the Graham Cracker Crust
Okay, let’s get started with the crust! This is the foundation of our delicious no-bake Key lime pies, and it’s super easy to make.
- Combine the Dry Ingredients: In a medium-sized bowl, whisk together the graham cracker crumbs, granulated sugar, and a pinch of salt. Make sure everything is evenly distributed. This ensures a consistent flavor throughout the crust.
- Add the Melted Butter: Pour the melted butter into the bowl with the dry ingredients. Use a fork or your fingers to mix everything together until the crumbs are evenly moistened. The mixture should resemble wet sand. If it seems too dry, you can add a tiny bit more melted butter, a teaspoon at a time, until it reaches the right consistency.
- Press into the Pie Dish: Now, it’s time to press the crust into your pie dish. I usually use a 9-inch pie dish, but you can also use individual ramekins for mini pies! Pour the graham cracker mixture into the dish. Use the bottom of a measuring cup or your fingers to firmly press the crumbs evenly across the bottom and up the sides of the dish. Make sure the crust is compact and well-formed. This will prevent it from crumbling later.
- Chill the Crust: Once the crust is pressed into the dish, cover it with plastic wrap and place it in the refrigerator to chill for at least 30 minutes. This will help the crust set and become firm. You can even chill it for longer, up to a few hours, if you have the time. A well-chilled crust is key to a perfect no-bake pie!
Making the Key Lime Filling
Now for the star of the show the Key lime filling! This is where the magic happens, and it’s surprisingly simple to create that tangy, creamy goodness.
- Soften the Cream Cheese: Make sure your cream cheese is softened to room temperature before you start. This is crucial for a smooth and creamy filling. If the cream cheese is too cold, it will be difficult to blend and you’ll end up with lumps in your filling. You can leave it out at room temperature for about an hour, or you can microwave it in 15-second intervals until it’s soft.
- Combine Cream Cheese and Sweetened Condensed Milk: In a large bowl, beat the softened cream cheese with an electric mixer until it’s smooth and creamy. Gradually add the sweetened condensed milk, beating until everything is well combined. Make sure there are no lumps of cream cheese remaining. The mixture should be light and fluffy.
- Add the Key Lime Juice and Zest: Slowly pour in the Key lime juice and add the lime zest. Beat on low speed until the filling is smooth and well combined. Be careful not to overmix, as this can cause the filling to become too thin. The lime juice will react with the sweetened condensed milk and cream cheese, thickening the filling.
- Optional: Add Food Coloring: If you want a more vibrant green color for your Key lime pie, you can add a few drops of green food coloring at this stage. Start with just a drop or two and add more until you reach your desired color. Be careful not to add too much, as it can affect the taste of the pie.
- Pour into the Crust: Remove the chilled graham cracker crust from the refrigerator. Pour the Key lime filling into the crust, spreading it evenly.
- Chill the Pie: Cover the pie with plastic wrap and refrigerate for at least 4 hours, or preferably overnight. This will allow the filling to set completely and develop its full flavor. The longer you chill it, the better it will taste!
Preparing the Whipped Cream Topping (Optional)
While the pie is chilling, you can prepare the whipped cream topping. This is totally optional, but it adds a lovely touch of sweetness and creaminess that complements the tartness of the Key lime filling.
- Chill the Bowl and Whisk: Before you start, place your mixing bowl and whisk (or the beaters of your electric mixer) in the freezer for about 15-20 minutes. This will help the heavy cream whip up more quickly and easily.
- Whip the Heavy Cream: Pour the chilled heavy cream into the chilled bowl. Beat with an electric mixer on medium speed until soft peaks begin to form.
- Add Powdered Sugar and Vanilla Extract: Gradually add the powdered sugar and vanilla extract to the whipped cream. Continue beating until stiff peaks form. Be careful not to overwhip, as this can turn the cream into butter. You want the whipped cream to be thick and fluffy, but not grainy.
Assembling and Garnishing the Pie
The final step! This is where you get to put the finishing touches on your beautiful no-bake Key lime pie.
- Add the Whipped Cream: Once the pie has chilled completely, remove it from the refrigerator. Spread the whipped cream evenly over the top of the pie. You can use a spoon or a piping bag to create a decorative design.
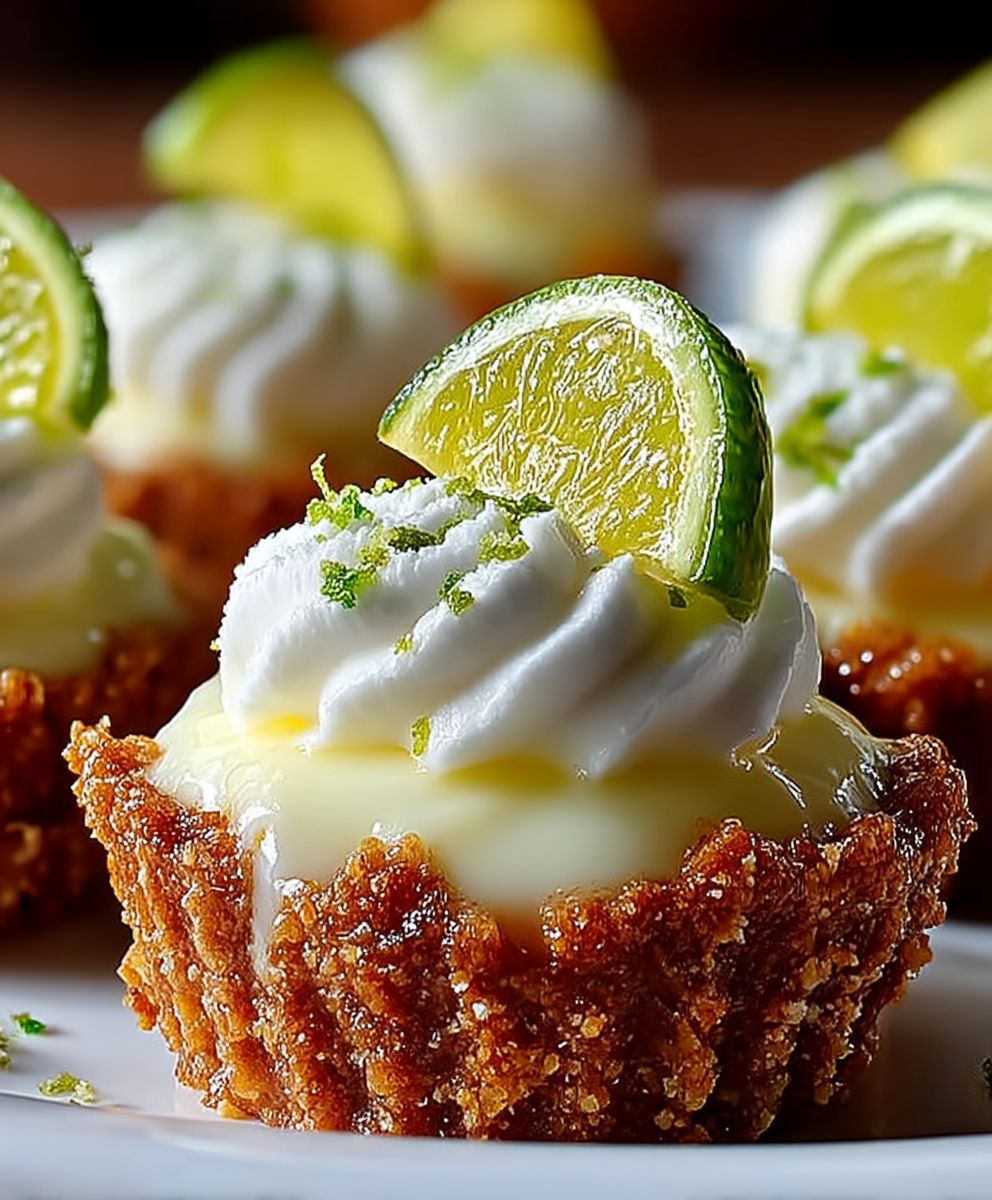
- Garnish: Garnish the pie with lime slices or lime zest. You can also add a few graham cracker crumbs for extra texture. Get creative and make it look beautiful!
- Serve and Enjoy: Slice the pie and serve immediately. Store any leftovers in the refrigerator. This pie is best enjoyed cold!
Tips for the Perfect No-Bake Key Lime Pie:
- Use Fresh Key Lime Juice: While bottled Key lime juice can work in a pinch, freshly squeezed Key lime juice will give you the best flavor. It’s worth the extra effort!
- Don’t Overmix the Filling: Overmixing the filling can cause it to become too thin. Mix just until everything is combined.
- Chill Thoroughly: Chilling the pie for at least 4 hours, or preferably overnight, is essential for the filling to set properly.
- Adjust Sweetness to Taste: If you prefer a less sweet pie, you can reduce the amount of sweetened condensed milk slightly.
- Get Creative with Garnishes: Feel free to experiment with different garnishes, such as toasted coconut flakes, chocolate shavings, or fresh berries.
Troubleshooting:
- Filling is Too Thin: If your filling is too thin, it could be due to overmixing or using too much Key lime juice. Try chilling the pie for a longer period of time. If it’s still too thin, you can add a tablespoon of cornstarch to the filling before chilling.
- Crust is Crumbly: If your crust is crumbly, it could be due to not using enough butter. Add a little more melted butter until the crumbs are evenly moistened.
- Whipped Cream is Grainy: If your whipped cream is grainy, it means you’ve overwhipped it. Unfortunately, there’s no way to fix overwhipped cream. You’ll have to start over with a fresh batch.
Variations:
- Mini Key Lime Pies: Use individual ramekins instead of a pie dish to make mini Key lime pies.
- Chocolate Crust: Use chocolate graham crackers instead of regular graham crackers for a chocolatey twist.
- Coconut Crust: Add shredded coconut to the graham cracker crust for a tropical flavor.
- Vegan Key Lime Pie: Use vegan cream cheese and sweetened condensed milk alternatives to make a vegan version of this pie.
Conclusion:
This No Bake Key Lime Pie recipe is truly a game-changer, and I wholeheartedly believe it deserves a spot in your regular dessert rotation. Why? Because it delivers that classic, tangy, and utterly refreshing Key Lime Pie flavor without any of the fuss of baking. We’re talking about a dessert that’s ready in minutes, perfect for those moments when you crave something sweet but don’t want to spend hours in the kitchen. The creamy, dreamy filling, balanced perfectly with the zesty lime, sits atop a buttery graham cracker crust, creating a symphony of textures and tastes that will leave you wanting more.
But the best part? It’s incredibly versatile! While I adore it just as it is, there are so many ways to customize this No Bake Key Lime Pie to your liking. For a richer experience, try using a shortbread crust instead of graham crackers. Or, if you’re feeling adventurous, add a layer of whipped cream or meringue on top before chilling. A sprinkle of lime zest or a few fresh berries can also elevate the presentation and add a burst of fresh flavor.
Serving suggestions are endless! This pie is fantastic on its own as a light and refreshing dessert after a meal. It’s also a crowd-pleaser at parties and potlucks. Cut it into smaller squares for easy serving, or present individual mini pies in ramekins for an elegant touch. Pair it with a scoop of vanilla ice cream or a dollop of whipped cream for an extra indulgent treat. And don’t forget the lime wedge for that extra zing!
For a fun twist, consider making Key Lime Pie parfaits. Simply layer the graham cracker crumbs, Key Lime filling, and whipped cream in glasses for a beautiful and delicious dessert. You could even add a layer of crushed pineapple for a tropical vibe. Another variation I love is making Key Lime Pie bars. Press the graham cracker crust into a baking dish, pour the filling on top, chill, and then cut into bars. These are perfect for lunchboxes or on-the-go snacking.
I’ve poured my heart into perfecting this recipe, and I’m confident that you’ll love it as much as I do. It’s the perfect balance of simplicity and deliciousness, making it a winner in my book. So, what are you waiting for? Gather your ingredients, follow the easy steps, and prepare to be amazed by the incredible flavor of this No Bake Key Lime Pie.
I’m so excited for you to try this recipe! Once you’ve made it, I would absolutely love to hear about your experience. Did you make any variations? What did you think of the flavor? Share your photos and comments with me! Let me know what you think and if you have any questions. Your feedback is invaluable, and it helps me continue to create and share recipes that you’ll love. Happy baking (or rather, no-baking!) and enjoy every single bite! I can’t wait to hear all about your Key Lime Pie adventures.
No Bake Key Lime Pies: The Easiest Dessert Recipe
Tangy and creamy no-bake Key lime pie with a graham cracker crust. A refreshing and easy dessert perfect for any occasion!
Ingredients
- 1 ½ cups graham cracker crumbs
- 5 tablespoons unsalted butter, melted
- ¼ cup granulated sugar
- Pinch of salt
- 2 (14 ounce) cans sweetened condensed milk
- ¾ cup Key lime juice (freshly squeezed is best!)
- 8 ounces cream cheese, softened
- 1 teaspoon lime zest
- Optional: A few drops of green food coloring (for a more vibrant color)
- 1 cup heavy cream
- 2 tablespoons powdered sugar
- ½ teaspoon vanilla extract
- Lime slices or zest for garnish
Instructions
- In a medium-sized bowl, whisk together the graham cracker crumbs, granulated sugar, and a pinch of salt.
- Pour the melted butter into the bowl with the dry ingredients. Use a fork or your fingers to mix everything together until the crumbs are evenly moistened. The mixture should resemble wet sand. If it seems too dry, you can add a tiny bit more melted butter, a teaspoon at a time, until it reaches the right consistency.
- Pour the graham cracker mixture into a 9-inch pie dish (or individual ramekins). Use the bottom of a measuring cup or your fingers to firmly press the crumbs evenly across the bottom and up the sides of the dish.
- Cover with plastic wrap and refrigerate for at least 30 minutes (or up to a few hours).
- Ensure cream cheese is softened to room temperature.
- In a large bowl, beat the softened cream cheese with an electric mixer until smooth. Gradually add the sweetened condensed milk, beating until well combined.
- Slowly pour in the Key lime juice and add the lime zest. Beat on low speed until the filling is smooth and well combined. Be careful not to overmix.
- Add a few drops of green food coloring if desired, until you reach your desired color.
- Remove the chilled graham cracker crust from the refrigerator. Pour the Key lime filling into the crust, spreading it evenly.
- Cover the pie with plastic wrap and refrigerate for at least 4 hours, or preferably overnight.
- Place your mixing bowl and whisk (or the beaters of your electric mixer) in the freezer for about 15-20 minutes.
- Pour the chilled heavy cream into the chilled bowl. Beat with an electric mixer on medium speed until soft peaks begin to form.
- Gradually add the powdered sugar and vanilla extract to the whipped cream. Continue beating until stiff peaks form. Be careful not to overwhip.
- Once the pie has chilled completely, remove it from the refrigerator. Spread the whipped cream evenly over the top of the pie.
- Garnish the pie with lime slices or lime zest. You can also add a few graham cracker crumbs for extra texture.
- Slice the pie and serve immediately. Store any leftovers in the refrigerator.
Notes
- Use fresh Key lime juice for the best flavor.
- Don’t overmix the filling.
- Chill thoroughly for the filling to set properly.
- Adjust sweetness to taste by reducing the amount of sweetened condensed milk.
- Get creative with garnishes!