
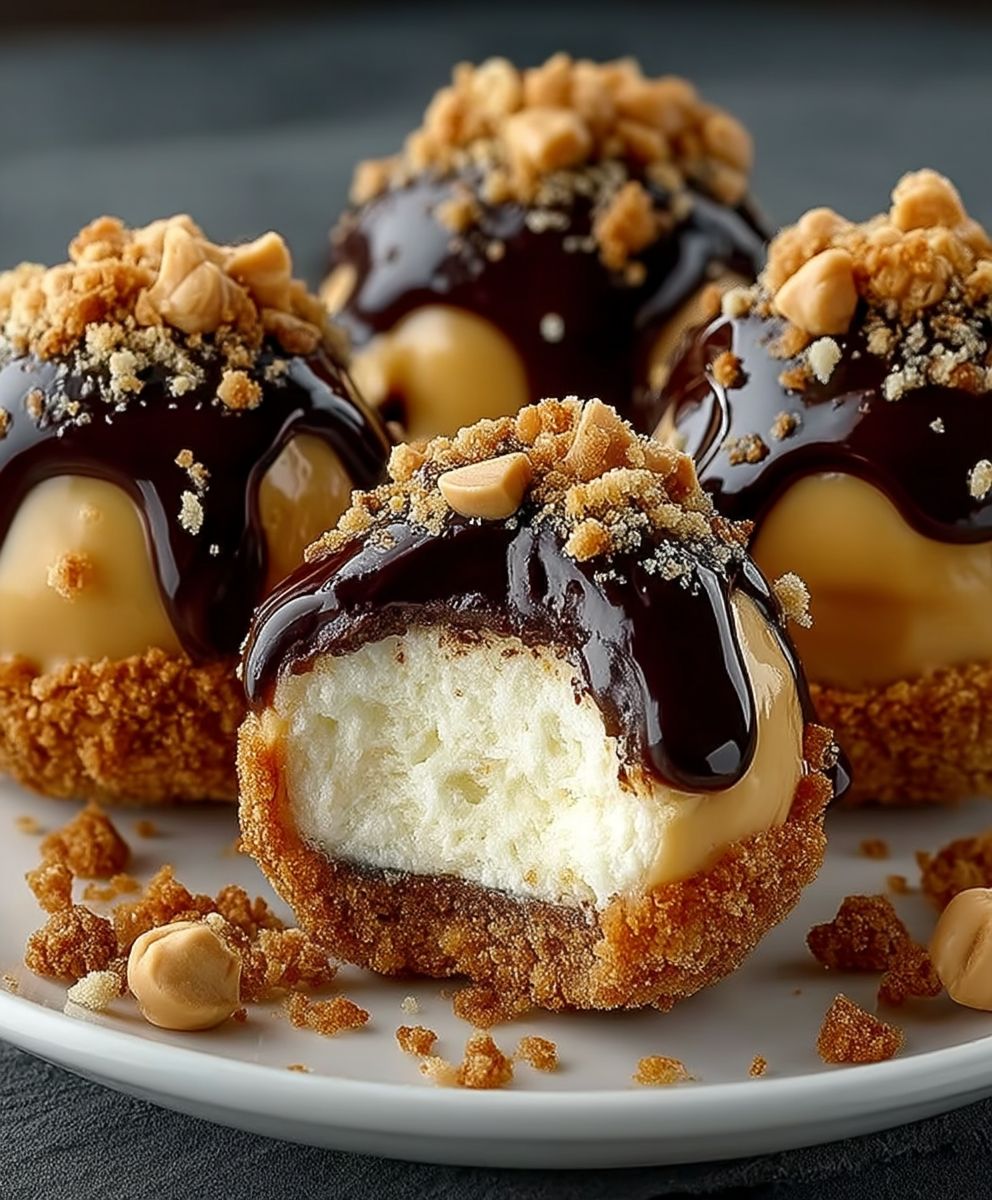
Peanut Butter Cheesecake Balls: Prepare to be amazed by these bite-sized explosions of creamy, peanut buttery goodness! Imagine the rich decadence of cheesecake combined with the irresistible allure of peanut butter, all rolled into a perfectly poppable treat. This isn’t just a dessert; it’s an experience.
While the exact origins of Peanut Butter Cheesecake Balls are shrouded in delicious mystery, their popularity is no secret. They’ve become a staple at parties, potlucks, and holiday gatherings, quickly disappearing from dessert tables as soon as they appear. Think of them as a modern twist on classic no-bake desserts, offering a sophisticated yet playful indulgence.
What makes these little spheres so beloved? It’s the perfect marriage of textures and flavors. The smooth, tangy cheesecake filling contrasts beautifully with the salty, nutty peanut butter. Plus, they’re incredibly convenient! No baking required, and they can be made ahead of time, making them the ideal dessert for busy hosts (like me!). The combination of sweet, salty, and creamy is simply irresistible, making these Peanut Butter Cheesecake Balls a guaranteed crowd-pleaser. Get ready to whip up a batch and watch them vanish before your eyes!

Ingredients:
- 16 ounces cream cheese, softened
- 1 cup creamy peanut butter
- 1 cup powdered sugar
- 1 teaspoon vanilla extract
- 1/4 teaspoon salt
- 12 ounces chocolate chips (milk, dark, or semi-sweet your choice!)
- 1 tablespoon coconut oil (optional, for smoother chocolate)
- Optional toppings: chopped peanuts, sprinkles, sea salt flakes
Preparing the Peanut Butter Cheesecake Mixture
Okay, let’s get started! The first thing we need to do is create that creamy, dreamy peanut butter cheesecake base. This is where the magic happens, so pay close attention!
- Soften the Cream Cheese: This is crucial! Make sure your cream cheese is properly softened. Take it out of the refrigerator at least an hour before you plan to start. If you’re short on time, you can carefully microwave it in 15-second intervals, checking and stirring each time, until it’s soft but not melted. Lumpy cream cheese will ruin the texture of our balls, and nobody wants that!
- Combine Cream Cheese and Peanut Butter: In a large mixing bowl, add the softened cream cheese and peanut butter. I highly recommend using a stand mixer with the paddle attachment for this, but a hand mixer will work just fine too. Beat the cream cheese and peanut butter together on medium speed until they are completely smooth and well combined. This usually takes about 2-3 minutes. Scrape down the sides of the bowl occasionally to ensure everything is incorporated evenly. We want a homogenous mixture, free of any cream cheese lumps.
- Add Powdered Sugar: Gradually add the powdered sugar to the cream cheese and peanut butter mixture. Start with about half of the powdered sugar and mix on low speed until it’s incorporated. Then, add the remaining powdered sugar and continue mixing until everything is smooth. Make sure to mix on low speed to avoid a powdered sugar cloud! Nobody wants to inhale that. Again, scrape down the sides of the bowl as needed.
- Incorporate Vanilla Extract and Salt: Add the vanilla extract and salt to the mixture. Mix on low speed until everything is well combined. The vanilla extract enhances the flavor, and the salt balances the sweetness. Don’t skip the salt! It really makes a difference.
- Taste Test (Optional, but Highly Recommended!): Now, for the best part! Give the mixture a taste. Adjust the sweetness or peanut butter flavor to your liking. If you want it sweeter, add a little more powdered sugar. If you want more peanut butter flavor, add a little more peanut butter. Just remember to add small amounts at a time and mix well after each addition.
Forming the Cheesecake Balls
Now that we have our delicious peanut butter cheesecake mixture, it’s time to form the balls. This part can get a little messy, but it’s also kind of fun!
- Chill the Mixture: This is a very important step! Cover the bowl with plastic wrap and refrigerate the mixture for at least 30 minutes, or even better, an hour. This will help the mixture firm up and make it much easier to roll into balls. Trust me, you don’t want to skip this step. If the mixture is too soft, the balls will be sticky and difficult to handle.
- Prepare Your Workspace: While the mixture is chilling, prepare your workspace. Line a baking sheet with parchment paper or wax paper. This will prevent the balls from sticking to the baking sheet.
- Scoop and Roll: Once the mixture is chilled, use a small cookie scoop (about 1 tablespoon) to scoop out portions of the mixture. Roll each portion between your palms to form a smooth ball. If the mixture is still a little sticky, you can lightly dust your hands with powdered sugar.
- Place on Baking Sheet: Place the formed balls onto the prepared baking sheet, spacing them slightly apart.
- Freeze (Again!): Once all the balls are formed, place the baking sheet in the freezer for at least 30 minutes. This will help them firm up even more and make them easier to dip in chocolate. This double chilling/freezing is key to a perfect final product.
Dipping in Chocolate
Alright, the moment we’ve all been waiting for! It’s time to dip those peanut butter cheesecake balls in glorious, melted chocolate. This is where things get really exciting (and delicious!).
- Melt the Chocolate: Place the chocolate chips in a microwave-safe bowl. Add the coconut oil (if using). The coconut oil helps to thin the chocolate and gives it a smoother, shinier finish, but it’s optional. Microwave in 30-second intervals, stirring after each interval, until the chocolate is completely melted and smooth. Be careful not to overheat the chocolate, as it can burn. If you prefer, you can melt the chocolate using a double boiler.
- Prepare Your Dipping Station: Set up your dipping station. You’ll need the bowl of melted chocolate, the baking sheet with the frozen peanut butter cheesecake balls, and a fork or dipping tools.
- Dip the Balls: Remove the baking sheet with the frozen peanut butter cheesecake balls from the freezer. One at a time, carefully dip each ball into the melted chocolate, making sure it’s completely coated. Use a fork or dipping tools to lift the ball out of the chocolate, allowing any excess chocolate to drip off. You can gently tap the fork against the side of the bowl to help remove excess chocolate.
- Place on Parchment Paper: Place the chocolate-covered ball back onto the parchment-lined baking sheet.
- Add Toppings (Optional): While the chocolate is still wet, sprinkle with your desired toppings, such as chopped peanuts, sprinkles, or sea salt flakes. The sea salt flakes add a wonderful salty-sweet contrast.
- Repeat: Repeat the dipping process with the remaining peanut butter cheesecake balls.
Setting and Storing
We’re almost there! Just a little more patience, and you’ll be enjoying these delicious treats.
- Chill to Set: Place the baking sheet with the chocolate-covered peanut butter cheesecake balls back in the refrigerator for at least 30 minutes, or until the chocolate is completely set. This will ensure that the chocolate is firm and doesn’t melt when you handle them.
- Store Properly: Once the chocolate is set, store the peanut butter cheesecake balls in an airtight container in the refrigerator. They will keep for up to a week. You can also freeze them for longer storage. If freezing, wrap them individually in plastic wrap before placing them in an airtight container.
Tips and Variations:
- Different Chocolate: Experiment with different types of chocolate! Milk chocolate, dark chocolate, white chocolate they all work great. You can even swirl different chocolates together for a marbled effect.
- Nut Butter Variations: Don’t limit yourself to just peanut butter! Try using almond butter, cashew butter, or even sunflower seed butter.
- Add-Ins: Mix in some chopped nuts, mini chocolate chips, or crushed cookies into the peanut butter cheesecake mixture for added texture and flavor.
- Coatings: Instead of dipping in chocolate, try rolling the balls in crushed graham crackers, cocoa powder, or powdered sugar.
- Liqueur: Add a tablespoon of your favorite liqueur (like Frangelico or Baileys) to the peanut butter cheesecake mixture for an extra kick.
- Vegan Option: Use vegan cream cheese and vegan chocolate chips to make these peanut butter cheesecake balls vegan-friendly.
Troubleshooting:
- Chocolate Seizing: If your chocolate seizes (becomes thick and grainy), try adding a teaspoon of vegetable oil or shortening and stirring until smooth.
- Balls Too Soft: If the peanut butter cheesecake mixture is too soft to roll into balls, chill it for a longer period of time.
- Chocolate Not Sticking: Make sure the peanut butter cheesecake balls are frozen before dipping them in chocolate. This will help the chocolate adhere better.
Enjoy your homemade Peanut Butter Cheesecake Balls! I hope you love them as much as I do. They’re perfect for parties, holidays, or just a sweet treat any time of day.
Conclusion:
So there you have it! These Peanut Butter Cheesecake Balls are truly a must-try for anyone who loves a sweet treat that’s both decadent and incredibly easy to make. I know I’ve made them countless times, and they’re always a hit, whether it’s for a casual get-together, a holiday party, or just a little something special to brighten up a weekday. The creamy, tangy cheesecake filling combined with the rich, nutty peanut butter is a flavor explosion that will leave you wanting more. And honestly, who can resist a bite-sized ball of pure deliciousness?
But the best part? They’re so versatile! While I’ve given you my go-to recipe, feel free to experiment and make them your own.
Serving Suggestions and Variations:
* Dipping Delights: Instead of just rolling them in crushed peanuts, try dipping them in melted dark chocolate, milk chocolate, or even white chocolate for an extra layer of indulgence. A sprinkle of sea salt on top of the chocolate adds a wonderful contrast.
* Cookie Crumbles: Swap the crushed peanuts for crushed Oreo cookies, graham crackers, or even your favorite shortbread cookies. The texture and flavor variations are endless!
* Spice it Up: Add a pinch of cinnamon or nutmeg to the cheesecake filling for a warm, comforting flavor.
* Nutty Alternatives: If you’re not a fan of peanuts, try using almond butter, cashew butter, or even sunflower seed butter. Just be sure to adjust the sweetness to your liking.
* Presentation is Key: Arrange the Peanut Butter Cheesecake Balls on a pretty platter, or package them in small gift boxes for a thoughtful homemade present. A little garnish of fresh berries or a dusting of cocoa powder can also elevate the presentation.
* Freezing for Later: These little gems freeze beautifully! Make a big batch and store them in the freezer for a quick and easy dessert whenever you need a sweet fix. Just let them thaw for a few minutes before serving.
* Holiday Twist: For the holidays, consider using festive sprinkles or colored sugars to decorate the balls. You could even add a touch of peppermint extract to the filling for a Christmas-themed treat.
I truly believe that this recipe for Peanut Butter Cheesecake Balls is a winner. It’s simple enough for even beginner bakers, yet the results are impressive enough to wow your friends and family. It’s the perfect combination of ease and deliciousness, and I’m confident that you’ll love them as much as I do.
So, what are you waiting for? Gather your ingredients, put on some music, and get ready to have some fun in the kitchen! I promise you won’t regret it. And most importantly, don’t be afraid to get creative and experiment with different flavors and toppings. That’s the beauty of cooking it’s all about expressing yourself and creating something that you truly enjoy.
I’m so excited for you to try this recipe! Once you do, please come back and share your experience in the comments below. I’d love to hear what variations you tried, what your friends and family thought, and any tips or tricks you discovered along the way. Happy baking! Let me know if you have any questions, and I’ll do my best to help. Enjoy!
Peanut Butter Cheesecake Balls: Easy No-Bake Recipe
Decadent peanut butter cheesecake balls dipped in chocolate and topped with your favorite sprinkles. A perfect no-bake treat!
Ingredients
- 16 ounces cream cheese, softened
- 1 cup creamy peanut butter
- 1 cup powdered sugar
- 1 teaspoon vanilla extract
- 1/4 teaspoon salt
- 12 ounces chocolate chips (milk, dark, or semi-sweet your choice!)
- 1 tablespoon coconut oil (optional, for smoother chocolate)
Instructions
- Soften the Cream Cheese: Ensure cream cheese is softened by leaving it out for at least an hour or microwaving in 15-second intervals until soft.
- Combine Cream Cheese and Peanut Butter: In a large mixing bowl, beat softened cream cheese and peanut butter together on medium speed until smooth and well combined (2-3 minutes). Scrape down the sides of the bowl.
- Add Powdered Sugar: Gradually add powdered sugar to the mixture on low speed until smooth. Scrape down the sides of the bowl.
- Incorporate Vanilla Extract and Salt: Add vanilla extract and salt to the mixture. Mix on low speed until well combined.
- Taste Test: Adjust sweetness or peanut butter flavor to your liking by adding small amounts of powdered sugar or peanut butter.
- Chill the Mixture: Cover the bowl with plastic wrap and refrigerate for at least 30 minutes (or an hour) to firm up.
- Prepare Your Workspace: Line a baking sheet with parchment paper or wax paper.
- Scoop and Roll: Use a small cookie scoop (about 1 tablespoon) to scoop portions of the mixture. Roll each portion between your palms to form a smooth ball. Dust hands with powdered sugar if sticky.
- Place on Baking Sheet: Place the formed balls onto the prepared baking sheet, spacing them slightly apart.
- Freeze: Place the baking sheet in the freezer for at least 30 minutes to firm up.
- Melt the Chocolate: Place chocolate chips and coconut oil (if using) in a microwave-safe bowl. Microwave in 30-second intervals, stirring after each interval, until melted and smooth. Alternatively, use a double boiler.
- Prepare Your Dipping Station: Set up the bowl of melted chocolate, the baking sheet with frozen balls, and a fork or dipping tools.
- Dip the Balls: Dip each ball into the melted chocolate, ensuring it’s completely coated. Use a fork to lift the ball out, allowing excess chocolate to drip off.
- Place on Parchment Paper: Place the chocolate-covered ball back onto the parchment-lined baking sheet.
- Add Toppings: While the chocolate is still wet, sprinkle with desired toppings.
- Repeat: Repeat the dipping process with the remaining balls.
- Chill to Set: Place the baking sheet back in the refrigerator for at least 30 minutes, or until the chocolate is completely set.
- Store Properly: Store the balls in an airtight container in the refrigerator for up to a week. Freeze for longer storage, wrapping individually in plastic wrap before placing in an airtight container.
Notes
- Soften cream cheese thoroughly for a smooth texture.
- Chilling and freezing the mixture is crucial for easy handling and dipping.
- Use coconut oil for a smoother, shinier chocolate coating (optional).
- Experiment with different types of chocolate, nut butters, and toppings.
- If chocolate seizes, add a teaspoon of vegetable oil or shortening.
- If balls are too soft, chill them longer.
- Ensure balls are frozen before dipping for better chocolate adhesion.