
Ham gravy, a Southern staple, is more than just a sauce; it’s a warm hug on a plate. Have you ever tasted something that instantly transports you back to childhood, to Sunday dinners filled with laughter and the comforting aroma of home-cooked goodness? That’s precisely what this creamy, savory gravy does. Its a dish that whispers of tradition and family gatherings.
While the exact origins of ham gravy are shrouded in the mists of Southern culinary history, it’s safe to say that it evolved from a resourceful need to make the most of every part of the pig. After enjoying a delicious ham, the flavorful drippings were too precious to discard. Instead, they were transformed into this luscious gravy, a testament to Southern ingenuity and a deep respect for food.
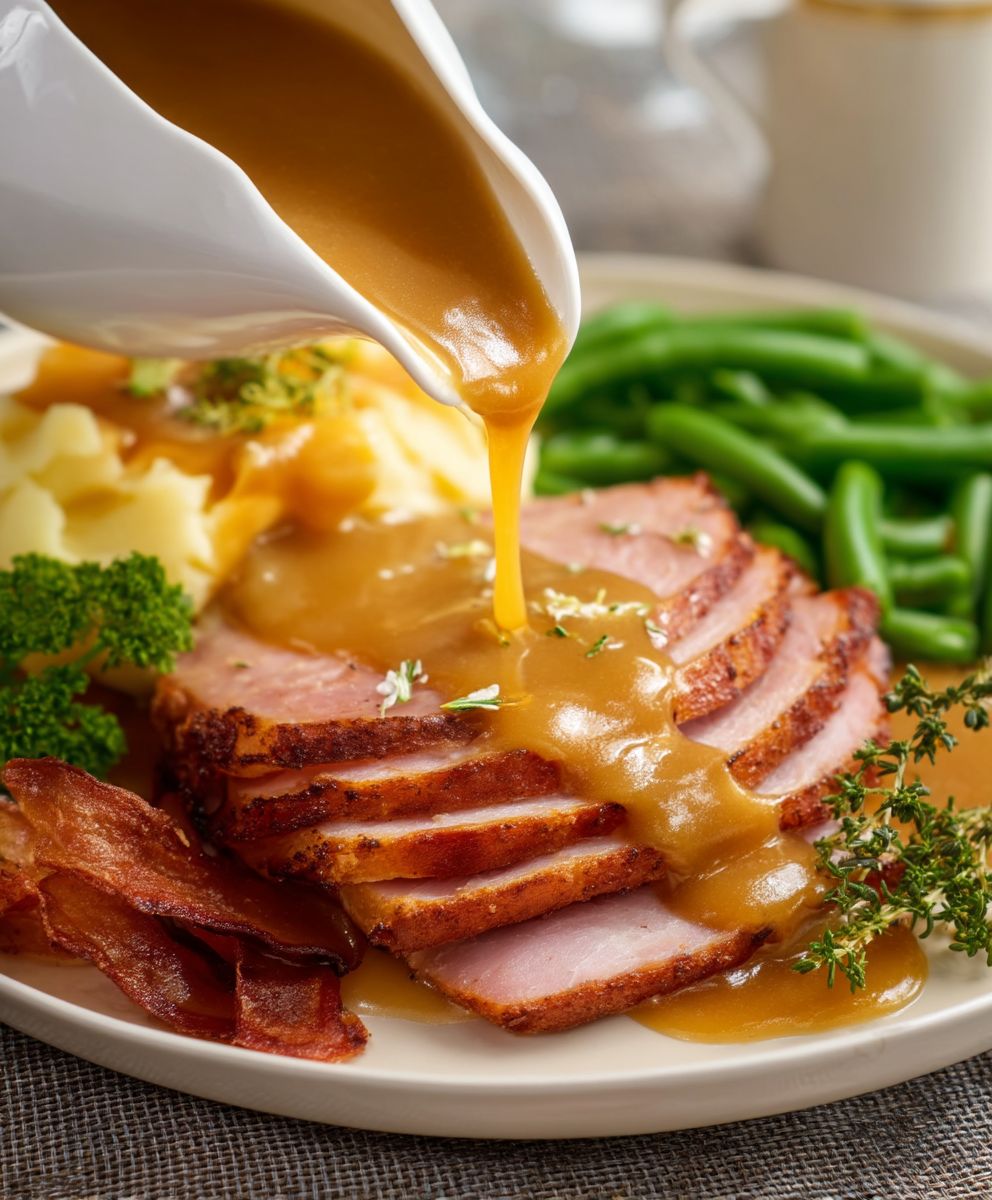
People adore this gravy for its rich, smoky flavor that perfectly complements biscuits, mashed potatoes, or even fried chicken. The creamy texture is incredibly satisfying, and the ease of preparation makes it a weeknight winner. Its a simple dish, but the taste is anything but ordinary. Its a taste of home, a taste of comfort, and a taste of pure Southern delight. Let’s dive into making this classic recipe together!

Ingredients:
- 1/4 cup reserved ham drippings (or bacon grease if you don’t have enough ham drippings)
- 1/4 cup all-purpose flour
- 2 cups milk (whole milk or 2% is best for richness)
- 1 cup chicken broth (low sodium preferred)
- 1/2 cup diced cooked ham (the finer the dice, the better it incorporates)
- 1/4 teaspoon black pepper (freshly ground is ideal)
- 1/4 teaspoon garlic powder
- 1/4 teaspoon onion powder
- Pinch of cayenne pepper (optional, for a little kick)
- Salt to taste (be careful, ham drippings are already salty!)
- 1 tablespoon chopped fresh parsley (for garnish, optional)
Making the Roux: The Foundation of Flavor
The key to a smooth, lump-free gravy is starting with a good roux. Don’t rush this step! We’re going to cook the flour and fat together to create a base that will thicken our gravy beautifully and add a nutty depth of flavor.
- Melt the Ham Drippings: In a medium saucepan over medium heat, melt the ham drippings (or bacon grease). Watch it carefully; you don’t want it to burn. If you don’t have a full 1/4 cup of ham drippings, you can supplement with a little butter or vegetable oil. The fat is crucial for the roux to form properly.
- Add the Flour: Once the drippings are melted and shimmering, add the all-purpose flour. Immediately whisk the flour into the melted drippings. The mixture will form a thick paste. This is your roux!
- Cook the Roux: This is where patience comes in. Continue whisking constantly for about 3-5 minutes. The roux will start to bubble and foam, and it will gradually turn a light golden brown color. The longer you cook it (without burning!), the richer and nuttier the flavor of your gravy will be. Be vigilant and keep whisking to prevent sticking and burning. A burnt roux will ruin the whole gravy, and you’ll have to start over. You’re aiming for a light tan color, like peanut butter.
Creating the Gravy: Smooth and Creamy Goodness
Now that we have our roux, we can start building the gravy. We’ll gradually add the liquids, whisking constantly to prevent lumps. The key is to add the liquid slowly and allow the roux to absorb it before adding more.
- Whisk in the Milk: Reduce the heat to low. Slowly pour in about 1/4 cup of the milk, whisking constantly and vigorously. The roux will thicken up immediately. Continue whisking until the mixture is smooth and lump-free. Gradually add the remaining milk, about 1/2 cup at a time, whisking continuously after each addition. Make sure each addition is fully incorporated before adding more. This gradual process is crucial for preventing lumps.
- Add the Chicken Broth: Once all the milk is incorporated and the gravy is smooth, slowly pour in the chicken broth, again whisking constantly. The chicken broth adds another layer of flavor and helps to thin the gravy to the desired consistency.
- Simmer and Thicken: Bring the gravy to a gentle simmer over low heat. Continue to simmer, stirring occasionally, for about 5-10 minutes, or until the gravy has thickened to your desired consistency. The longer it simmers, the thicker it will become. If it gets too thick, you can add a little more milk or chicken broth to thin it out.
Adding the Ham and Seasoning: The Finishing Touches
Now it’s time to add the ham and seasonings that will transform this thickened sauce into delicious ham gravy. We want the ham to warm through and the flavors to meld together beautifully.
- Stir in the Ham: Add the diced cooked ham to the gravy. Stir to combine, ensuring the ham is evenly distributed throughout the gravy.
- Season the Gravy: Add the black pepper, garlic powder, onion powder, and cayenne pepper (if using). Stir well to incorporate the seasonings.
- Taste and Adjust: This is the most important step! Taste the gravy and adjust the seasoning as needed. Remember that ham drippings are already salty, so be careful when adding salt. You may not need any at all. Add salt a little at a time, tasting after each addition, until the gravy reaches your desired level of saltiness. You can also add more pepper or garlic powder to taste.
- Simmer Briefly: Continue to simmer the gravy for another 2-3 minutes, allowing the ham to warm through and the flavors to meld together. Stir occasionally to prevent sticking.
Serving Your Ham Gravy: The Grand Finale
Your ham gravy is now ready to be served! This gravy is incredibly versatile and can be enjoyed in so many ways.
- Garnish (Optional): If desired, garnish the gravy with chopped fresh parsley for a pop of color and freshness.
- Serve Immediately: Serve the ham gravy immediately while it’s hot and creamy.
Serving Suggestions:
- Biscuits: The classic pairing! Warm, fluffy biscuits smothered in ham gravy are a match made in heaven.
- Mashed Potatoes: Creamy mashed potatoes topped with ham gravy make a comforting and satisfying meal.
- Chicken Fried Steak: Elevate your chicken fried steak with a generous serving of ham gravy.
- Pork Chops: Drizzle ham gravy over grilled or pan-fried pork chops for a flavorful and hearty dinner.
- Eggs: Pour ham gravy over scrambled or fried eggs for a delicious and savory breakfast.
- Open-Faced Sandwiches: Use ham gravy as a sauce for open-faced sandwiches with leftover ham or turkey.
Tips for Success:
- Use Fresh Ingredients: Freshly ground black pepper and good-quality milk and chicken broth will make a noticeable difference in the flavor of your gravy.
- Don’t Overcook the Roux: A burnt roux will ruin the gravy. Keep a close eye on it and whisk constantly.
- Whisk Vigorously: Whisking is key to preventing lumps. Don’t be afraid to put some elbow grease into it!
- Adjust the Consistency: If the gravy is too thick, add more milk or chicken broth. If it’s too thin, simmer it for a few more minutes to allow it to thicken.
- Taste and Season: Taste the gravy frequently and adjust the seasoning as needed. Don’t be afraid to experiment with different spices and herbs to create your own unique flavor profile.
- Keep it Warm: If you’re not serving the gravy immediately, keep it warm in a slow cooker or on the stovetop over very low heat. Stir occasionally to prevent a skin from forming.
Storage Instructions:
- Refrigerate: Leftover ham gravy can be stored in an airtight container in the refrigerator for up to 3 days.
- Reheat: To reheat, gently warm the gravy in a saucepan over low heat, stirring occasionally. You may need to add a little milk or chicken broth to thin it out.
- Freezing: While you *can* freeze ham gravy, the texture may change slightly upon thawing. The milk solids can sometimes separate, resulting in a slightly grainy texture. If you do freeze it, allow it to cool completely before transferring it to a freezer-safe container. Thaw it in the refrigerator overnight and reheat gently, whisking constantly. You may need to add a little milk or cream to restore the smooth texture.
Conclusion:
And there you have it! This ham gravy recipe is more than just a sauce; it’s a warm hug on a plate, a taste of home, and a guaranteed crowd-pleaser. I truly believe this will become a staple in your kitchen, not just for holiday feasts, but for any weeknight meal that needs a little extra love.
Why is this a must-try? Because it’s incredibly easy to make, uses simple ingredients you likely already have on hand, and delivers an explosion of savory, smoky flavor that elevates everything it touches. Forget bland, forget boring this ham gravy is a flavor powerhouse! It’s the perfect way to use up leftover ham, transforming it into something truly special. Plus, the rich, creamy texture is simply irresistible. I’ve made this gravy countless times, and it never fails to impress.
But the best part? It’s incredibly versatile!
Serving Suggestions and Variations:
Of course, the classic pairing is with biscuits. Fluffy, golden-brown biscuits smothered in this creamy ham gravy are pure comfort food perfection. But don’t stop there!
* Over Mashed Potatoes: Transform ordinary mashed potatoes into a decadent side dish. The gravy adds richness and depth of flavor that will have everyone asking for seconds.
* With Chicken Fried Steak: Take your chicken fried steak to the next level with a generous ladle of this savory gravy. The combination is simply divine.
* As a Breakfast Topping: Drizzle it over scrambled eggs or a breakfast casserole for a hearty and flavorful start to your day.
* Poured over Pork Chops: Elevate simple pork chops with the rich, smoky flavor of this gravy.
* Vegetable Boost: Even steamed or roasted vegetables benefit from a drizzle of this delicious gravy. Think green beans, asparagus, or even Brussels sprouts!
And if you’re feeling adventurous, here are a few variations to try:
* Spicy Kick: Add a pinch of red pepper flakes or a dash of hot sauce for a little heat.
* Herbaceous Delight: Stir in some fresh thyme, rosemary, or sage for an extra layer of flavor.
* Mushroom Magic: Sauté some sliced mushrooms and add them to the gravy for an earthy twist.
* Creamy Dreamy: For an even richer gravy, use heavy cream instead of milk.
I’m confident that once you try this recipe, you’ll be hooked. It’s the kind of dish that becomes a family favorite, passed down through generations. It’s the perfect way to show your loved ones you care, with a simple, homemade meal that’s bursting with flavor.
So, what are you waiting for? Gather your ingredients, put on your apron, and get ready to create some kitchen magic. I promise you won’t be disappointed. And most importantly, don’t be afraid to experiment and make it your own!
I’m so excited for you to try this ham gravy recipe! Once you do, please come back and share your experience in the comments below. Let me know what you served it with, what variations you tried, and how much everyone loved it. I can’t wait to hear all about it! Happy cooking!
Ham Gravy: The Ultimate Guide to Making Perfect Gravy
Creamy, flavorful ham gravy made from scratch with a rich roux, diced ham, and savory seasonings. Perfect over biscuits, mashed potatoes, or your favorite comfort food.
Ingredients
- 1/4 cup reserved ham drippings (or bacon grease if you don’t have enough ham drippings)
- 1/4 cup all-purpose flour
- 2 cups milk (whole milk or 2% is best for richness)
- 1 cup chicken broth (low sodium preferred)
- 1/2 cup diced cooked ham (the finer the dice, the better it incorporates)
- 1/4 teaspoon black pepper (freshly ground is ideal)
- 1/4 teaspoon garlic powder
- 1/4 teaspoon onion powder
- Pinch of cayenne pepper (optional, for a little kick)
- Salt to taste (be careful, ham drippings are already salty!)
- 1 tablespoon chopped fresh parsley (for garnish, optional)
Instructions
- Melt the Ham Drippings: In a medium saucepan over medium heat, melt the ham drippings (or bacon grease). Watch it carefully; you don’t want it to burn. If you don’t have a full 1/4 cup of ham drippings, you can supplement with a little butter or vegetable oil.
- Add the Flour: Once the drippings are melted and shimmering, add the all-purpose flour. Immediately whisk the flour into the melted drippings. The mixture will form a thick paste (roux).
- Cook the Roux: Continue whisking constantly for about 3-5 minutes. The roux will start to bubble and foam, and it will gradually turn a light golden brown color. Be vigilant and keep whisking to prevent sticking and burning. Aim for a light tan color, like peanut butter.
- Whisk in the Milk: Reduce the heat to low. Slowly pour in about 1/4 cup of the milk, whisking constantly and vigorously. The roux will thicken up immediately. Continue whisking until the mixture is smooth and lump-free. Gradually add the remaining milk, about 1/2 cup at a time, whisking continuously after each addition.
- Add the Chicken Broth: Once all the milk is incorporated and the gravy is smooth, slowly pour in the chicken broth, again whisking constantly.
- Simmer and Thicken: Bring the gravy to a gentle simmer over low heat. Continue to simmer, stirring occasionally, for about 5-10 minutes, or until the gravy has thickened to your desired consistency.
- Stir in the Ham: Add the diced cooked ham to the gravy. Stir to combine, ensuring the ham is evenly distributed throughout the gravy.
- Season the Gravy: Add the black pepper, garlic powder, onion powder, and cayenne pepper (if using). Stir well to incorporate the seasonings.
- Taste and Adjust: Taste the gravy and adjust the seasoning as needed. Remember that ham drippings are already salty, so be careful when adding salt. Add salt a little at a time, tasting after each addition, until the gravy reaches your desired level of saltiness.
- Simmer Briefly: Continue to simmer the gravy for another 2-3 minutes, allowing the ham to warm through and the flavors to meld together. Stir occasionally to prevent sticking.
- Garnish (Optional): If desired, garnish the gravy with chopped fresh parsley for a pop of color and freshness.
- Serve Immediately: Serve the ham gravy immediately while it’s hot and creamy.
Notes
- The key to a smooth gravy is a good roux. Don’t rush the roux-making process.
- Whisk constantly while adding liquids to prevent lumps.
- Use fresh ingredients for the best flavor.
- Be careful with the salt, as ham drippings are already salty.
- Adjust the consistency by adding more milk or chicken broth if needed.
- Leftover ham gravy can be stored in an airtight container in the refrigerator for up to 3 days. Reheat gently over low heat, adding a little milk or chicken broth if needed.
- While you *can* freeze ham gravy, the texture may change slightly upon thawing.