
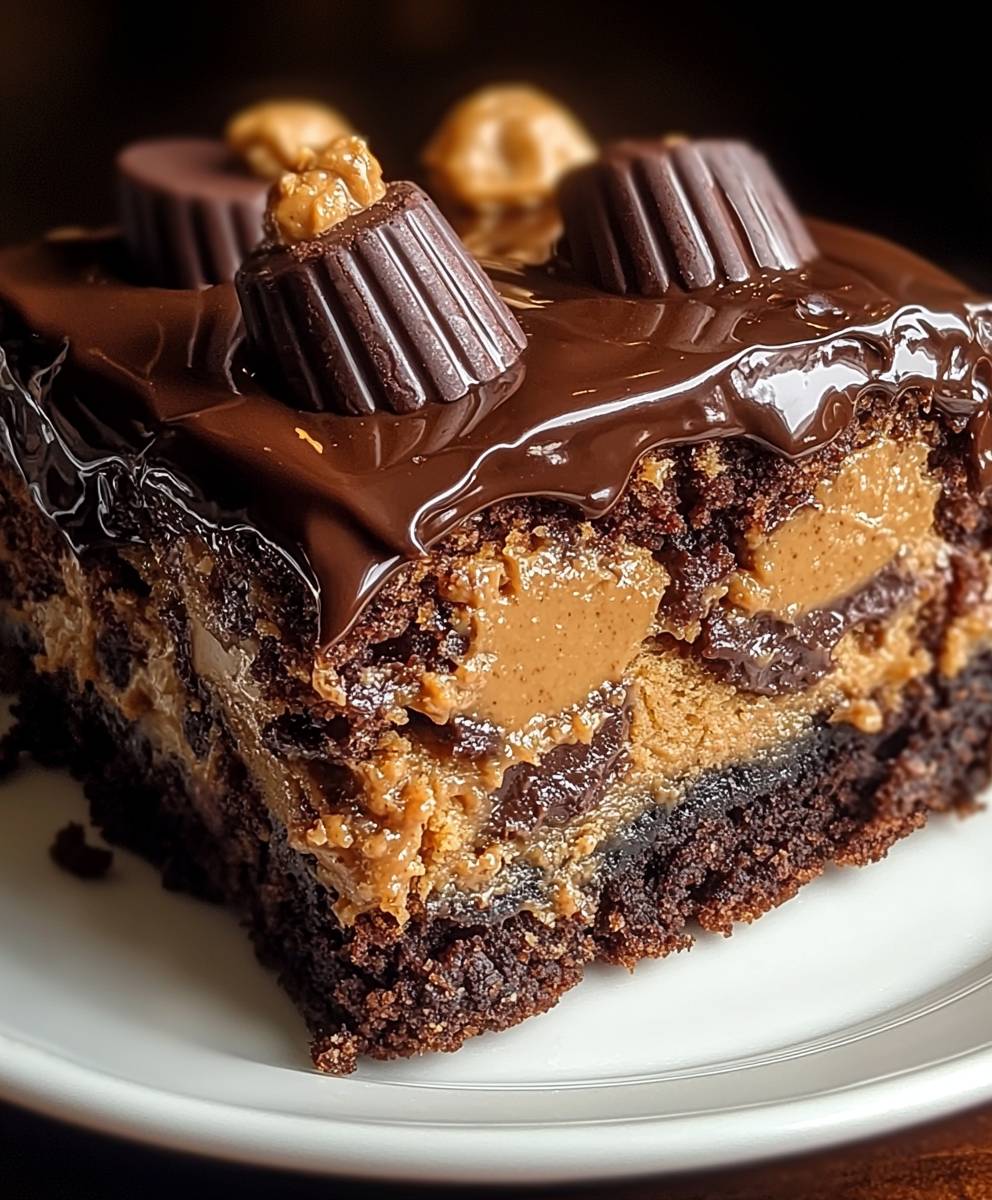
Peanut Butter Cup Cake: Prepare to enter a world of chocolatey, peanut buttery bliss! Imagine sinking your fork into a moist, decadent cake, its rich chocolate layers perfectly complemented by a creamy, irresistible peanut butter frosting. This isn’t just dessert; it’s an experience, a symphony of flavors that will have you craving more with every single bite.
While the exact origins of the Peanut Butter Cup Cake are shrouded in delicious mystery, its inspiration is clear: the iconic peanut butter cup. This beloved candy, a staple in American culture, has inspired countless desserts, and this cake is arguably one of the most impressive. It takes the simple pleasure of peanut butter and chocolate and elevates it to a show-stopping centerpiece.
What makes this cake so universally adored? It’s the perfect balance of sweet and salty, the contrasting textures of the soft cake and the smooth frosting, and the sheer indulgence of it all. Plus, let’s be honest, who can resist the combination of peanut butter and chocolate? Whether you’re baking for a special occasion or simply want to treat yourself, this Peanut Butter Cup Cake is guaranteed to be a crowd-pleaser. I know I can’t resist it!

Ingredients:
- For the Chocolate Cake:
- 2 cups all-purpose flour
- 2 cups granulated sugar
- ¾ cup unsweetened cocoa powder
- 1 ½ teaspoons baking powder
- 1 ½ teaspoons baking soda
- 1 teaspoon salt
- 1 cup buttermilk
- ½ cup vegetable oil
- 2 large eggs
- 2 teaspoons vanilla extract
- 1 cup boiling water
- For the Peanut Butter Filling:
- 1 cup (2 sticks) unsalted butter, softened
- 3 cups powdered sugar
- 1 cup creamy peanut butter
- ¼ cup heavy cream
- 1 teaspoon vanilla extract
- Pinch of salt
- For the Chocolate Ganache:
- 1 cup heavy cream
- 12 ounces semi-sweet chocolate chips
- 2 tablespoons unsalted butter
- For Decoration (Optional):
- Mini peanut butter cups, halved
- Chopped peanuts
Preparing the Chocolate Cake:
- Preheat and Prep: First things first, preheat your oven to 350°F (175°C). Grease and flour two 9-inch round cake pans. I like to use baking spray with flour already in it it makes life so much easier! You can also line the bottoms with parchment paper rounds for extra insurance against sticking.
- Dry Ingredients: In a large bowl, whisk together the flour, sugar, cocoa powder, baking powder, baking soda, and salt. Make sure everything is evenly distributed. This step is crucial for a consistent cake texture.
- Wet Ingredients: In a separate bowl, whisk together the buttermilk, oil, eggs, and vanilla extract. Combine these until they’re well incorporated.
- Combine Wet and Dry: Gradually add the wet ingredients to the dry ingredients, mixing on low speed until just combined. Be careful not to overmix! Overmixing develops the gluten in the flour, which can lead to a tough cake.
- Add Boiling Water: Slowly pour in the boiling water while mixing on low speed. The batter will be thin don’t worry, that’s normal! The hot water helps to bloom the cocoa powder and creates a super moist cake.
- Divide and Bake: Divide the batter evenly between the prepared cake pans. Bake for 30-35 minutes, or until a wooden skewer inserted into the center comes out clean. Keep a close eye on them; baking times can vary depending on your oven.
- Cool Completely: Let the cakes cool in the pans for 10 minutes before inverting them onto a wire rack to cool completely. This prevents them from sticking and allows them to cool evenly. Make sure they are completely cool before frosting!
Making the Peanut Butter Filling:
- Cream the Butter: In a large bowl (or the bowl of your stand mixer), beat the softened butter until it’s light and fluffy. This usually takes about 2-3 minutes.
- Add Powdered Sugar: Gradually add the powdered sugar, one cup at a time, beating on low speed until combined. Be careful not to create a powdered sugar cloud!
- Mix in Peanut Butter: Add the peanut butter and beat until well combined. Scrape down the sides of the bowl as needed to ensure everything is evenly mixed.
- Add Cream and Vanilla: Pour in the heavy cream and vanilla extract. Beat on medium speed until the frosting is smooth and creamy. Add a pinch of salt to balance the sweetness.
- Adjust Consistency: If the frosting is too thick, add a little more heavy cream, one tablespoon at a time, until you reach your desired consistency. If it’s too thin, add a little more powdered sugar.
Preparing the Chocolate Ganache:
- Heat the Cream: In a saucepan, heat the heavy cream over medium heat until it just begins to simmer. Do not boil!
- Pour Over Chocolate: Remove the saucepan from the heat and pour the hot cream over the chocolate chips in a heatproof bowl.
- Let it Sit: Let the mixture sit for 1-2 minutes to allow the heat to melt the chocolate.
- Stir Until Smooth: Gently stir the mixture until the chocolate is completely melted and the ganache is smooth and glossy.
- Add Butter: Stir in the butter until it’s melted and incorporated into the ganache. This will give the ganache a beautiful shine.
- Cool Slightly: Let the ganache cool slightly before pouring it over the cake. This will help it thicken up a bit and prevent it from running off the sides completely.
Assembling the Peanut Butter Cup Cake:
- Level the Cakes: If your cakes have a dome on top, use a serrated knife to carefully level them. This will ensure that your cake is even and stable.
- First Layer: Place one cake layer on a serving plate or cake stand.
- Peanut Butter Filling: Spread an even layer of the peanut butter filling over the first cake layer. Make sure to spread it all the way to the edges.
- Second Layer: Carefully place the second cake layer on top of the peanut butter filling.
- Chocolate Ganache: Pour the slightly cooled chocolate ganache over the top of the cake, allowing it to drip down the sides. You can use an offset spatula to help spread the ganache evenly.
- Decorate (Optional): While the ganache is still wet, decorate the cake with halved mini peanut butter cups and chopped peanuts. Get creative!
- Chill: Refrigerate the cake for at least 30 minutes to allow the ganache to set. This will make it easier to slice and serve. I sometimes chill it for an hour or two it really helps the flavors meld together.
- Serve and Enjoy!: Remove the cake from the refrigerator about 15-20 minutes before serving to allow it to soften slightly. Slice and enjoy your delicious Peanut Butter Cup Cake!
Conclusion:
This Peanut Butter Cup Cake isn’t just a dessert; it’s an experience. It’s the kind of cake that makes you close your eyes and savor every single bite, a symphony of rich chocolate and creamy peanut butter that will leave you utterly satisfied. From the moist, decadent cake layers to the luscious peanut butter frosting and the generous scattering of miniature peanut butter cups, every element works in perfect harmony to create a truly unforgettable treat. I know, I know, I’m gushing, but trust me, this cake deserves all the praise! But why is this recipe a must-try? Because it’s surprisingly easy to make! Don’t let the impressive appearance fool you. The steps are straightforward, and even beginner bakers can achieve stunning results. Plus, the ingredients are readily available, so you won’t have to spend hours searching for obscure items. More importantly, it’s a guaranteed crowd-pleaser. Whether you’re baking for a birthday celebration, a holiday gathering, or simply a weekend treat, this cake is sure to be a hit with everyone. Prepare for rave reviews and requests for the recipe! Now, let’s talk serving suggestions and variations. While this cake is absolutely divine on its own, there are plenty of ways to customize it to your liking. For an extra touch of elegance, drizzle melted dark chocolate over the top. A sprinkle of sea salt can also enhance the flavors and add a delightful salty-sweet contrast. If you’re feeling adventurous, try adding a layer of peanut butter ganache between the cake layers. It’s incredibly rich and decadent, but oh-so-worth it! For a lighter option, you can serve the cake with a scoop of vanilla ice cream or a dollop of whipped cream. Fresh berries, such as raspberries or strawberries, also make a beautiful and refreshing accompaniment. And if you’re looking for a fun twist, try making individual cupcakes instead of a full-sized cake. They’re perfect for parties and easy to transport. You could even experiment with different types of peanut butter cups, such as white chocolate or dark chocolate versions. The possibilities are endless! Don’t be afraid to get creative and put your own spin on this Peanut Butter Cup Cake. Baking should be fun and enjoyable, so don’t worry about making mistakes. Even if your cake isn’t perfect, it will still taste delicious! The most important thing is to have fun and enjoy the process. I truly believe that this recipe is a winner, and I can’t wait for you to try it. So, gather your ingredients, preheat your oven, and get ready to bake the most amazing cake you’ve ever tasted. Once you’ve made it, please come back and share your experience in the comments below. I’d love to hear what you think and see your creations! Did you make any variations? What did your friends and family think? Your feedback is invaluable and helps me to improve my recipes. Happy baking! I’m confident that this will become a new favorite in your household, just as it has in mine. Enjoy every crumb! Print
Peanut Butter Cup Cake: The Ultimate Recipe and Baking Guide
- Total Time: 120 minutes
- Yield: 10–12 servings 1x
Description
Decadent chocolate cake layered with creamy peanut butter filling and topped with a rich chocolate ganache. A peanut butter cup lover’s dream!
Ingredients
- 2 cups all-purpose flour
- 2 cups granulated sugar
- ¾ cup unsweetened cocoa powder
- 1 ½ teaspoons baking powder
- 1 ½ teaspoons baking soda
- 1 teaspoon salt
- 1 cup buttermilk
- ½ cup vegetable oil
- 2 large eggs
- 2 teaspoons vanilla extract
- 1 cup boiling water
- 1 cup (2 sticks) unsalted butter, softened
- 3 cups powdered sugar
- 1 cup creamy peanut butter
- ¼ cup heavy cream
- 1 teaspoon vanilla extract
- Pinch of salt
- 1 cup heavy cream
- 12 ounces semi-sweet chocolate chips
- 2 tablespoons unsalted butter
- Mini peanut butter cups, halved
- Chopped peanuts
Instructions
- Preheat oven to 350°F (175°C). Grease and flour two 9-inch round cake pans (or use baking spray with flour). Line the bottoms with parchment paper rounds.
- In a large bowl, whisk together the flour, sugar, cocoa powder, baking powder, baking soda, and salt.
- In a separate bowl, whisk together the buttermilk, oil, eggs, and vanilla extract.
- Gradually add the wet ingredients to the dry ingredients, mixing on low speed until just combined. Do not overmix.
- Slowly pour in the boiling water while mixing on low speed. The batter will be thin.
- Divide the batter evenly between the prepared cake pans. Bake for 30-35 minutes, or until a wooden skewer inserted into the center comes out clean.
- Let the cakes cool in the pans for 10 minutes before inverting them onto a wire rack to cool completely.
- In a large bowl (or stand mixer), beat the softened butter until light and fluffy (2-3 minutes).
- Gradually add the powdered sugar, one cup at a time, beating on low speed until combined.
- Add the peanut butter and beat until well combined. Scrape down the sides of the bowl as needed.
- Pour in the heavy cream and vanilla extract. Beat on medium speed until smooth and creamy. Add a pinch of salt.
- If the frosting is too thick, add more heavy cream (1 tablespoon at a time). If it’s too thin, add more powdered sugar.
- In a saucepan, heat the heavy cream over medium heat until it just begins to simmer. Do not boil.
- Remove from heat and pour the hot cream over the chocolate chips in a heatproof bowl.
- Let the mixture sit for 1-2 minutes.
- Gently stir until the chocolate is completely melted and the ganache is smooth and glossy.
- Stir in the butter until melted and incorporated.
- Let the ganache cool slightly before pouring it over the cake.
- If necessary, level the cakes with a serrated knife.
- Place one cake layer on a serving plate or cake stand.
- Spread an even layer of peanut butter filling over the first layer.
- Carefully place the second cake layer on top of the filling.
- Pour the slightly cooled ganache over the top of the cake, allowing it to drip down the sides. Use an offset spatula to spread evenly.
- While the ganache is still wet, decorate with halved mini peanut butter cups and chopped peanuts.
- Refrigerate for at least 30 minutes to allow the ganache to set.
- Remove from the refrigerator 15-20 minutes before serving. Slice and enjoy!
Notes
- For best results, use high-quality cocoa powder and chocolate chips.
- Be careful not to overmix the cake batter, as this can result in a tough cake.
- The boiling water in the cake batter helps to bloom the cocoa powder and creates a super moist cake.
- Adjust the consistency of the peanut butter filling to your liking by adding more heavy cream or powdered sugar.
- Let the ganache cool slightly before pouring it over the cake to prevent it from running off the sides completely.
- Chilling the cake before serving helps the flavors meld together and makes it easier to slice.
- Prep Time: 45 minutes
- Cook Time: 30 minutes