
Classic Chess Pie: Prepare to be transported back in time with a single bite of this Southern dessert staple! Imagine a pie so rich, so decadent, and so utterly irresistible that it practically melts in your mouth. That’s the magic of a truly great chess pie, and I’m thrilled to share my family’s cherished recipe with you.
Chess pie, with its humble origins, has been gracing tables across the American South for generations. While its exact history is shrouded in a bit of mystery, some believe the name originated from a simple mispronunciation of “chest pie,” as it was often stored in a pie chest. Others suggest it was simply “the best pie” a cook could make with pantry staples. Whatever the true story, its enduring popularity speaks volumes.
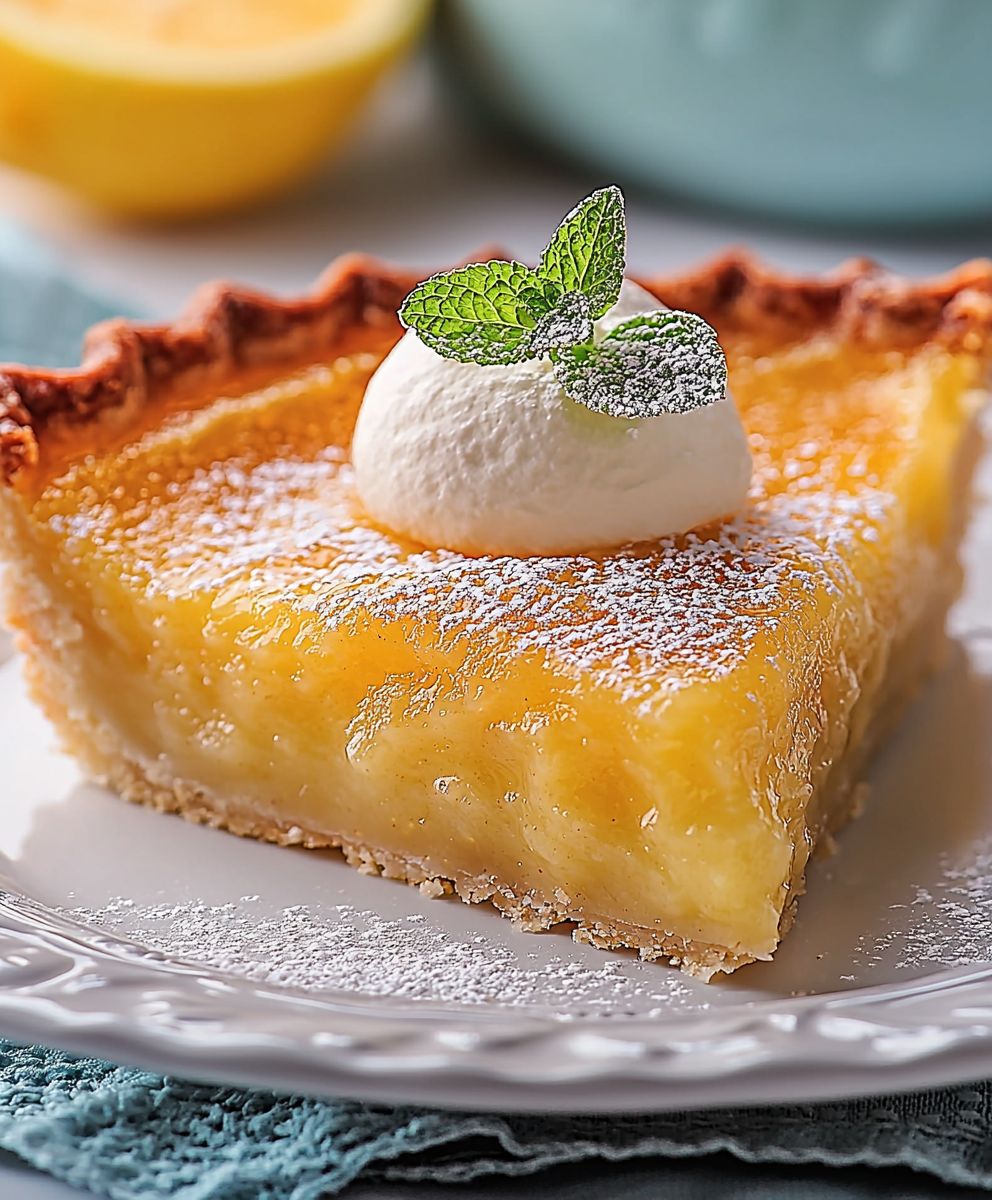
What makes this classic chess pie so beloved? It’s the perfect marriage of textures: a crisp, buttery crust giving way to a smooth, custard-like filling that’s both sweet and tangy. The simplicity of the ingredients butter, sugar, eggs, and a touch of vinegar belies the complexity of flavor. It’s a comforting, nostalgic dessert that’s surprisingly easy to make, making it perfect for both weeknight treats and special occasions. So, let’s get baking and create a little slice of Southern comfort together!

Ingredients:
- For the Crust:
- 1 1/4 cups all-purpose flour
- 1/2 teaspoon salt
- 1/2 cup (1 stick) cold unsalted butter, cut into cubes
- 3-5 tablespoons ice water
- For the Filling:
- 1 3/4 cups granulated sugar
- 1/4 cup all-purpose flour
- 1/4 teaspoon salt
- 1/2 cup (1 stick) unsalted butter, melted and cooled slightly
- 4 large eggs, lightly beaten
- 1 teaspoon vanilla extract
- 1/4 cup milk
- 1/4 cup white vinegar
Preparing the Crust:
Okay, let’s start with the crust. I always find that a good crust is the foundation of any great pie, and this one is no exception. We’re aiming for a flaky, tender crust that will complement the sweet, rich filling perfectly.
- Combine Dry Ingredients: In a large bowl, whisk together the flour and salt. This ensures that the salt is evenly distributed throughout the flour, which is important for flavor development.
- Cut in the Butter: Add the cold, cubed butter to the flour mixture. Using a pastry blender or your fingertips (work quickly to keep the butter cold!), cut the butter into the flour until the mixture resembles coarse crumbs. You should still see small pieces of butter these are what create those lovely flaky layers. The size of the butter pieces should be about pea-sized.
- Add Ice Water: Gradually add the ice water, one tablespoon at a time, mixing gently after each addition. The amount of water you need will vary depending on the humidity and the flour you’re using. Stop adding water when the dough just comes together and is slightly moist but not sticky. Be careful not to overwork the dough, as this will develop the gluten and result in a tough crust.
- Form the Dough: Gently gather the dough into a ball. Flatten it into a disc, wrap it tightly in plastic wrap, and refrigerate for at least 30 minutes. This allows the gluten to relax, making the dough easier to roll out. Chilling the butter also helps prevent it from melting during baking, which is crucial for a flaky crust.
- Roll Out the Dough: On a lightly floured surface, roll out the dough into a 12-inch circle. Make sure to rotate the dough as you roll to prevent it from sticking to the surface. If the dough starts to stick, sprinkle a little more flour underneath.
- Transfer to Pie Plate: Carefully transfer the rolled-out dough to a 9-inch pie plate. Gently press the dough into the bottom and up the sides of the plate. Trim any excess dough with a knife or kitchen shears, leaving about 1/2 inch overhang.
- Crimp the Edges: Crimp the edges of the crust using your fingers or a fork. This not only makes the pie look pretty but also helps to seal the edges and prevent the filling from leaking out. You can use a simple fork crimp or get fancy with a more elaborate design.
- Pre-bake (Optional): For a crispier crust, you can pre-bake it. Prick the bottom of the crust several times with a fork to prevent it from puffing up. Line the crust with parchment paper and fill it with pie weights or dried beans. Bake in a preheated oven at 375°F (190°C) for 15 minutes. Remove the parchment paper and weights and bake for another 5-10 minutes, or until the crust is lightly golden brown. Let the crust cool completely before adding the filling. I often skip this step, but if you’re worried about a soggy bottom, pre-baking is a good idea.
Preparing the Filling:
Now for the star of the show the Chess Pie filling! This is where the magic happens. It’s a simple filling, but the combination of ingredients creates a wonderfully rich, sweet, and slightly tangy flavor that’s just irresistible.
- Combine Dry Ingredients: In a large bowl, whisk together the sugar, flour, and salt. This ensures that the dry ingredients are evenly distributed and will help to prevent lumps in the filling.
- Add Melted Butter: Add the melted and slightly cooled butter to the dry ingredients and whisk until well combined. Make sure the butter isn’t too hot, or it could cook the eggs when you add them later.
- Incorporate Eggs: Gradually add the lightly beaten eggs, whisking constantly until the mixture is smooth and creamy. It’s important to add the eggs slowly to prevent them from scrambling.
- Add Flavorings: Stir in the vanilla extract, milk, and white vinegar. The vinegar is the secret ingredient that gives Chess Pie its signature tang. Don’t worry, you won’t taste the vinegar directly it just balances the sweetness and adds a subtle complexity to the flavor.
Assembling and Baking the Pie:
We’re almost there! Now it’s time to put everything together and bake our Chess Pie to golden perfection.
- Pour Filling into Crust: Pour the prepared filling into the unbaked or pre-baked pie crust. Make sure the filling is evenly distributed.
- Bake the Pie: Bake in a preheated oven at 350°F (175°C) for 45-55 minutes, or until the filling is set but still slightly jiggly in the center. The edges of the crust should be golden brown. If the crust starts to brown too quickly, you can cover it loosely with aluminum foil.
- Cool Completely: Remove the pie from the oven and let it cool completely on a wire rack. This is important because the filling will continue to set as it cools. Don’t be tempted to cut into it while it’s still warm, or the filling will be too runny.
- Chill (Optional): For an even firmer filling, you can chill the pie in the refrigerator for a few hours before serving. This is especially nice on a hot day.
- Serve and Enjoy: Slice and serve the Chess Pie. It’s delicious on its own, but you can also top it with whipped cream, fresh berries, or a dusting of powdered sugar. Enjoy!
Conclusion:
This Classic Chess Pie isn’t just a dessert; it’s a slice of Southern comfort, a taste of tradition, and a guaranteed crowd-pleaser. I truly believe that once you experience the rich, buttery, and subtly tangy flavor of this pie, it will become a staple in your baking repertoire. Its simplicity is deceptive; the depth of flavor achieved with so few ingredients is genuinely remarkable. It’s the kind of pie that evokes memories of family gatherings and cozy evenings, and it’s a recipe I’m incredibly excited to share with you. Why is this a must-try? Because it’s foolproof! Even if you’re a novice baker, you can achieve pie perfection with this recipe. The ingredients are readily available, the instructions are straightforward, and the result is a pie that tastes like it took hours to create. Plus, it’s incredibly versatile. While the classic version is divine on its own, there are so many ways to customize it to your liking.Serving Suggestions and Variations:
For a truly decadent experience, serve your Classic Chess Pie slightly warm with a dollop of freshly whipped cream or a scoop of vanilla ice cream. The contrast between the warm pie and the cool cream is simply heavenly. A dusting of powdered sugar adds a touch of elegance, and a few fresh berries can brighten up the presentation. But don’t stop there! Feel free to experiment with different flavor variations. Add a tablespoon of lemon zest to the filling for a brighter, more citrusy flavor. A splash of bourbon or rum can add a warm, boozy kick. For a chocolate twist, stir in a couple of tablespoons of cocoa powder. Or, if you’re feeling adventurous, try adding a pinch of cayenne pepper for a subtle hint of spice. Another fun variation is to incorporate different extracts. Almond extract adds a nutty sweetness, while orange extract provides a refreshing citrus note. You can also experiment with different types of crusts. A graham cracker crust adds a delightful crunch, while a chocolate crust complements the rich filling beautifully. And for those who are gluten-free, simply substitute the all-purpose flour with a gluten-free blend. The pie will still be just as delicious! Ultimately, the best part about this Classic Chess Pie recipe is that it’s a blank canvas for your creativity. Don’t be afraid to experiment and make it your own. I encourage you to try different variations and find your perfect combination of flavors. I’m so confident that you’ll love this recipe, and I can’t wait to hear about your experience. Please, give it a try! Bake this pie for your family, bring it to a potluck, or simply enjoy it as a treat for yourself. And when you do, please share your photos and comments with me. I’d love to see your creations and hear about your favorite variations. Let me know what you think of this Classic Chess Pie and how you made it your own! Happy baking! Print
Classic Chess Pie: A Timeless Dessert Recipe
- Total Time: 80 minutes
- Yield: 8 servings 1x
Description
Classic Chess Pie with a flaky homemade crust and a rich, sweet, and tangy filling.
Ingredients
- 1 1/4 cups all-purpose flour
- 1/2 teaspoon salt
- 1/2 cup (1 stick) cold unsalted butter, cut into cubes
- 3–5 tablespoons ice water
- 1 3/4 cups granulated sugar
- 1/4 cup all-purpose flour
- 1/4 teaspoon salt
- 1/2 cup (1 stick) unsalted butter, melted and cooled slightly
- 4 large eggs, lightly beaten
- 1 teaspoon vanilla extract
- 1/4 cup milk
- 1/4 cup white vinegar
Instructions
- Combine Dry Ingredients: In a large bowl, whisk together the flour and salt.
- Cut in the Butter: Add the cold, cubed butter to the flour mixture. Using a pastry blender or your fingertips (work quickly to keep the butter cold!), cut the butter into the flour until the mixture resembles coarse crumbs. You should still see small pieces of butter these are what create those lovely flaky layers. The size of the butter pieces should be about pea-sized.
- Add Ice Water: Gradually add the ice water, one tablespoon at a time, mixing gently after each addition. The amount of water you need will vary depending on the humidity and the flour you’re using. Stop adding water when the dough just comes together and is slightly moist but not sticky. Be careful not to overwork the dough, as this will develop the gluten and result in a tough crust.
- Form the Dough: Gently gather the dough into a ball. Flatten it into a disc, wrap it tightly in plastic wrap, and refrigerate for at least 30 minutes. This allows the gluten to relax, making the dough easier to roll out. Chilling the butter also helps prevent it from melting during baking, which is crucial for a flaky crust.
- Roll Out the Dough: On a lightly floured surface, roll out the dough into a 12-inch circle. Make sure to rotate the dough as you roll to prevent it from sticking to the surface. If the dough starts to stick, sprinkle a little more flour underneath.
- Transfer to Pie Plate: Carefully transfer the rolled-out dough to a 9-inch pie plate. Gently press the dough into the bottom and up the sides of the plate. Trim any excess dough with a knife or kitchen shears, leaving about 1/2 inch overhang.
- Crimp the Edges: Crimp the edges of the crust using your fingers or a fork. This not only makes the pie look pretty but also helps to seal the edges and prevent the filling from leaking out. You can use a simple fork crimp or get fancy with a more elaborate design.
- Pre-bake (Optional): For a crispier crust, you can pre-bake it. Prick the bottom of the crust several times with a fork to prevent it from puffing up. Line the crust with parchment paper and fill it with pie weights or dried beans. Bake in a preheated oven at 375°F (190°C) for 15 minutes. Remove the parchment paper and weights and bake for another 5-10 minutes, or until the crust is lightly golden brown. Let the crust cool completely before adding the filling.
- Combine Dry Ingredients: In a large bowl, whisk together the sugar, flour, and salt.
- Add Melted Butter: Add the melted and slightly cooled butter to the dry ingredients and whisk until well combined. Make sure the butter isn’t too hot, or it could cook the eggs when you add them later.
- Incorporate Eggs: Gradually add the lightly beaten eggs, whisking constantly until the mixture is smooth and creamy. It’s important to add the eggs slowly to prevent them from scrambling.
- Add Flavorings: Stir in the vanilla extract, milk, and white vinegar.
- Pour Filling into Crust: Pour the prepared filling into the unbaked or pre-baked pie crust. Make sure the filling is evenly distributed.
- Bake the Pie: Bake in a preheated oven at 350°F (175°C) for 45-55 minutes, or until the filling is set but still slightly jiggly in the center. The edges of the crust should be golden brown. If the crust starts to brown too quickly, you can cover it loosely with aluminum foil.
- Cool Completely: Remove the pie from the oven and let it cool completely on a wire rack. This is important because the filling will continue to set as it cools. Don’t be tempted to cut into it while it’s still warm, or the filling will be too runny.
- Chill (Optional): For an even firmer filling, you can chill the pie in the refrigerator for a few hours before serving.
- Serve and Enjoy: Slice and serve the Chess Pie. It’s delicious on its own, but you can also top it with whipped cream, fresh berries, or a dusting of powdered sugar.
Notes
- For the flakiest crust, keep the butter cold and don’t overwork the dough.
- Pre-baking the crust is optional but recommended if you’re concerned about a soggy bottom.
- The white vinegar in the filling adds a subtle tang that balances the sweetness.
- Let the pie cool completely before slicing to allow the filling to set properly.
- Prep Time: 30 minutes
- Cook Time: 50 minutes