
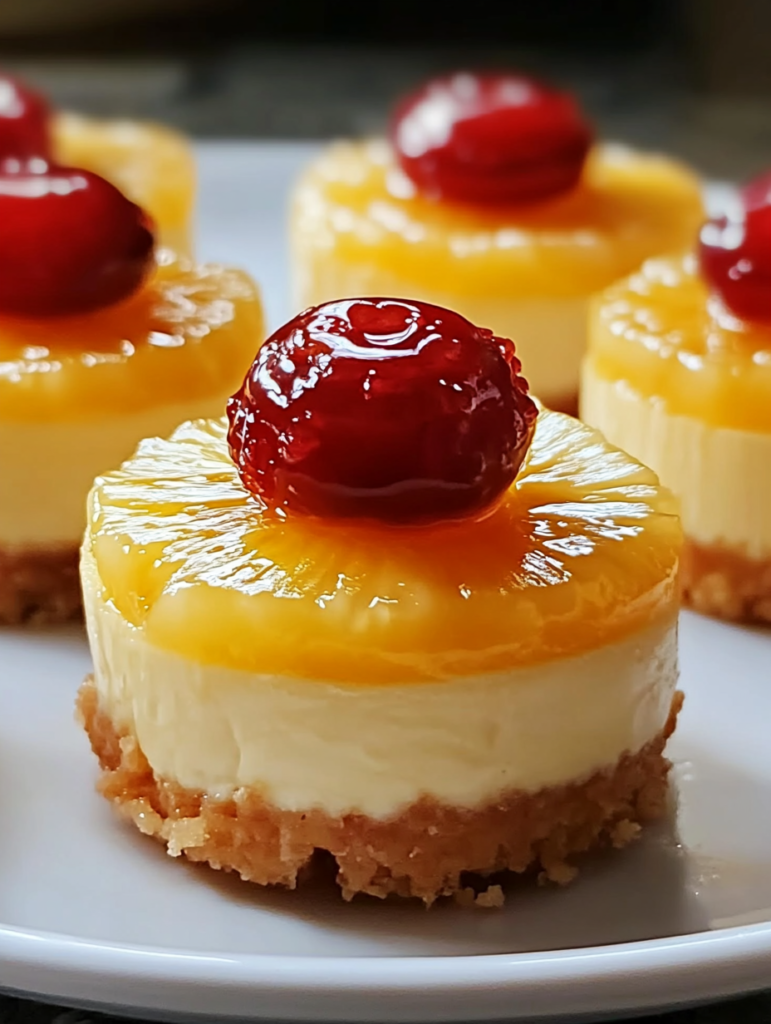
Mini Pineapple Upside-Down Cheesecakes are a delightful fusion of two beloved desserts: the classic pineapple upside-down cake and the indulgent, creamy cheesecake. The idea of combining the rich, velvety texture of cheesecake with the sweet, caramelized flavor of pineapple creates a mouthwatering experience that is sure to impress guests at any gathering or serve as a special treat for yourself. Whether you’re hosting a summer party, a tropical-themed dinner, or just craving a delicious dessert, these mini cheesecakes are perfect for individual servings, making them a convenient choice for easy portion control. What makes these cheesecakes even better is that they’re not just a feast for the taste buds but also visually stunning, with their golden-brown topping and vibrant pineapple chunks.
In this article, we’ll walk you through every step of preparing these mini pineapple upside-down cheesecakes, share useful tips for achieving the perfect texture, and guide you on how to avoid common mistakes. Whether you’re a seasoned baker or a beginner, you’ll find this recipe easy to follow, and the result will be a beautifully layered dessert that is guaranteed to impress.

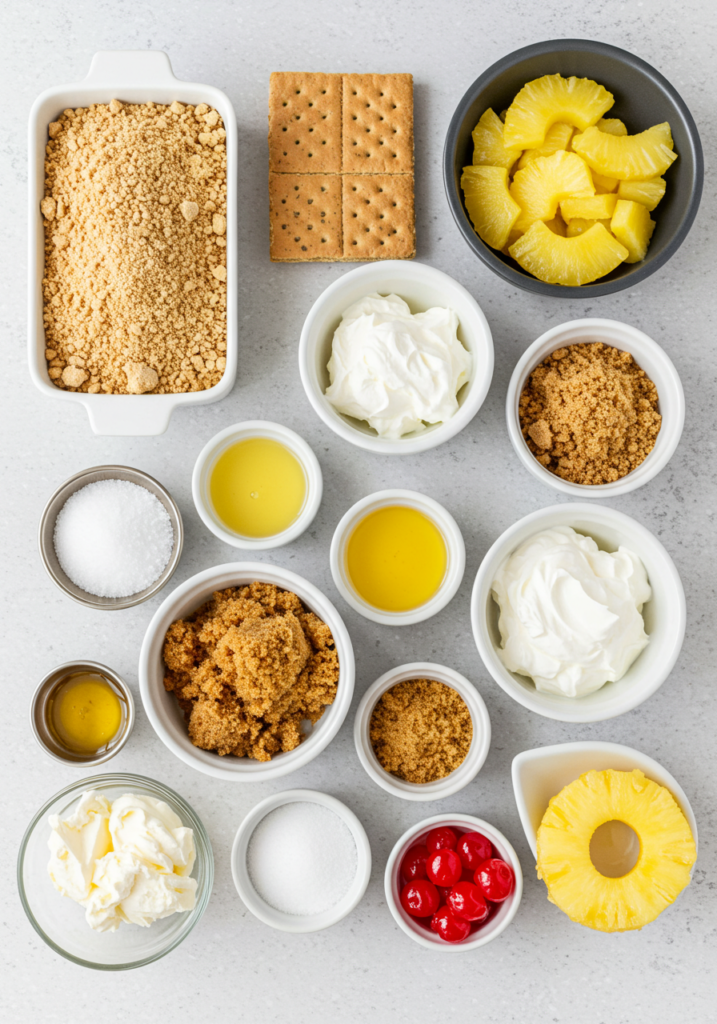
Ingredients
For the Crust:
The foundation of your mini pineapple upside-down cheesecakes starts with a buttery, crunchy crust. This simple yet essential layer is typically made using graham cracker crumbs, but you can easily customize it to suit your preferences. Here’s what you’ll need:
- Graham Cracker Crumbs: The star of the crust. You can also use digestive biscuits, vanilla wafer cookies, or even a mix of oat-based crumbs if you prefer a different flavor profile. The graham cracker crust gives the mini cheesecakes that signature sweetness and slight crunch.
- Butter: Melted butter binds the crumbs together and provides richness to the crust. Ensure it’s melted for an even texture.
- Sugar (Optional): A bit of sugar can enhance the sweetness of the crust, though the graham crackers themselves are usually sweet enough.
- Salt: A pinch of salt balances the sweetness and complements the rich flavors of the cheesecake filling.
For the Cheesecake Filling:
The creamy filling is the heart of these mini cheesecakes. Here are the ingredients that will create that smooth, rich texture:
- Cream Cheese: Softened cream cheese is essential for creating that smooth, dense, and tangy filling. It’s the main base for your cheesecake, so using high-quality cream cheese will make a noticeable difference in the final taste.
- Sour Cream or Greek Yogurt: Adding a bit of sour cream or Greek yogurt provides extra creaminess and a slight tang that contrasts beautifully with the sweetness of the pineapple.
- Granulated Sugar: Sugar sweetens the cheesecake mixture. You can adjust the amount based on how sweet you like your desserts.
- Eggs: Eggs are crucial for the structure of the cheesecake. They help set the filling and create a rich, smooth consistency. Be sure to add them one at a time, mixing gently to avoid overworking the batter.
- Vanilla Extract: A touch of vanilla extract enhances the overall flavor and complements the caramelized pineapple topping.
- A Pinch of Salt: Just like with the crust, a pinch of salt balances the sweetness and brings out the flavors of the filling.
For the Pineapple Topping:
The pineapple topping is what makes this cheesecake special and gives it that signature upside-down cake look. Here’s what you’ll need for the topping:
- Pineapple: Fresh pineapple is ideal, but canned pineapple rings can work in a pinch. Fresh pineapple provides a slightly firmer texture and a fresher flavor. If using canned pineapple, be sure to drain it well to avoid excess moisture.
- Brown Sugar: Brown sugar adds depth and richness to the topping, helping to create that beautiful caramelization as the pineapple cooks.
- Butter: Butter is essential for melting the sugar and creating a smooth, syrup-like glaze over the pineapple.
- Maraschino Cherries (Optional): To add a pop of color and a touch of sweetness, you can top each mini cheesecake with a maraschino cherry, though this is entirely optional.
Preparation
Step 1: Prepare the Crust
The first step in making your mini pineapple upside-down cheesecakes is to create the crust. This simple yet essential layer gives your cheesecakes structure and a delicious crunch. Start by crushing the graham crackers (or your chosen substitute) into fine crumbs. You can do this by placing the crackers in a plastic bag and using a rolling pin or a food processor to get the crumbs to a fine texture. Aim for about 1 1/2 cups of crumbs, which should be enough to make 12 mini cheesecakes.
Once you have your graham cracker crumbs, mix them in a bowl with melted butter. If you like, you can add a tablespoon of sugar to the mixture for an extra sweet touch. The butter will help bind the crumbs together, creating a firm base. Add a pinch of salt to balance the sweetness and ensure the crust is flavorful.
Next, press the mixture into the bottoms of your mini cheesecake pans, tart pans, or muffin tins. Use the back of a spoon or your fingers to press the crumbs down firmly, making sure the crust is even and compact. After this, pre-bake the crust at 325°F (160°C) for about 5-7 minutes. This helps set the crust and prevents it from becoming soggy once the cheesecake filling is added.
Step 2: Make the Pineapple Topping
While the crust is baking, you can prepare the pineapple topping. This step is what really elevates the mini cheesecakes and gives them that signature upside-down cake look and flavor. Begin by cutting your pineapple (or draining the canned pineapple if you’re using that) into small chunks. If you’re using fresh pineapple, remove the skin, core, and slice it into bite-sized pieces.
In a skillet over medium heat, melt 2 tablespoons of butter. Once the butter is melted, add 1/2 cup of brown sugar. Stir the mixture until the sugar dissolves completely and begins to bubble. Add the pineapple chunks to the skillet and cook for 5-7 minutes, stirring occasionally, until the pineapple softens and caramelizes. The mixture will thicken and form a syrup-like glaze. Be sure to stir gently to avoid burning the sugar.
Once the pineapple is caramelized, remove it from the heat and set it aside to cool slightly. If you’re using maraschino cherries for decoration, now is the time to cut them in half, as they’ll be placed on top of each cheesecake later.
Step 3: Prepare the Cheesecake Filling
In a large mixing bowl, combine the softened cream cheese with granulated sugar and vanilla extract. Use an electric mixer to beat the mixture on medium speed until smooth and creamy. You want the cream cheese to be fully incorporated with no lumps, so take your time with this step.
Next, add the sour cream (or Greek yogurt) and continue mixing until smooth. Then, add the eggs one at a time, mixing gently after each addition to ensure the filling remains smooth and fluffy. Make sure not to overmix the batter, as this can cause the cheesecake to crack during baking.
Once everything is well-combined, your cheesecake batter is ready to pour into the prepared mini cheesecake pans. Be sure to fill each pan about 2/3 of the way full to leave room for the pineapple topping. Afterward, tap the pans gently on the counter to remove any air bubbles and ensure an even filling.
Step 4: Assemble the Mini Cheesecakes
Now it’s time to assemble the cheesecakes. First, spoon the caramelized pineapple mixture into the bottom of each cheesecake pan, spreading it evenly. Then, pour the cheesecake batter over the pineapple, filling the pan to the top. Use a spoon or spatula to smooth the surface of the batter.
At this point, you can add half a maraschino cherry to each cheesecake if you’re using them for decoration. This adds a classic touch to your mini cheesecakes and makes them look even more appealing.
Mistakes to Avoid
Overbaking or Underbaking the Cheesecakes
One of the most common mistakes when baking mini cheesecakes is not getting the baking time just right. If you overbake the cheesecakes, they can become dry and cracked, while underbaking them will result in a runny, undercooked filling. The key is to bake the cheesecakes at a moderate temperature (325°F or 160°C) and keep an eye on them during the last few minutes. You’ll know they’re done when the edges are set but the center still has a slight jiggle. Don’t worry—the center will continue to set as the cheesecakes cool.
Not Letting the Cheesecakes Cool Properly
Cooling the cheesecakes properly is essential to prevent cracks in the filling. After removing them from the oven, let the mini cheesecakes cool to room temperature in the pans for about 10-15 minutes. This allows the cheesecake to set without the sudden temperature change that could cause cracking. Afterward, transfer them to the fridge and let them chill for at least 2-3 hours (or preferably overnight) to firm up completely. This step also ensures that the pineapple topping stays in place when you flip the cheesecakes out of the pans.
Skipping the Pre-baking of the Crust
Some bakers might be tempted to skip the pre-baking step for the crust, but this is a mistake. The graham cracker crust needs to be slightly crisp to hold its shape and prevent sogginess. If you skip this step, the crust will absorb too much moisture from the cheesecake filling and become mushy. Pre-baking ensures that your crust is firm and crunchy, giving a perfect contrast to the creamy filling.
Overmixing the Cheesecake Filling
Another mistake to avoid is overmixing the cheesecake batter. While it’s important to thoroughly combine the ingredients, overmixing can introduce too much air into the filling. This air can cause cracks to form during baking. Mix the ingredients just enough to achieve a smooth, even batter, and avoid overbeating once the eggs are added.
Alternative Ingredients
Swapping Out the Crust
While graham cracker crumbs are the traditional choice for cheesecake crusts, there are plenty of alternatives if you’re looking to customize or switch up the flavor. For instance, digestive biscuits or vanilla wafer cookies make excellent substitutes, adding a slightly different texture and flavor profile. You can also make a nut-based crust by using crushed almonds, pecans, or walnuts mixed with butter and a touch of sugar for a gluten-free option. This will not only enhance the flavor but also create a more hearty, nutty base that pairs wonderfully with the creamy cheesecake filling.
If you’re on a low-carb diet or trying to avoid refined sugars, you can opt for almond flour or coconut flour mixed with melted butter to make a keto-friendly crust. These substitutions will give you a lighter, more fibrous texture, perfect for those following specific dietary preferences.
Variations for the Cheesecake Filling
The cheesecake filling itself is versatile and can be adjusted depending on what flavors you prefer. For a lighter filling, consider substituting the full-fat cream cheese with Neufchatel cheese (a lower-fat option). If you want to make the cheesecake filling more indulgent, you can mix in some whipped heavy cream for a fluffier, richer texture.
Another fun option is to add flavorings directly into the filling. You can infuse your cheesecake with ingredients like coconut milk or lime zest to create a tropical twist that pairs beautifully with the pineapple topping. For a more indulgent flavor, try adding white chocolate or coconut flakes into the filling to enhance the tropical theme.
If you prefer a dairy-free option, you can substitute the cream cheese and sour cream with dairy-free cream cheese and coconut yogurt, both of which work well in cheesecake recipes without sacrificing creaminess. Ensure to use plant-based butter for the crust in this case to keep everything dairy-free.
Pineapple Topping Alternatives
If you’re not fond of pineapple, there are other fruits you can use as a topping for these mini cheesecakes. Peach or mango slices can provide a similar tropical flair, and they caramelize beautifully in the brown sugar mixture. For a twist on the classic, you could try berries like strawberries, raspberries, or blackberries for a more tangy and juicy contrast to the rich cheesecake.
You could also experiment with apples or pears for a fall-inspired version. Cook them down with a bit of cinnamon and brown sugar, and you’ll have a caramelized topping that works wonderfully with the creamy cheesecake base.
For a completely different take, consider using cherries or blueberries for a berry-filled upside-down cheesecake that retains the sweet-tart balance of the original dessert. You can even swap out the brown sugar for maple syrup or honey to bring in a different sweetness that complements the fruit.
Tips & Tricks
Achieving the Perfect Texture
The texture of your mini pineapple upside-down cheesecakes can make or break the dessert. To ensure your cheesecakes come out smooth and creamy, use room-temperature ingredients. Both the cream cheese and eggs should be brought to room temperature before mixing. Cold ingredients can lead to lumps and a less-smooth batter. If you’re in a rush, you can soften the cream cheese by microwaving it in short intervals on low power.
Additionally, don’t overmix the batter. Overmixing can incorporate too much air into the filling, which will cause the cheesecakes to crack as they bake. Mix only until the ingredients are fully combined, and avoid vigorous stirring after the eggs are added.
Preventing Cracks
Cracking is a common issue with cheesecakes, but there are steps you can take to minimize it. Bake at a lower temperature to prevent the filling from becoming too firm too quickly. You can also bake your mini cheesecakes in a water bath (also known as a bain-marie), which involves placing the cheesecake pan into a larger pan filled with hot water. This technique ensures gentle, even baking and helps to prevent cracking by maintaining a humid environment.
Allow your cheesecakes to cool gradually at room temperature before transferring them to the fridge. Sudden changes in temperature can cause the filling to contract and crack. The cooling process is just as important as the baking time in ensuring a crack-free cheesecake.
Flipping the Cheesecakes
Flipping your mini cheesecakes out of the pans without ruining their appearance can be tricky. To make this easier, line your pans with parchment paper or use mini cheesecake pans with removable bottoms. After the cheesecakes have cooled completely, run a knife around the edges to loosen them from the pan before gently flipping them onto a plate. If you used parchment paper, you can easily lift the cheesecakes out without worrying about them sticking to the pan.
Suggestions
Serving and Presenting Your Mini Pineapple Upside-Down Cheesecakes
The beauty of these mini pineapple upside-down cheesecakes lies not just in their taste but in their appearance. Their individual sizes make them perfect for serving at parties, events, or as a special dessert for a dinner gathering. When it comes to presentation, there are a few simple but effective ways to elevate the look of your mini cheesecakes.
To serve, carefully place each mini cheesecake on a small dessert plate. You can garnish them with a dollop of freshly whipped cream or a scoop of vanilla ice cream for extra indulgence. If you want to keep things tropical, sprinkle some toasted coconut flakes over the top for a crunchy texture that complements the soft, creamy cheesecake.
For a more festive touch, add a maraschino cherry on top of each cheesecake before serving, or drizzle with a little caramel sauce or pineapple syrup from the topping. You could even serve them with a small sprig of mint for a fresh contrast to the richness of the dessert.
If you’re hosting a party or a get-together, consider arranging the cheesecakes on a tiered dessert stand for a stunning display. This makes it easy for guests to grab a serving, and it also creates a beautiful visual centerpiece.
Pairing Suggestions
Mini pineapple upside-down cheesecakes are quite rich, so they pair beautifully with lighter beverages. Consider serving them with a tropical cocktail like a piña colada or a mojito to keep the tropical theme alive. For a non-alcoholic option, serve them with iced coconut water or a refreshing glass of pineapple lemonade.
For those who enjoy wine, a muscato or a sweet Riesling would complement the sweetness of the pineapple topping, while a light sparkling wine can add a refreshing contrast to the richness of the cheesecake. If you prefer a hot drink, chai tea or herbal teas such as mint or ginger would balance out the sweetness nicely.
FAQ
Can I make these mini cheesecakes ahead of time?
Yes, mini pineapple upside-down cheesecakes are perfect for making ahead. You can prepare them a day in advance and store them in the fridge until you’re ready to serve. In fact, they often taste even better the next day after the flavors have had time to meld together.
Can I use other fruits besides pineapple?
Absolutely! You can substitute the pineapple with other fruits like peach, mango, or berries. Just make sure to caramelize the fruit first to get that signature upside-down cake topping. If you use berries, you may want to add a bit of sugar to enhance their sweetness since they’re naturally more tart than pineapple.
How do I store leftovers?
Store any leftover mini cheesecakes in an airtight container in the refrigerator. They will stay fresh for about 3-4 days. If you want to keep them longer, you can freeze them. To freeze, place the cheesecakes on a baking sheet to freeze individually for a few hours, then transfer them to a freezer-safe container or zip-top bag. They can be frozen for up to 2 months. When ready to eat, thaw them in the fridge overnight.
Can I make these mini cheesecakes in a regular cheesecake pan?
While these cheesecakes are designed to be mini, you can absolutely make them in a regular-sized cheesecake pan. Keep in mind that the baking time will be longer—around 50-60 minutes, depending on the size of the pan. You’ll want to keep an eye on them and use the “jiggle test” (slightly jiggly center) to know when they’re done.
Conclusion
Mini Pineapple Upside-Down Cheesecakes combine the best elements of two classic desserts into a delightful treat that’s perfect for any occasion. With a buttery graham cracker crust, a rich, creamy cheesecake filling, and a decadent caramelized pineapple topping, these individual-sized cheesecakes are sure to become a favorite among family, friends, and guests. The versatility of the recipe allows for endless customization, whether you’re swapping out fruits or trying different flavor combinations.
The key to achieving the perfect mini cheesecakes lies in paying attention to the details: pre-baking the crust, carefully mixing the cheesecake batter, and letting them cool properly to avoid cracks. With a little patience and the right ingredients, you’ll be able to make these mouthwatering desserts that impress every time.
So why not give these mini pineapple upside-down cheesecakes a try at your next gathering? They’ll undoubtedly become a hit and add a tropical touch to your dessert spread. Whether you serve them as a fun individual treat or as part of a larger dessert table, these cheesecakes will bring the perfect balance of sweetness, creaminess, and tropical flair to any celebration.
Print
Mini Pineapple Upside-Down Cheesecakes: Perfect Recipe & Tips
- Total Time: 50 minutes (plus chilling time)
- Yield: 12 mini cheesecakes 1x
Description
These Mini Pineapple Upside-Down Cheesecakes are a delightful fusion of two beloved desserts: the rich, creamy cheesecake and the sweet, caramelized pineapple topping. Perfect for parties or personal indulgence, these individual-sized cheesecakes are easy to make and guaranteed to impress.
Ingredients
For the Crust:
- 1 1/2 cups graham cracker crumbs (or substitute with vanilla wafer crumbs or crushed cookies)
- 1/4 cup melted butter
- 1 tablespoon granulated sugar (optional)
- Pinch of salt
For the Cheesecake Filling:
- 16 oz cream cheese (softened)
- 1/2 cup sour cream or Greek yogurt
- 1 cup granulated sugar
- 2 large eggs (room temperature)
- 1 teaspoon vanilla extract
- Pinch of salt
For the Pineapple Topping:
- 1 1/2 cups fresh pineapple, cut into small chunks (or 1 can pineapple rings, drained)
- 1/2 cup brown sugar
- 2 tablespoons butter
- 12 maraschino cherries (optional)
Instructions
1. Prepare the Crust:
- Preheat your oven to 325°F (160°C).
- In a bowl, mix the graham cracker crumbs, melted butter, sugar (if using), and salt until well combined.
- Press the mixture evenly into the bottoms of 12 mini cheesecake pans or a muffin tin.
- Bake the crusts for 5-7 minutes, then set aside to cool.
2. Prepare the Pineapple Topping:
- In a skillet over medium heat, melt the butter.
- Add the brown sugar and stir until it melts and starts to bubble.
- Add the pineapple chunks and cook for 5-7 minutes, stirring occasionally, until the pineapple is softened and caramelized.
- Remove from heat and set aside to cool.
3. Make the Cheesecake Filling:
- In a mixing bowl, beat the softened cream cheese and sugar until smooth and creamy.
- Add the sour cream (or Greek yogurt) and vanilla extract, mixing until combined.
- Add the eggs one at a time, mixing gently after each addition until smooth.
- Add a pinch of salt and mix until fully incorporated.
4. Assemble the Cheesecakes:
- Spoon the caramelized pineapple mixture into the bottom of each mini cheesecake pan.
- Pour the cheesecake filling over the pineapple layer, filling each pan about 2/3 full.
- Tap the pans gently on the counter to remove any air bubbles.
5. Bake and Cool:
- Bake the cheesecakes at 325°F (160°C) for 20-25 minutes or until the edges are set and the center is slightly jiggly.
- Let the cheesecakes cool in the pans for 10-15 minutes before transferring to the fridge to chill for at least 2-3 hours, or overnight.
6. Serve:
- After chilling, carefully remove the cheesecakes from the pans.
- If desired, top each cheesecake with a maraschino cherry.
- Serve chilled, and enjoy!
Notes
- If you prefer, you can use canned pineapple rings, but make sure to drain them well to avoid excess moisture.
- These mini cheesecakes can be stored in an airtight container in the fridge for 3-4 days or frozen for up to 2 months.
- For variations, you can substitute the pineapple with mango, peach, or berries for a different tropical twist.
Serving Suggestions:
- Serve with a dollop of whipped cream, a drizzle of caramel sauce, or a sprinkle of toasted coconut for extra flavor and texture.
- For a fun presentation, serve on a tiered dessert stand for a beautiful display at parties or events.
- Prep Time: 25 minutes
- Cook Time: 25 minutes
- Category: Dessert
- Method: Baking
- Cuisine: American
Nutrition
- Serving Size: per serving
- Calories: 290