
Flourless Oreo Cake: Prepare to be amazed! Imagine sinking your fork into a decadent, intensely chocolatey cake that’s unbelievably moist and rich, yet surprisingly light. And the best part? It’s completely flourless! This isn’t just a dessert; it’s a revelation for anyone who thought baking without flour meant sacrificing flavor or texture.
While the exact origins of this specific Flourless Oreo Cake recipe are a bit of a mystery, the concept of flourless cakes has a rich history, often linked to naturally gluten-free ingredients like almond flour or chocolate itself. This particular adaptation, however, cleverly utilizes the Oreo’s creamy filling to provide structure and moisture, resulting in a truly unique and unforgettable treat.
What makes this cake so irresistible? It’s the perfect combination of textures – a fudgy, almost brownie-like interior contrasted with the slight crunch of the Oreo pieces. The intense chocolate flavor is balanced by the sweet creaminess of the Oreos, creating a symphony of flavors that will tantalize your taste buds. Plus, it’s incredibly easy to make, requiring minimal ingredients and effort. Whether you’re gluten-free, looking for a show-stopping dessert, or simply craving something utterly delicious, this Flourless Oreo Cake is guaranteed to become a new favorite.

Ingredients:
- For the Oreo Crust:
- 30 Oreo cookies, finely crushed (about 3 cups)
- 6 tablespoons (85g) unsalted butter, melted
- For the Chocolate Cake:
- 1 cup (100g) unsweetened cocoa powder
- 1 cup (240ml) boiling water
- 1 teaspoon instant espresso powder (optional, enhances chocolate flavor)
- 1 cup (2 sticks, 226g) unsalted butter, softened
- 1 ¾ cups (350g) granulated sugar
- 2 large eggs
- 2 teaspoons vanilla extract
- ½ teaspoon salt
- 1 teaspoon baking soda
- 1 cup (240ml) buttermilk
- For the Oreo Cream Cheese Frosting:
- 8 ounces (226g) cream cheese, softened
- ½ cup (1 stick, 113g) unsalted butter, softened
- 4 cups (480g) powdered sugar
- 1 teaspoon vanilla extract
- Pinch of salt
- 15 Oreo cookies, finely crushed (about 1 ½ cups)
- Optional Garnish:
- Whole Oreo cookies
- Chocolate shavings
Preparing the Oreo Crust
Okay, let’s start with the foundation of our masterpiece – the Oreo crust! This is super easy and adds a fantastic textural contrast to the rich chocolate cake.
- Crush the Oreos: The first step is to crush those Oreos! You can use a food processor for a really fine crumb, which is what I prefer. Pulse them until they’re almost like sand. Alternatively, you can put them in a large zip-top bag and crush them with a rolling pin. This method is a bit more therapeutic, if you ask me! Just make sure you get them crushed pretty finely. You should end up with about 3 cups of crushed Oreos.
- Melt the Butter: Next, melt the butter. You can do this in the microwave in short bursts, or in a saucepan over low heat. Just make sure it’s completely melted but not browned.
- Combine and Press: In a medium bowl, combine the crushed Oreos and the melted butter. Mix them together until the crumbs are evenly moistened. The mixture should resemble wet sand.
- Press into Pan: Now, grab a 9-inch springform pan. This is crucial because it will allow you to easily remove the cake later. Pour the Oreo crumb mixture into the pan and press it firmly and evenly onto the bottom. I like to use the bottom of a measuring cup to really pack it down. Make sure the crust is nice and compact.
- Chill the Crust: Place the springform pan with the Oreo crust in the refrigerator for at least 30 minutes. This will help the crust set and become firm. You can even chill it for longer, up to a few hours, if you have the time.
Making the Flourless Chocolate Cake
Now for the star of the show – the decadent, flourless chocolate cake! Don’t be intimidated by the length of the ingredient list; it’s actually quite simple to make.
- Prepare the Cocoa Mixture: In a medium bowl, whisk together the cocoa powder, boiling water, and instant espresso powder (if using). The espresso powder really enhances the chocolate flavor, but it’s totally optional. Whisk until smooth and set aside to cool slightly. This step is important because the hot water blooms the cocoa powder, intensifying its flavor.
- Cream Butter and Sugar: In a large bowl (or the bowl of a stand mixer), cream together the softened butter and granulated sugar until light and fluffy. This usually takes about 3-5 minutes. You want the mixture to be pale and airy.
- Add Eggs and Vanilla: Beat in the eggs one at a time, mixing well after each addition. Then, stir in the vanilla extract.
- Combine Wet and Dry Ingredients: In a separate small bowl, whisk together the salt and baking soda. Add this mixture to the cocoa mixture. It will fizz a bit, which is normal.
- Alternate Additions: Gradually add the cocoa mixture to the butter and sugar mixture, alternating with the buttermilk, beginning and ending with the cocoa mixture. Mix until just combined. Be careful not to overmix, as this can result in a tough cake. The batter will be quite thin, which is perfectly fine.
- Pour into Pan: Pour the chocolate cake batter over the chilled Oreo crust in the springform pan. Spread it evenly.
- Bake: Bake in a preheated oven at 350°F (175°C) for 50-60 minutes, or until a toothpick inserted into the center comes out with a few moist crumbs attached. The baking time may vary depending on your oven, so keep an eye on it.
- Cool Completely: Once the cake is done, remove it from the oven and let it cool in the pan for at least 1 hour. Then, run a thin knife around the edge of the pan to loosen the cake. Carefully release the springform pan and transfer the cake to a wire rack to cool completely. This is crucial! Don’t try to frost it while it’s still warm, or the frosting will melt.
Making the Oreo Cream Cheese Frosting
Now for the final touch – the creamy, dreamy Oreo cream cheese frosting! This frosting is seriously addictive, so be prepared to lick the bowl clean.
- Cream Cheese and Butter: In a large bowl (or the bowl of a stand mixer), beat together the softened cream cheese and softened butter until smooth and creamy. Make sure both the cream cheese and butter are at room temperature, or you’ll end up with lumpy frosting.
- Add Powdered Sugar: Gradually add the powdered sugar, one cup at a time, beating on low speed until combined. Once all the powdered sugar is added, increase the speed to medium and beat until light and fluffy.
- Add Vanilla and Salt: Stir in the vanilla extract and a pinch of salt. The salt helps to balance the sweetness of the frosting.
- Fold in Crushed Oreos: Gently fold in the crushed Oreos until evenly distributed throughout the frosting. Again, you can use a food processor or a zip-top bag and rolling pin to crush the Oreos. You want them to be finely crushed, but not completely pulverized. You want some texture.
Assembling and Decorating the Cake
The moment we’ve all been waiting for – putting it all together! This is where you get to unleash your inner artist.
- Frost the Cake: Once the cake is completely cool, frost the top and sides with the Oreo cream cheese frosting. You can use an offset spatula for a smooth finish, or just swirl the frosting on for a more rustic look.
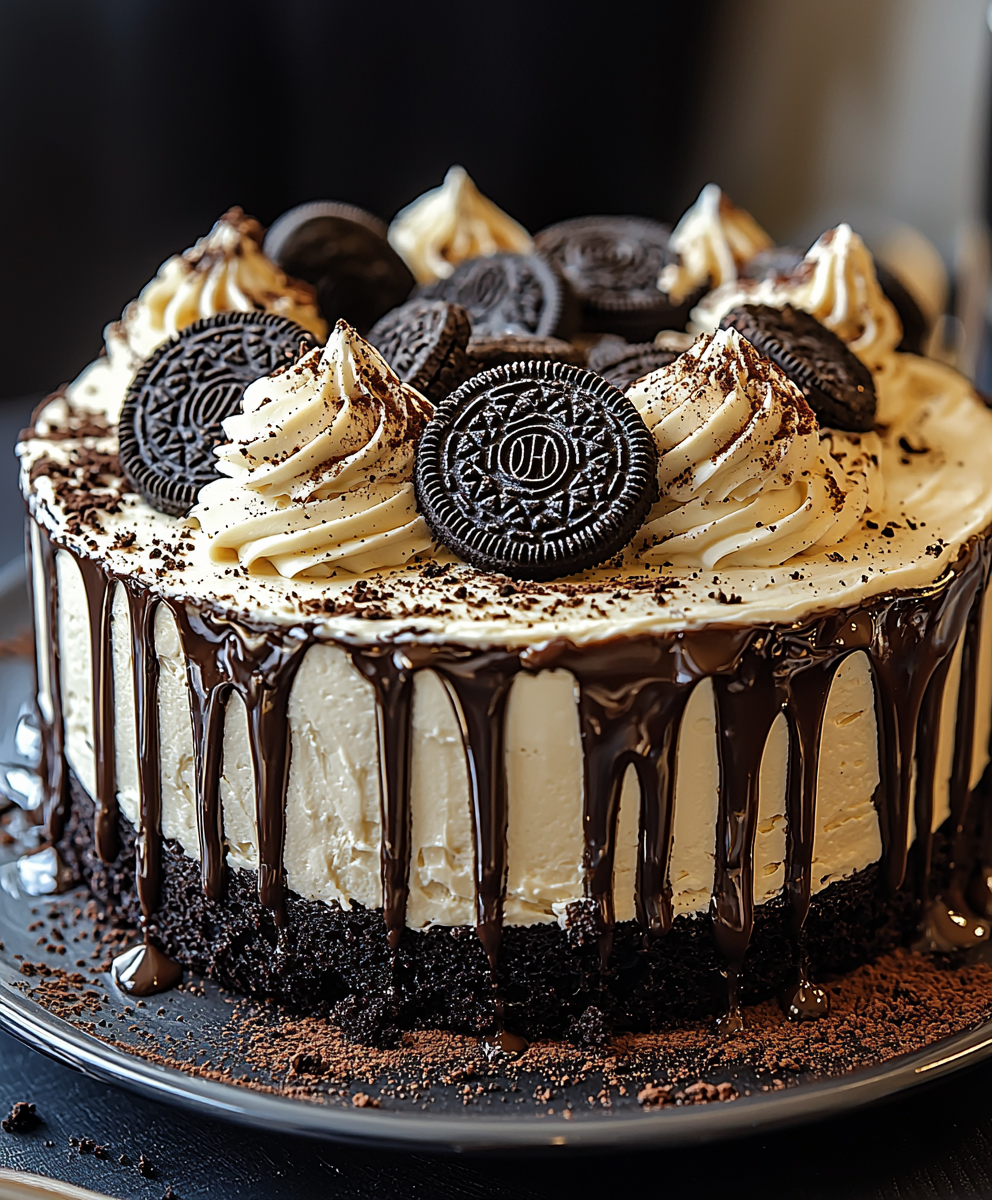
- Garnish (Optional): If desired, garnish the cake with whole Oreo cookies and chocolate shavings. You can arrange the Oreo cookies around the edge of the cake, or create a pattern on top. Get creative!
- Chill: Place the frosted cake in the refrigerator for at least 30 minutes to allow the frosting to set. This will make it easier to slice and serve.
- Serve and Enjoy: Slice the cake and serve. This cake is best served cold. Prepare for rave reviews!
Conclusion:
This Flourless Oreo Cake is more than just a dessert; it’s an experience. It’s the kind of recipe that will have everyone asking for seconds, and trust me, you’ll be happy to oblige. The rich, decadent chocolate flavor, perfectly balanced by the creamy Oreo filling, creates a symphony of textures and tastes that’s simply irresistible. If you’re looking for a show-stopping dessert that’s surprisingly easy to make, look no further. This is it!
But why is this cake a must-try? Well, beyond the incredible flavor profile, it’s also naturally gluten-free, making it a fantastic option for those with dietary restrictions. You don’t have to sacrifice taste or texture just because you’re avoiding gluten. This cake proves that point beautifully. Plus, the simplicity of the recipe means you can whip it up even on a busy weeknight. It’s a win-win!
Ready to take your dessert game to the next level? Here are a few serving suggestions and variations to make this Flourless Oreo Cake truly your own:
* Classic Presentation: Serve it chilled with a dollop of whipped cream and a sprinkle of crushed Oreos on top. This is a timeless combination that never fails to impress.
* Ice Cream Dream: Pair a slice of this cake with a scoop of your favorite ice cream. Vanilla bean, chocolate, or even cookies and cream ice cream would be divine.
* Chocolate Ganache Drizzle: For an extra layer of indulgence, drizzle a warm chocolate ganache over the cake before serving. The combination of the rich ganache and the Oreo flavor is heavenly.
* Berry Bliss: Add a touch of freshness by serving the cake with a side of fresh berries. Raspberries, strawberries, or blueberries would all complement the chocolate flavor beautifully.
* Peanut Butter Twist: If you’re a peanut butter lover, try adding a swirl of peanut butter to the batter before baking. The peanut butter will add a nutty flavor that pairs perfectly with the chocolate and Oreos.
* Mint Chocolate Magic: For a refreshing twist, add a few drops of peppermint extract to the batter. This will create a mint chocolate version of the cake that’s perfect for the holidays.
* Espresso Enhancement: Add a teaspoon of instant espresso powder to the batter to enhance the chocolate flavor and give the cake a subtle coffee kick.
I’m so excited for you to try this recipe! I know you’re going to love it as much as I do. It’s the perfect dessert for any occasion, from a casual weeknight treat to a special celebration.
So, what are you waiting for? Grab your ingredients and get baking! I can’t wait to hear about your experience with this Flourless Oreo Cake. Please, share your photos and comments with me. Let me know what variations you tried and how they turned out. Did you add a ganache? Did you try the peanut butter swirl? I’m eager to see your creations and hear your feedback. Happy baking!
Flourless Oreo Cake: The Ultimate Decadent Dessert Recipe
Decadent flourless chocolate cake with an Oreo cookie crust and Oreo cream cheese frosting. A chocolate lover's dream!
Ingredients
- 30 Oreo cookies, finely crushed (about 3 cups)
- 6 tablespoons (85g) unsalted butter, melted
- 1 cup (100g) unsweetened cocoa powder
- 1 cup (240ml) boiling water
- 1 teaspoon instant espresso powder (optional, enhances chocolate flavor)
- 1 cup (2 sticks, 226g) unsalted butter, softened
- 1 ¾ cups (350g) granulated sugar
- 2 large eggs
- 2 teaspoons vanilla extract
- ½ teaspoon salt
- 1 teaspoon baking soda
- 1 cup (240ml) buttermilk
- 8 ounces (226g) cream cheese, softened
- ½ cup (1 stick, 113g) unsalted butter, softened
- 4 cups (480g) powdered sugar
- 1 teaspoon vanilla extract
- Pinch of salt
- 15 Oreo cookies, finely crushed (about 1 ½ cups)
- Whole Oreo cookies
- Chocolate shavings
Instructions
- Crush the Oreos finely using a food processor or a zip-top bag and rolling pin. You should have about 3 cups.
- Melt the butter in the microwave or in a saucepan over low heat.
- In a medium bowl, combine the crushed Oreos and melted butter. Mix until evenly moistened.
- Press the mixture firmly and evenly into the bottom of a 9-inch springform pan.
- Chill the crust in the refrigerator for at least 30 minutes.
- In a medium bowl, whisk together the cocoa powder, boiling water, and instant espresso powder (if using) until smooth. Set aside to cool slightly.
- In a large bowl (or stand mixer), cream together the softened butter and granulated sugar until light and fluffy (3-5 minutes).
- Beat in the eggs one at a time, then stir in the vanilla extract.
- In a separate small bowl, whisk together the salt and baking soda. Add this mixture to the cocoa mixture.
- Gradually add the cocoa mixture to the butter and sugar mixture, alternating with the buttermilk, beginning and ending with the cocoa mixture. Mix until just combined.
- Pour the chocolate cake batter over the chilled Oreo crust in the springform pan. Spread evenly.
- Bake in a preheated oven at 350°F (175°C) for 50-60 minutes, or until a toothpick inserted into the center comes out with a few moist crumbs attached.
- Cool the cake in the pan for at least 1 hour. Then, run a thin knife around the edge of the pan to loosen the cake. Carefully release the springform pan and transfer the cake to a wire rack to cool completely.
- In a large bowl (or stand mixer), beat together the softened cream cheese and softened butter until smooth and creamy.
- Gradually add the powdered sugar, one cup at a time, beating on low speed until combined. Increase the speed to medium and beat until light and fluffy.
- Stir in the vanilla extract and a pinch of salt.
- Gently fold in the crushed Oreos until evenly distributed throughout the frosting.
- Once the cake is completely cool, frost the top and sides with the Oreo cream cheese frosting.
- If desired, garnish the cake with whole Oreo cookies and chocolate shavings.
- Chill the frosted cake in the refrigerator for at least 30 minutes to allow the frosting to set.
- Slice and serve cold.
Notes
- Using a springform pan is essential for easy cake removal.
- Make sure the cream cheese and butter are softened for smooth frosting.
- Don’t overmix the cake batter.
- Cool the cake completely before frosting to prevent melting.
- Espresso powder is optional but enhances the chocolate flavor.
- Chilling the cake after frosting helps the frosting set and makes slicing easier.