
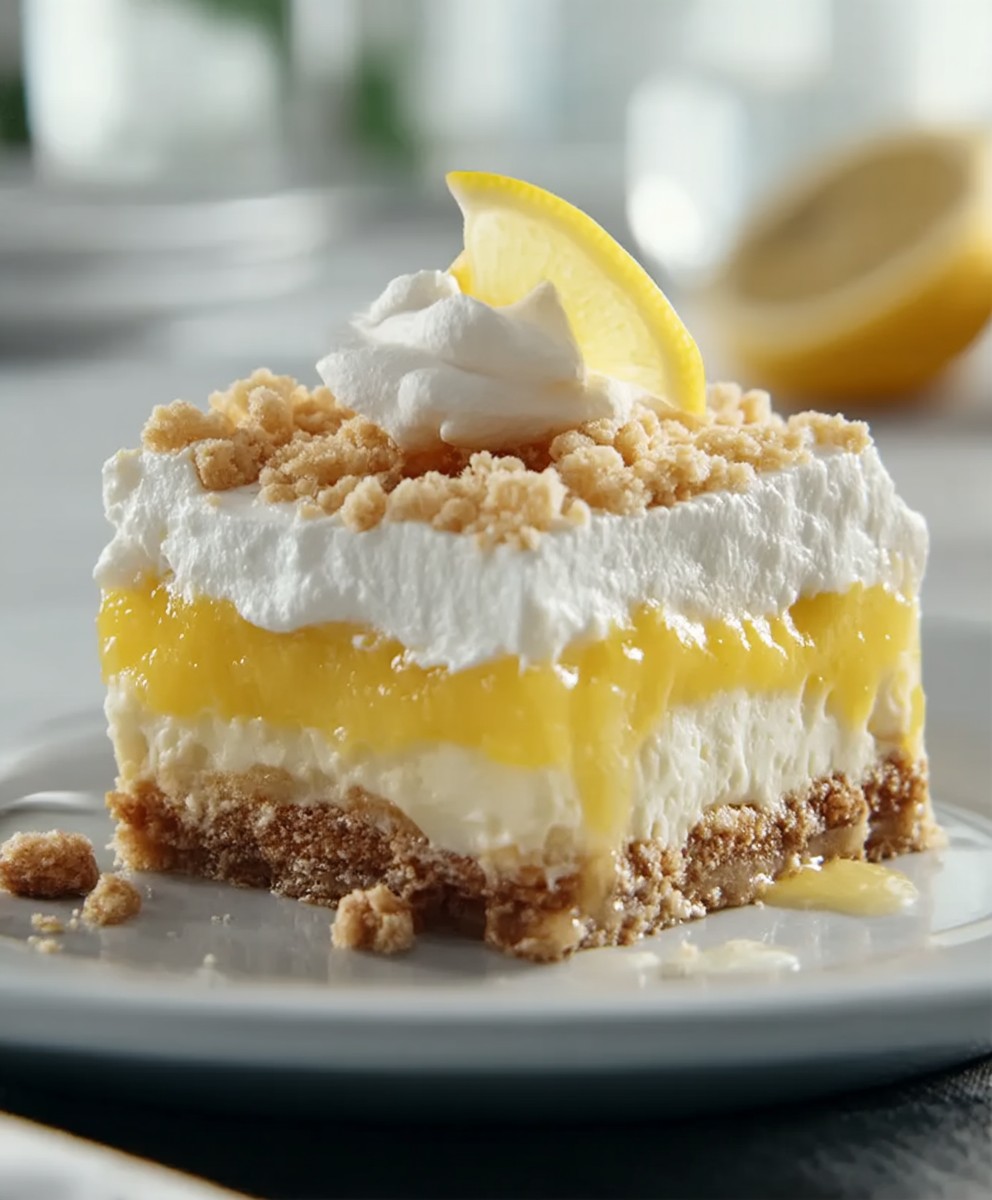
Lemon Lush Dessert: Prepare to be transported to dessert heaven with this layered delight that’s as visually stunning as it is delicious! Imagine sinking your spoon into a creamy, tangy dream, a symphony of textures that dance on your palate. This isn’t just a dessert; it’s an experience, a sweet escape from the everyday.
While the exact origins of Lemon Lush Dessert are shrouded in a bit of mystery, similar layered desserts have been gracing tables across the Southern United States for generations. These types of desserts often showcase a combination of readily available ingredients, making them perfect for potlucks, family gatherings, and celebrations. They represent a tradition of resourceful baking and sharing deliciousness with loved ones.
What makes this particular dessert so irresistible? It’s the perfect balance of sweet and tart, the creamy smoothness contrasted with the crisp, buttery crust. People adore the ease of preparation no complicated techniques required! Plus, its a crowd-pleaser, guaranteed to disappear quickly at any gathering. The vibrant lemon flavor is refreshing and uplifting, making it a perfect treat for any time of year. Get ready to discover why this Lemon Lush Dessert will become your new go-to recipe!

Ingredients:
- For the Crust:
- 1 package (14.3 ounces) golden Oreo cookies, finely crushed (about 3 cups)
- 6 tablespoons (3 ounces) unsalted butter, melted
- For the First Layer (Cream Cheese Layer):
- 8 ounces cream cheese, softened
- 1 cup powdered sugar
- 1 teaspoon vanilla extract
- 8 ounces frozen whipped topping, thawed (like Cool Whip)
- For the Second Layer (Lemon Pudding Layer):
- 2 packages (3.4 ounces each) instant lemon pudding mix
- 3 cups cold milk
- For the Third Layer (Whipped Topping Layer):
- 8 ounces frozen whipped topping, thawed (like Cool Whip)
- For the Garnish (Optional):
- Lemon slices or wedges
- Lemon zest
- Additional crushed golden Oreo cookies
Preparing the Crust:
- First, let’s tackle the crust! In a medium bowl, combine the finely crushed golden Oreo cookies and the melted butter. Make sure the butter is evenly distributed so the crust holds together nicely. I like to use a fork to mix it all up.
- Press the mixture firmly into the bottom of a 9×13 inch baking dish. You can use the bottom of a measuring cup or a flat-bottomed glass to really pack it down. This will give you a nice, solid base for all those delicious layers to come.
- Pop the baking dish into the refrigerator while you prepare the next layer. This will help the crust set and prevent it from getting soggy.
Making the Cream Cheese Layer:
- Now for the creamy goodness! In a large bowl, beat the softened cream cheese with an electric mixer until it’s smooth and fluffy. This is really important, because you don’t want any lumps in your cream cheese layer.
- Gradually add the powdered sugar, beating until it’s fully incorporated and the mixture is smooth. Be careful not to add it all at once, or you’ll end up with a cloud of powdered sugar!
- Stir in the vanilla extract. This adds a lovely touch of flavor that complements the cream cheese perfectly.
- Gently fold in the thawed whipped topping until everything is just combined. Be careful not to overmix, or you’ll deflate the whipped topping. You want to keep it light and airy.
- Spread this creamy mixture evenly over the chilled Oreo crust. Make sure it reaches all the edges!
- Return the baking dish to the refrigerator while you prepare the lemon pudding layer.
Preparing the Lemon Pudding Layer:
- Time for the zesty lemon layer! In a large bowl, whisk together the instant lemon pudding mix and the cold milk until the pudding starts to thicken. This usually takes about 2-3 minutes.
- Let the pudding mixture stand for about 5 minutes to fully thicken. This will prevent it from seeping into the cream cheese layer.
- Carefully spread the lemon pudding mixture evenly over the cream cheese layer. I like to use a spatula to gently spread it, being careful not to disturb the layer underneath.
- Place the baking dish back into the refrigerator to allow the lemon pudding layer to set. This usually takes about 30 minutes.
Adding the Whipped Topping Layer and Garnish:
- Once the lemon pudding layer has set, spread the remaining thawed whipped topping evenly over the top. Again, be gentle so you don’t disturb the layers underneath.
- Now for the fun part: garnishing! You can get creative here. I like to arrange lemon slices or wedges on top for a pop of color and a hint of lemon flavor.
- Sprinkle some lemon zest over the whipped topping for an extra burst of citrus.
- If you want to add a little more texture and flavor, sprinkle some additional crushed golden Oreo cookies around the edges or in the center.
- Cover the baking dish with plastic wrap and refrigerate for at least 2 hours, or preferably overnight, to allow all the flavors to meld together. This is crucial for the best flavor and texture.
Serving and Storage:
- When you’re ready to serve, cut the Lemon Lush into squares and enjoy!
- Store any leftovers in the refrigerator, covered, for up to 3 days. The crust might soften slightly over time, but it will still taste delicious.
Tips and Variations:
- Crust Variations: If you’re not a fan of golden Oreos, you can use regular Oreos (with or without the filling), graham crackers, or even shortbread cookies for the crust. Just adjust the amount of butter accordingly.
- Lemon Flavor Boost: For an even more intense lemon flavor, add a tablespoon of lemon zest to the lemon pudding mixture.
- Fruit Additions: You can add a layer of fresh berries, such as blueberries, raspberries, or strawberries, between the lemon pudding layer and the whipped topping layer. This adds a lovely burst of freshness and color.
- Individual Servings: For a more elegant presentation, you can assemble the Lemon Lush in individual dessert cups or glasses. This is perfect for parties or special occasions.
- Dietary Considerations: To make this dessert gluten-free, use gluten-free Oreo cookies or graham crackers for the crust. You’ll also need to ensure that the pudding mix and whipped topping are gluten-free.
- Make Ahead: This dessert is perfect for making ahead of time. In fact, it tastes even better after it’s had a chance to chill in the refrigerator for a few hours or overnight.
- Whipped Cream Alternative: If you prefer homemade whipped cream, you can use that instead of store-bought whipped topping. Just make sure to whip it to stiff peaks and sweeten it to your liking.
- Pudding Flavor Swap: While lemon is classic, feel free to experiment with other pudding flavors like vanilla, coconut, or even cheesecake! Each will give the dessert a unique twist.
Troubleshooting:
- Soggy Crust: To prevent a soggy crust, make sure to press the cookie crumbs firmly into the baking dish and chill it in the refrigerator before adding the other layers. You can also bake the crust for a few minutes at 350°F (175°C) to help it set.
- Lumpy Cream Cheese Layer: To avoid a lumpy cream cheese layer, make sure the cream cheese is fully softened before beating it. You can also beat it for a longer period of time to ensure it’s smooth and creamy.
- Runny Pudding Layer: If the lemon pudding layer is too runny, it might be because you didn’t use enough milk or you didn’t let it thicken for long enough. Make sure to follow the instructions on the pudding mix package carefully.
- Whipped Topping Deflating: To prevent the whipped topping from deflating, be careful not to overmix it. Gently fold it into the cream cheese mixture until it’s just combined.
Nutritional Information (Approximate, per serving):
Note: Nutritional information is an estimate and may vary based on specific ingredients and serving sizes.
- Calories: 450-550
- Fat: 25-35g
- Saturated Fat: 15-20g
- Cholesterol: 75-100mg
- Sodium: 300-400mg
- Carbohydrates: 50-60g
- Sugar: 35-45g
- Protein: 5-7g
Enjoy your delicious Lemon Lush Dessert! I hope you love it as much as I do!
Conclusion:
And there you have it! This Lemon Lush Dessert is truly a must-try for anyone who loves a light, refreshing, and utterly delightful treat. From the buttery, crumbly pecan crust to the tangy lemon filling and the creamy, dreamy whipped topping, every layer works in perfect harmony to create a symphony of flavors and textures that will leave you wanting more. I know I always do!
But why is this recipe so special? It’s more than just a dessert; it’s an experience. It’s the perfect ending to a summer barbecue, a delightful addition to a potluck, or simply a comforting indulgence on a cozy evening. The bright lemon flavor is incredibly uplifting, and the overall lightness of the dessert means you can enjoy a slice (or two!) without feeling weighed down. Plus, it’s surprisingly easy to make, even for beginner bakers. The layering process is simple and straightforward, and the results are always impressive. Trust me, you’ll be fielding compliments left and right!
Now, let’s talk about serving suggestions and variations. While this Lemon Lush Dessert is absolutely divine on its own, there are plenty of ways to customize it to your liking. For a more intense lemon flavor, you can add a tablespoon of lemon zest to the filling. If you’re feeling adventurous, try using a different type of nut in the crust, like walnuts or almonds. You could even add a sprinkle of toasted coconut to the whipped topping for a tropical twist.
Serving-wise, this dessert is best served chilled. I like to let it sit in the refrigerator for at least a couple of hours before serving to allow the flavors to meld together and the layers to set properly. A dollop of fresh whipped cream and a few lemon slices make for a beautiful presentation. You can also garnish it with fresh berries, such as raspberries or blueberries, for a pop of color and added flavor. For a truly decadent experience, try serving it with a scoop of vanilla ice cream.
Don’t be afraid to experiment and make this recipe your own! That’s the beauty of baking it’s all about creativity and having fun in the kitchen. I’ve made this Lemon Lush Dessert countless times, and I’m always finding new ways to tweak it and make it even better.
So, what are you waiting for? Grab your ingredients, preheat your oven, and get ready to create a dessert that will wow your family and friends. I promise you won’t be disappointed. This recipe is a guaranteed crowd-pleaser, and it’s sure to become a staple in your dessert repertoire.
I’m so excited for you to try this recipe! Once you do, please come back and share your experience in the comments below. I’d love to hear what you think, what variations you tried, and how it turned out. Did you add any special ingredients? Did you serve it at a particular event? Your feedback is invaluable, and it helps me to continue creating recipes that you’ll love. Happy baking, and enjoy every delicious bite of your homemade Lemon Lush Dessert! I can’t wait to hear all about it!
Lemon Lush Dessert: A Delicious & Easy Recipe
A layered dessert with a golden Oreo crust, creamy cream cheese, tangy lemon pudding, and whipped topping. A refreshing and easy-to-make treat!
Ingredients
- 1 package (14.3 ounces) golden Oreo cookies, finely crushed (about 3 cups)
- 6 tablespoons (3 ounces) unsalted butter, melted
- 8 ounces cream cheese, softened
- 1 cup powdered sugar
- 1 teaspoon vanilla extract
- 8 ounces frozen whipped topping, thawed (like Cool Whip)
- 2 packages (3.4 ounces each) instant lemon pudding mix
- 3 cups cold milk
- 8 ounces frozen whipped topping, thawed (like Cool Whip)
- Lemon slices or wedges
- Lemon zest
- Additional crushed golden Oreo cookies
Instructions
- Prepare the Crust: In a medium bowl, combine crushed golden Oreo cookies and melted butter. Mix well. Press firmly into the bottom of a 9×13 inch baking dish. Refrigerate while preparing the next layer.
- Make the Cream Cheese Layer: In a large bowl, beat softened cream cheese until smooth. Gradually add powdered sugar, beating until incorporated. Stir in vanilla extract. Gently fold in thawed whipped topping. Spread evenly over the chilled Oreo crust. Refrigerate while preparing the lemon pudding layer.
- Prepare the Lemon Pudding Layer: In a large bowl, whisk together instant lemon pudding mix and cold milk until pudding starts to thicken (2-3 minutes). Let stand for 5 minutes to fully thicken. Carefully spread the lemon pudding mixture evenly over the cream cheese layer. Refrigerate for about 30 minutes to allow the lemon pudding layer to set.
- Add Whipped Topping and Garnish: Once the lemon pudding layer has set, spread the remaining thawed whipped topping evenly over the top. Garnish with lemon slices/wedges, lemon zest, and/or additional crushed golden Oreo cookies (optional).
- Chill: Cover the baking dish with plastic wrap and refrigerate for at least 2 hours, or preferably overnight, to allow all the flavors to meld together.
- Serve: Cut into squares and enjoy!
Notes
- Crust Variations: Use regular Oreos, graham crackers, or shortbread cookies instead of golden Oreos. Adjust butter accordingly.
- Lemon Flavor Boost: Add a tablespoon of lemon zest to the lemon pudding mixture.
- Fruit Additions: Add a layer of fresh berries between the lemon pudding layer and the whipped topping layer.
- Individual Servings: Assemble in individual dessert cups or glasses.
- Dietary Considerations: Use gluten-free Oreo cookies or graham crackers for a gluten-free version. Ensure pudding mix and whipped topping are also gluten-free.
- Make Ahead: This dessert tastes even better after chilling for a few hours or overnight.
- Whipped Cream Alternative: Use homemade whipped cream instead of store-bought whipped topping.
- Pudding Flavor Swap: Experiment with other pudding flavors like vanilla, coconut, or cheesecake.
- Soggy Crust: Press the cookie crumbs firmly into the baking dish and chill it in the refrigerator before adding the other layers. You can also bake the crust for a few minutes at 350°F (175°C) to help it set.
- Lumpy Cream Cheese Layer: Make sure the cream cheese is fully softened before beating it. You can also beat it for a longer period of time to ensure it’s smooth and creamy.
- Runny Pudding Layer: Make sure to follow the instructions on the pudding mix package carefully.
- Whipped Topping Deflating: Gently fold it into the cream cheese mixture until it’s just combined.
- Storage: Store leftovers in the refrigerator, covered, for up to 3 days.