
Artisan Bread: the words alone conjure images of crusty loaves, fragrant aromas, and the simple pleasure of tearing into a freshly baked masterpiece. Have you ever dreamed of creating that bakery-quality bread in your own kitchen? I’m here to tell you it’s not only possible, but also incredibly rewarding!
Bread, in its many forms, has been a cornerstone of human civilization for millennia. From ancient grains ground between stones to the sophisticated techniques of modern bakers, bread represents sustenance, community, and tradition. Artisan bread, in particular, harkens back to a time when breadmaking was a craft, a slow and deliberate process that yielded loaves bursting with flavor and character.
What is it about artisan bread that captivates us so? Perhaps it’s the satisfying crunch of the crust giving way to a soft, chewy interior. Maybe it’s the complex flavors developed through long fermentation, a symphony of subtle tangs and nutty notes. Or perhaps it’s the simple act of creating something beautiful and nourishing with your own hands. Whatever the reason, artisan bread is a beloved staple in homes and restaurants around the world. This recipe will guide you through each step, ensuring you achieve that perfect loaf every time. Get ready to impress your friends and family with your newfound baking skills!

Ingredients:
- For the Starter (Levain):
- 100g Bread Flour (unbleached, high protein)
- 100g Warm Water (around 85-90°F)
- 1 tablespoon Mature Sourdough Starter (active and bubbly)
- For the Dough:
- 400g Bread Flour (unbleached, high protein)
- 300g Warm Water (around 85-90°F)
- All of the Levain (from above)
- 10g Fine Sea Salt
- Optional:
- Rice Flour (for dusting the proofing basket)
Preparing the Levain (Sourdough Starter)
The levain is the heart and soul of this artisan bread, giving it that characteristic tangy flavor and airy texture. It’s crucial to get this step right, so let’s take our time and be patient.
- Combine Ingredients: In a clean bowl, combine the 100g of bread flour, 100g of warm water, and 1 tablespoon of your mature sourdough starter. Make sure the starter is active and bubbly it should have doubled in size since its last feeding. If it hasn’t, give it another feeding and wait until it’s ready.
- Mix Thoroughly: Use a spoon or your hands to mix the ingredients until they form a smooth, slightly thick batter. There should be no dry clumps of flour remaining.
- Ferment: Cover the bowl with plastic wrap or a reusable lid. Let it sit at room temperature (ideally around 70-75°F) for 4-6 hours, or until it has doubled or even tripled in size and is very bubbly. The exact time will depend on the strength of your starter and the temperature of your environment. You’ll know it’s ready when it has a slightly domed shape and a pleasant, slightly sour aroma.
Making the Dough
Now that our levain is active and ready, we can move on to making the main dough. This is where the magic really happens!
- Combine Flour and Water: In a large bowl, combine the 400g of bread flour and 300g of warm water. Mix with your hands until just combined. You’re not trying to develop the gluten at this point, just making sure all the flour is hydrated. This is called an autolyse, and it helps to improve the texture and flavor of the bread.
- Autolyse: Cover the bowl with plastic wrap or a damp towel and let it rest for 30-60 minutes. This allows the flour to fully absorb the water, which will make the dough easier to work with later on.
- Add Levain: After the autolyse, add all of the levain to the bowl. Use your hands to gently incorporate it into the flour and water mixture. It will take a few minutes to fully combine.
- Add Salt: Once the levain is mostly incorporated, add the 10g of fine sea salt. Salt is essential for flavor and also helps to control the fermentation process.
- Mix Thoroughly: Now, it’s time to really mix the dough. You can do this by hand or with a stand mixer fitted with a dough hook. If mixing by hand, use the stretch and fold method (described below). If using a stand mixer, mix on low speed for 8-10 minutes, or until the dough is smooth and elastic.
Stretch and Fold Method (for Hand Mixing)
The stretch and fold method is a gentle way to develop the gluten in the dough without overworking it. It involves stretching a portion of the dough upwards and folding it over onto itself, repeating this process several times.
- First Stretch and Fold: With wet hands, reach under one side of the dough, stretch it upwards, and fold it over onto itself. Rotate the bowl 90 degrees and repeat. Do this a total of 4 times, stretching and folding from all sides of the dough.
- Rest: Cover the bowl and let the dough rest for 30 minutes.
- Repeat: Repeat the stretch and fold process 3-4 more times, with 30-minute rests in between each set of folds. You’ll notice that the dough becomes smoother and more elastic with each set of folds.
Bulk Fermentation (First Rise)
Bulk fermentation is the first rise of the dough, and it’s a crucial step in developing the flavor and texture of the bread. During this time, the yeast in the levain will ferment the sugars in the flour, producing carbon dioxide gas that will make the dough rise.
- Ferment: After the final stretch and fold, cover the bowl and let the dough ferment at room temperature (ideally around 70-75°F) for 3-5 hours, or until it has almost doubled in size. The exact time will depend on the strength of your starter and the temperature of your environment.
- Observe: During bulk fermentation, you should see bubbles forming throughout the dough. The dough should also feel light and airy.
Shaping the Dough
Shaping the dough is an important step in creating the final shape of the bread. It also helps to develop the surface tension of the dough, which will give it a nice crust.
- Gently Turn Out: Gently turn the dough out onto a lightly floured surface. Be careful not to deflate the dough too much.
- Shape: Shape the dough into a round or oval loaf, depending on your preference. There are many different shaping techniques you can use, but a simple method is to gently pull the edges of the dough towards the center, creating a tight ball.
- Tighten the Seam: Flip the dough over so that the seam is on the bottom. Gently tighten the seam by pulling the dough towards you.
Proofing (Second Rise)
Proofing is the second rise of the dough, and it’s the final step before baking. During this time, the dough will continue to rise and develop its flavor.
- Prepare Proofing Basket: Line a proofing basket (banneton) with rice flour. Rice flour is less likely to stick to the dough than other types of flour.
- Place Dough in Basket: Gently place the shaped dough into the proofing basket, seam-side up.
- Proof: Cover the basket with plastic wrap or a damp towel and let it proof in the refrigerator for 12-24 hours. This slow, cold proofing process helps to develop the flavor of the bread and makes it easier to score.
Baking the Bread
Finally, it’s time to bake our artisan bread! This is where all our hard work pays off.
- Preheat Oven: Preheat your oven to 450°F (232°C) with a Dutch oven inside. It’s crucial to preheat the Dutch oven for at least 30 minutes to ensure a crispy crust.
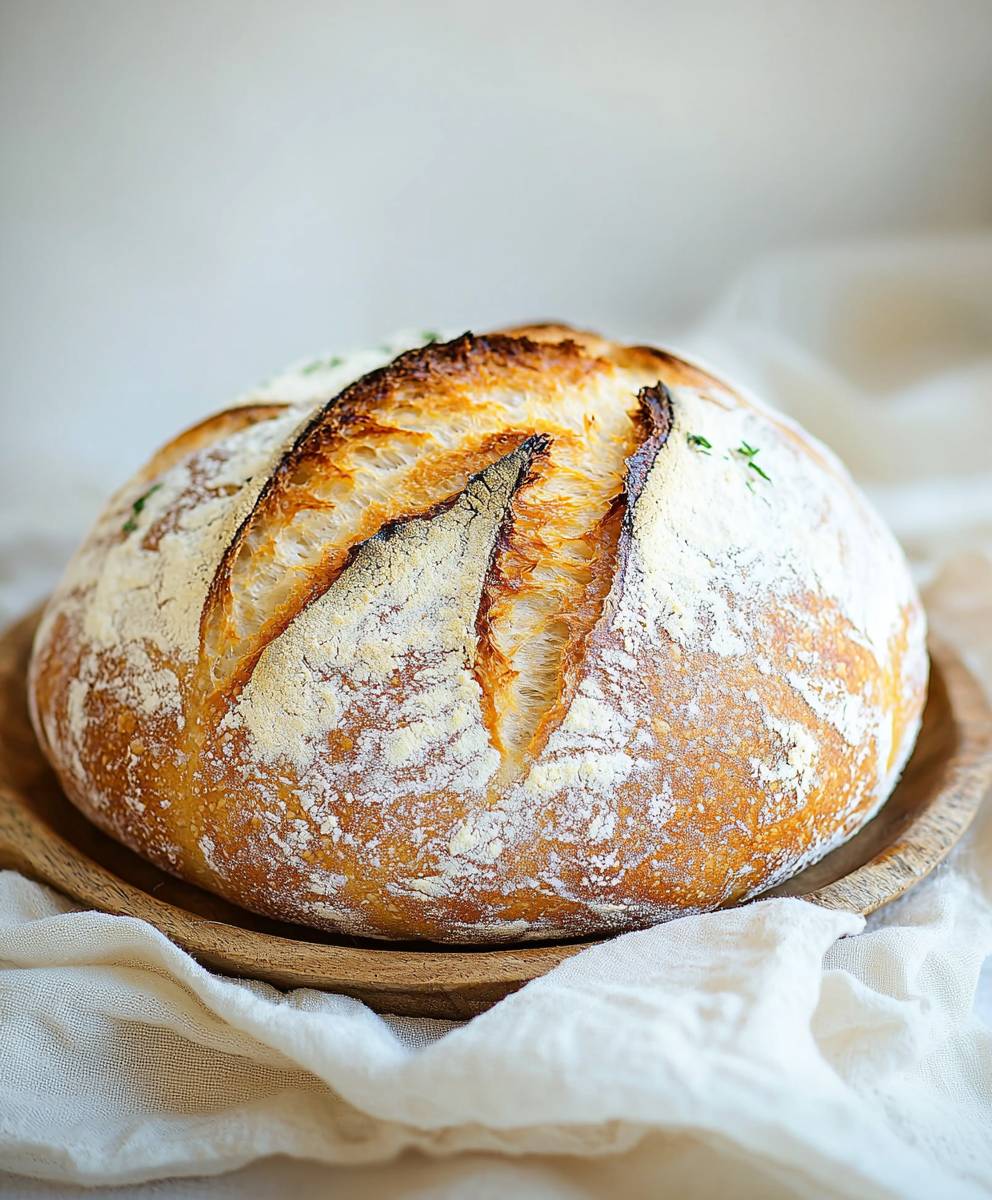
- Score the Dough: Carefully remove the Dutch oven from the oven. Remove the dough from the proofing basket and gently place it into the hot Dutch oven, seam-side down. Use a sharp knife or lame to score the top of the dough. Scoring allows the bread to expand properly in the oven and also creates a beautiful design. A single slash down the center is a classic choice, but you can also experiment with different patterns.
- Bake Covered: Cover the Dutch oven and bake for 20 minutes.
- Bake Uncovered: Remove the lid from the Dutch oven and bake for another 25-30 minutes, or until the crust is a deep golden brown and the internal temperature of the bread reaches 205-210°F (96-99°C).
- Cool: Carefully remove the bread from the Dutch oven and let it cool completely on a wire rack before slicing and serving. This is important because the bread is still cooking internally as it cools. If you slice it too soon, it will be gummy and the texture will be compromised.
Enjoy your homemade artisan bread! It’s delicious on its own, or with butter, cheese, or your favorite toppings.
Conclusion:
This artisan bread recipe isn’t just another bread recipe; it’s an invitation to experience the pure joy of baking and the unparalleled satisfaction of creating something truly special with your own hands. From the intoxicating aroma that fills your kitchen as it bakes to the deeply satisfying crust and airy crumb, every aspect of this bread screams homemade perfection. It’s a must-try because it’s surprisingly simple, incredibly rewarding, and delivers a taste that far surpasses anything you can buy in a store. Trust me, once you’ve tasted bread made with this recipe, you’ll understand why I’m so passionate about it! But the beauty of this recipe lies not only in its simplicity and flavor but also in its versatility. Think of it as a blank canvas for your culinary creativity! For a classic experience, slice it thick and serve it warm with a generous slather of salted butter. The simple combination is a testament to the quality of the bread itself. Or, elevate your breakfast game by using it to make the most incredible toast you’ve ever tasted. Top it with avocado and a sprinkle of red pepper flakes, or go sweet with a dollop of ricotta cheese and a drizzle of honey. Looking for something a little more substantial? This bread makes fantastic sandwiches. Imagine a crusty baguette filled with layers of prosciutto, mozzarella, and roasted red peppers. Or perhaps a hearty grilled cheese with sharp cheddar and caramelized onions. The possibilities are truly endless! And don’t be afraid to experiment with variations! For a rustic touch, try adding a handful of chopped walnuts and dried cranberries to the dough before the final proof. The nutty flavor and chewy texture will add a delightful complexity. If you’re a fan of herbs, incorporate a tablespoon of fresh rosemary or thyme into the dough for an aromatic twist. You could even add a pinch of chili flakes for a subtle kick. Another fantastic variation is to use different types of flour. Try substituting some of the all-purpose flour with whole wheat flour for a nuttier, more wholesome flavor. Or, experiment with rye flour for a darker, more complex bread. Just remember to adjust the hydration levels as needed, as different flours absorb water differently. This artisan bread is also perfect for dipping. Serve it alongside a bowl of creamy tomato soup or a flavorful olive oil and balsamic vinegar mixture. The crusty exterior is ideal for soaking up all the delicious flavors. And if you happen to have any leftovers (though I doubt you will!), don’t let them go to waste. Use them to make croutons for your salads or breadcrumbs for your favorite pasta dishes. I truly believe that everyone should experience the joy of baking their own bread, and this recipe is the perfect place to start. It’s simple enough for beginners, yet rewarding enough for experienced bakers. So, gather your ingredients, preheat your oven, and get ready to embark on a culinary adventure. I’m so excited for you to try this recipe and experience the magic of homemade bread. Once you do, please come back and share your experience! Let me know what variations you tried, what you served it with, and most importantly, how much you enjoyed it. I can’t wait to hear your stories and see your beautiful loaves of bread! Happy baking! Print
Artisan Bread: A Complete Guide to Baking Delicious Bread at Home
- Total Time: 960 minutes
- Yield: 1 Loaf 1x
Description
Create a tangy artisan sourdough bread from scratch using a levain starter and slow, cold proofing for optimal flavor and texture.
Ingredients
- 100g Bread Flour (unbleached, high protein)
- 100g Warm Water (around 85-90°F)
- 1 tablespoon Mature Sourdough Starter (active and bubbly)
- 400g Bread Flour (unbleached, high protein)
- 300g Warm Water (around 85-90°F)
- All of the Levain (from above)
- 10g Fine Sea Salt
- Rice Flour (for dusting the proofing basket)
Instructions
- In a clean bowl, combine 100g bread flour, 100g warm water, and 1 tablespoon of active sourdough starter.
- Mix until smooth.
- Cover and let sit at room temperature (70-75°F) for 4-6 hours, or until doubled/tripled in size and bubbly.
- In a large bowl, combine 400g bread flour and 300g warm water. Mix until just combined.
- Cover and let rest (autolyse) for 30-60 minutes.
- Add all of the levain to the bowl and gently incorporate it into the flour and water mixture.
- Add 10g fine sea salt.
- Mix thoroughly by hand (stretch and fold method) or with a stand mixer (8-10 minutes on low).
- With wet hands, reach under one side of the dough, stretch it upwards, and fold it over onto itself. Rotate the bowl 90 degrees and repeat. Do this a total of 4 times, stretching and folding from all sides of the dough.
- Cover the bowl and let the dough rest for 30 minutes.
- Repeat the stretch and fold process 3-4 more times, with 30-minute rests in between each set of folds.
- Cover the bowl and let the dough ferment at room temperature (70-75°F) for 3-5 hours, or until almost doubled in size.
- Gently turn the dough out onto a lightly floured surface.
- Shape the dough into a round or oval loaf.
- Flip the dough over so that the seam is on the bottom. Gently tighten the seam by pulling the dough towards you.
- Line a proofing basket (banneton) with rice flour.
- Gently place the shaped dough into the proofing basket, seam-side up.
- Cover and let proof in the refrigerator for 12-24 hours.
- Preheat oven to 450°F (232°C) with a Dutch oven inside for at least 30 minutes.
- Carefully remove the Dutch oven from the oven. Remove the dough from the proofing basket and gently place it into the hot Dutch oven, seam-side down.
- Score the top of the dough.
- Cover and bake for 20 minutes.
- Remove the lid and bake for another 25-30 minutes, or until the crust is a deep golden brown and the internal temperature reaches 205-210°F (96-99°C).
- Cool completely on a wire rack before slicing.
Notes
- The levain is crucial for flavor and texture. Ensure your starter is active and bubbly before using.
- Autolysing the flour improves dough texture and flavor.
- The stretch and fold method develops gluten gently.
- Bulk fermentation time depends on starter strength and temperature.
- Cold proofing enhances flavor and makes scoring easier.
- Preheating the Dutch oven is essential for a crispy crust.
- Cool the bread completely before slicing to prevent a gummy texture.
- Prep Time: 45 minutes
- Cook Time: 45 minutes