
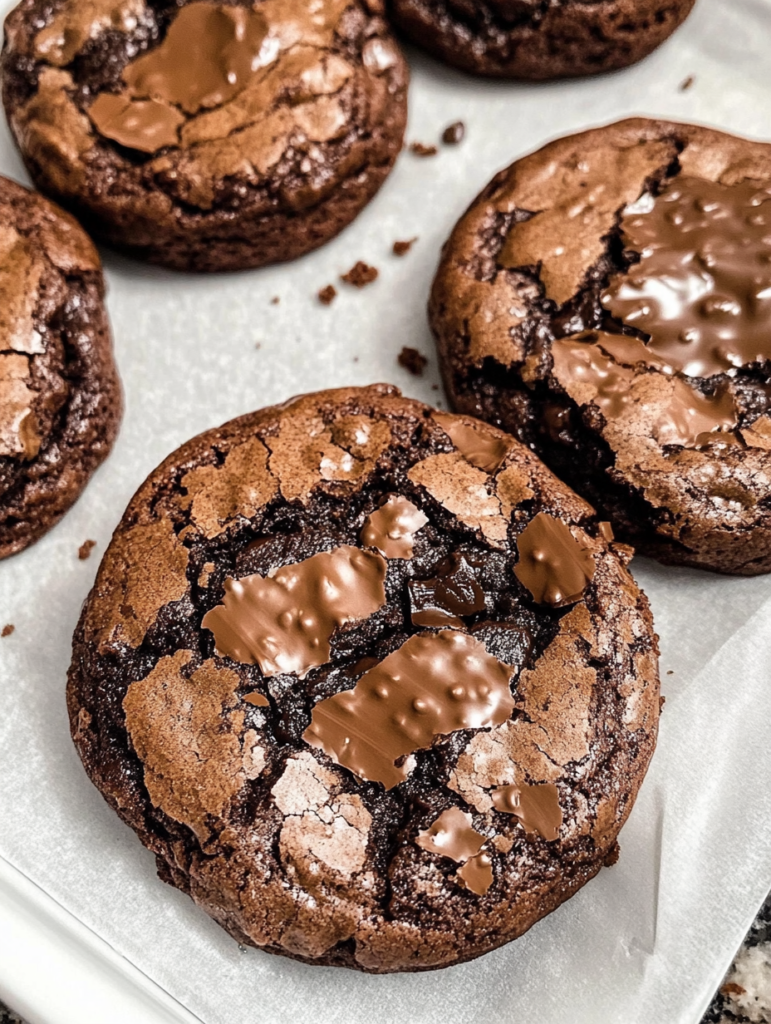
“Best Fudgy Chewy Browkies” Brownies and cookies are two of the most beloved desserts around the world. But imagine combining the best features of both into a single decadent dessert. Enter the browkie, or brookie—a mouthwatering fusion of brownies and cookies, creating the perfect balance of fudgy richness and chewy sweetness. This hybrid treat has taken the dessert world by storm for good reason: it’s the ultimate comfort food, offering the best of both worlds.
Whether you’re a dedicated brownie lover, a cookie enthusiast, or just someone looking for a unique dessert to impress your guests, this recipe will satisfy all cravings. In this article, we’ll walk you through everything you need to know to make the best fudgy, chewy browkies at home. From essential ingredients to helpful tips, we’ve got you covered to ensure that your browkies turn out perfectly every time.
With simple ingredients and a straightforward process, you’ll be able to master the art of browkies in no time. Follow along as we take you through each step of the way, offering plenty of suggestions, troubleshooting advice, and ways to customize this delicious dessert to suit your taste. Whether you’re baking for a special occasion or simply treating yourself, these browkies will quickly become your go-to recipe.

Essential Ingredients for the Best Browkies
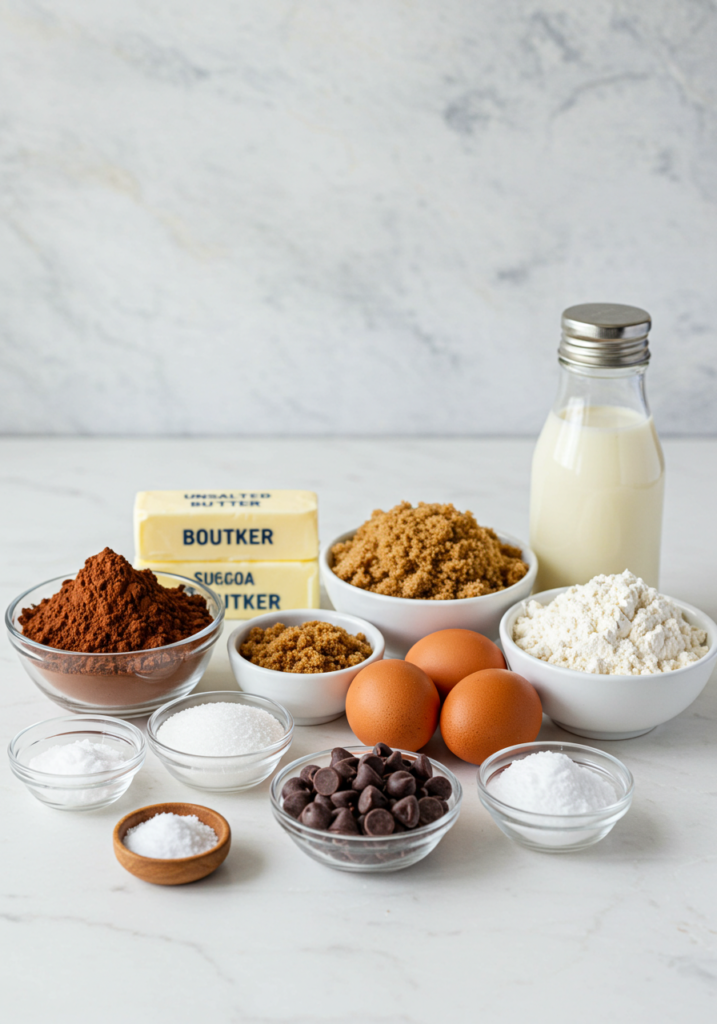
To make the best fudgy chewy browkies, you’ll need two sets of ingredients—one for the rich, fudgy brownie layer and another for the chewy cookie layer. Let’s break down the essential ingredients for each component, so you understand how each one contributes to the final dessert.
Brownie Layer Ingredients:
- Butter: Using unsalted butter helps control the salt levels and contributes to that rich, fudgy texture. It’s important to melt the butter with the chocolate to create a smooth and glossy mixture.
- Cocoa Powder: High-quality unsweetened cocoa powder is essential for a deep chocolate flavor. It helps build the foundation of the brownie layer’s richness.
- Sugar: A combination of granulated and brown sugar creates the perfect sweetness balance, with brown sugar contributing to moisture and a subtle caramel flavor.
- Eggs: Eggs bind the ingredients together and help the brownie layer achieve its fudgy consistency. Be sure to use room-temperature eggs for the best results.
- Vanilla Extract: A splash of vanilla brings out the chocolate flavor and adds a warm, aromatic sweetness to the batter.
- Flour: All-purpose flour provides structure to the brownies, giving them the right density without making them too cakey.
- Salt: A pinch of salt enhances the flavor of the chocolate and balances out the sweetness.
Cookie Layer Ingredients:
- Butter: Like in the brownie layer, unsalted butter is used in the cookie layer to create a rich base. Make sure it’s softened so it can be easily creamed with the sugars.
- Sugar: This recipe calls for both granulated sugar and brown sugar, which gives the cookies a chewy texture and rich flavor.
- Egg: The egg helps bind the ingredients and adds richness to the cookie dough.
- Vanilla Extract: Just like in the brownie batter, vanilla extract is key to enhancing the overall flavor.
- Flour: All-purpose flour is the main dry ingredient in the cookie dough, giving it structure while maintaining chewiness.
- Baking Soda: This ingredient helps the cookies rise slightly and spread out in the pan, ensuring they bake up with a tender texture.
- Chocolate Chips: Semi-sweet chocolate chips or chunks are a must for the cookie layer. They melt slightly as the cookie bakes, creating gooey pockets of chocolate throughout.
Preparation: How to Make the Best Fudgy Chewy Browkies
Now that we have our ingredients, it’s time to dive into the preparation process. Making fudgy chewy browkies is surprisingly easy, but there are a few steps to follow to ensure your dessert comes out perfectly every time. Here’s a step-by-step guide to creating these delicious hybrid treats.
Step 1: Prepare the Brownie Layer
- Preheat Your Oven: Start by preheating your oven to 350°F (175°C). Line an 8×8-inch square baking pan with parchment paper or lightly grease it to prevent sticking.
- Melt the Butter and Chocolate: In a saucepan over medium heat or in the microwave, melt the butter and cocoa powder together until smooth and glossy. Stir to combine thoroughly.
- Mix the Wet Ingredients: In a separate bowl, whisk together the eggs, granulated sugar, brown sugar, and vanilla extract until smooth. Add the melted butter and cocoa mixture, stirring until fully combined.
- Combine Dry Ingredients: In another bowl, sift together the all-purpose flour and salt. Gradually add the dry ingredients to the wet ingredients, mixing until the batter is just combined. Avoid over-mixing, as this can result in dense brownies.
Step 2: Make the Cookie Dough
- Cream the Butter and Sugars: In a separate large mixing bowl, beat together the softened butter, granulated sugar, and brown sugar until light and fluffy. This should take about 2-3 minutes.
- Add the Egg and Vanilla: Mix in the egg and vanilla extract, beating until the dough is smooth.
- Add the Dry Ingredients: Gradually add the sifted flour and baking soda to the wet ingredients, stirring until combined. Be careful not to overwork the dough.
- Fold in Chocolate Chips: Finally, fold in the semi-sweet chocolate chips or chunks, ensuring they are evenly distributed throughout the dough.
Step 3: Layer and Assemble the Browkies
- Layer the Brownie Batter First: Pour the brownie batter into the prepared pan, spreading it evenly with a spatula.
- Top with the Cookie Dough: Using a spoon or your hands, drop spoonfuls of the cookie dough over the brownie layer. Don’t worry about spreading it out perfectly; the cookie dough will spread as it bakes.
- Swirl (Optional): For a marbled effect, gently swirl the brownie and cookie layers together with a knife or skewer. This step is optional but adds a fun visual element to your browkies.
Step 4: Baking the Browkies
Bake the assembled browkies in the preheated oven for 30-35 minutes, or until a toothpick inserted in the center comes out with just a few moist crumbs (not wet batter). Keep a close eye on the browkies as baking times can vary depending on your oven and pan size.
Once baked, allow the browkies to cool in the pan for at least 15 minutes before cutting into squares. This helps the layers set, making them easier to slice.
Mistakes to Avoid When Making The Best fudgy chewy browkies
Making Best fudgy chewy browkies sounds simple, but there are a few common mistakes that can result in less-than-perfect results. Here are some of the most common errors and how to avoid them.
1. Overmixing the Batters
Both the brownie and cookie batters should be mixed just until combined. Overmixing can lead to dense or cakey results. It’s important to incorporate the dry ingredients gently to avoid activating the gluten in the flour, which can cause a tough texture.
2. Not Using Room-Temperature Ingredients
Using cold butter or eggs can cause the batters to separate or not blend properly, leading to inconsistent texture. Be sure to allow your butter and eggs to come to room temperature before you begin mixing.
3. Incorrect Oven Temperature
Baking at too high a temperature can cause the edges to burn while leaving the center raw, while too low a temperature may result in underbaked browkies. Always preheat your oven fully and check the temperature with an oven thermometer if necessary to avoid this issue.
4. Not Letting Them Cool Enough
Patience is key. While it’s tempting to dive into warm, gooey browkies right out of the oven, cutting them too soon can cause them to fall apart. Allow your browkies to cool for at least 15 minutes in the pan before slicing.
5. Using the Wrong Pan Size
The size of your baking pan affects the texture of the browkies. Using a pan that’s too small will cause the batter to overflow, while a pan that’s too large will make your browkies thin and dry. Stick to an 8×8-inch square pan for the best results.
Alternative Ingredients for Browkies
While the classic fudgy and chewy combination is perfect as is, feel free to get creative and swap out certain ingredients for alternatives that better suit your taste preferences or dietary needs. Here are some great ingredient swaps to consider for browkies.
1. Gluten-Free Flour
For a gluten-free version of browkies, substitute the all-purpose flour with a 1:1 gluten-free flour blend. Look for a blend that includes xanthan gum or guar gum, as this will help provide structure and elasticity to the batter, mimicking the gluten’s binding properties. Be aware that some gluten-free flours can create a denser texture, so you might need to experiment a bit to get the perfect consistency.
2. Dairy-Free Options
To make browkies dairy-free, swap the butter for vegan butter or coconut oil. For the chocolate, look for dairy-free chocolate chips or use dark chocolate, which typically doesn’t contain milk. You can also use a plant-based milk, such as almond milk or oat milk, in place of any dairy-based liquids if the recipe calls for it.
3. Healthier Sweeteners
If you’re looking to cut back on refined sugars, you can experiment with alternatives like maple syrup, honey, or coconut sugar. Keep in mind that these sweeteners may alter the texture slightly. For example, using honey can make the dough a little softer, and you may need to adjust the flour to compensate.
4. Nut Butters for Extra Flavor
For a unique twist, consider adding a swirl of peanut butter, almond butter, or hazelnut spread into the batter. This will give your browkies an extra creamy texture and nutty flavor. Just gently swirl the nut butter into the brownie layer before baking, or layer it between the brownie and cookie layers for an added surprise.
5. Low-Carb Sweeteners
For those following a low-carb or ketogenic diet, you can use low-carb sweeteners such as erythritol or monk fruit in place of traditional sugar. Keep in mind that these sweeteners may have different sweetness levels, so taste and adjust accordingly. Some low-carb sweeteners can affect the texture of baked goods, so be sure to follow trusted keto recipes for best results.
By making a few simple substitutions, you can easily customize this recipe to meet dietary needs or just to experiment with different flavors.
Tips & Tricks for Perfect Browkies Every Time
To ensure that your browkies turn out perfectly every time, here are some helpful tips and tricks that will elevate your baking game.
1. Use High-Quality Chocolate
Since chocolate is the star ingredient in both the brownie and cookie layers, using high-quality chocolate will make a noticeable difference in flavor. Opt for good-quality cocoa powder and chocolate chips or chunks—this will result in a richer and more decadent treat. If you’re using chocolate bars, chop them up into chunks for a more rustic look and better melt-in-your-mouth chocolate experience.
2. Don’t Overfill the Pan
When layering the brownie and cookie batters, make sure to leave some space in the pan. Overfilling can cause the batter to spill over and create a messy outcome. An 8×8-inch pan is the ideal size for this recipe, and it will give the browkies enough room to bake evenly.
3. Cool Before Cutting
Although it may be tempting to cut into your freshly baked browkies, letting them cool in the pan for 15-20 minutes ensures that they set properly. If you cut them too early, they might fall apart, especially because the center remains quite gooey. For clean cuts, let them cool completely or even chill them in the fridge for a couple of hours before slicing.
4. Use a Toothpick to Test for Doneness
Since the texture of browkies is fudgy, it can be hard to determine if they’re done just by looking at them. To test for doneness, insert a toothpick into the center. If it comes out with a few moist crumbs (but not wet batter), the browkies are ready to be taken out of the oven. If the toothpick comes out with batter still clinging to it, bake for a few more minutes.
5. Make It a Double Batch
If you’re baking for a crowd, don’t hesitate to double the recipe and use a 9×13-inch baking pan. Just keep in mind that the baking time may need to be adjusted slightly, so monitor them closely after 35 minutes.
These simple tips will help you perfect your browkies every time, resulting in a delicious dessert that’s sure to impress.
Suggestions for Serving and Storing Browkies
Best fudgy chewy browkies are incredibly versatile, and whether you’re serving them at a party or simply enjoying them at home, there are many ways to enjoy this delicious dessert. Here are a few suggestions for serving and storing your browkies to get the most out of your baking efforts.
1. Serve with Ice Cream
For an indulgent treat, serve your warm browkies with a scoop of vanilla ice cream, or try a scoop of salted caramel or chocolate ice cream for an extra twist. The contrast of the warm, fudgy browkies with the cold, creamy ice cream is nothing short of heavenly. You can also drizzle with hot fudge or caramel sauce for a decadent dessert.
2. Pair with a Hot Drink
Browkies pair wonderfully with hot beverages. A rich coffee or espresso is the perfect complement to the chocolatey goodness of browkies. For something more cozy, serve them with a warm cup of tea or hot cocoa. If you want to add an extra element, consider sprinkling some cinnamon or nutmeg on top of your drink.
3. Cut into Smaller Portions for Parties
If you’re hosting a gathering, slice your browkies into smaller, bite-sized squares. This makes it easy for guests to grab a treat without overindulging (although, let’s be honest, they’ll probably have more than one!). Browkies are perfect for parties because they’re easy to share and can be eaten with your hands.
4. Store Leftovers Properly
Browkies can be stored in an airtight container at room temperature for up to 3-4 days. Make sure to place parchment paper between layers to prevent them from sticking together. If you want to extend their shelf life, you can refrigerate them for up to a week, or freeze them for up to 3 months. To freeze, wrap the individual squares in plastic wrap or foil, then place them in a resealable bag. Simply thaw at room temperature when you’re ready to enjoy them again.
FAQ: Frequently Asked Questions About Browkies
1. Can I use boxed brownie and cookie mixes for this recipe?
While boxed mixes are convenient, making browkies from scratch yields far better flavor and texture. That said, if you’re short on time, you can use a brownie mix for the brownie layer and a chocolate chip cookie mix for the cookie layer. However, for the best results, we recommend using the homemade versions provided in this recipe.
2. Can I make these ahead of time?
Yes, you can make browkies ahead of time! They store well at room temperature for a few days or can be refrigerated or frozen for later enjoyment. You can also bake them a day or two in advance and simply reheat them in the microwave or oven before serving.
3. How do I know when my browkies are done baking?
To check if your browkies are done, insert a toothpick or cake tester into the center of the pan. If it comes out with only a few moist crumbs attached, your browkies are ready to be removed from the oven. If the toothpick comes out with wet batter, bake for a few more minutes and check again.
4. Can I make these in a different pan size?
Yes, you can use a larger or smaller pan, but this will affect the baking time. If using a larger pan, the browkies will bake faster and may be thinner. If using a smaller pan, the baking time will increase, and the layers might be thicker. Be sure to check the browkies frequently while they bake to ensure they don’t overbake or underbake.
5. How do I store leftover browkies?
Store leftover browkies in an airtight container at room temperature for up to 3-4 days. For longer storage, refrigerate them for up to a week or freeze them for up to 3 months. To freeze, wrap each square tightly in plastic wrap or foil and place in a resealable bag. Thaw at room temperature before serving.
Conclusion: Why You’ll Love These Browkies
Browkies are a dessert lover’s dream come true. Combining the chewy goodness of a cookie with the rich, fudgy texture of a brownie, these treats are perfect for satisfying all of your sweet cravings in one bite. Whether you enjoy them on their own, with a scoop of ice cream, or as part of a larger dessert spread, browkies are guaranteed to impress.
This easy-to-follow recipe offers plenty of room for customization—whether you’re adding a swirl of peanut butter, experimenting with different chocolate types, or adjusting the sweetness to your taste. Thanks to its simplicity and versatility, this recipe is a must-try for both novice and experienced bakers alike.
So go ahead, try this recipe and treat yourself (and your friends or family) to the best fudgy chewy browkies ever. Your taste buds will thank you!
Print
Best Fudgy Chewy Browkies Recipe – Easy & Delicious Browkies
- Total Time: 45-50 minutes
- Yield: 12 servings 1x
Description
A delicious hybrid dessert that combines the rich, fudgy texture of brownies with the chewy, gooey goodness of cookies. Perfect for satisfying all your chocolate cravings!
Ingredients
For the Brownie Layer
- 1/2 cup unsalted butter (melted)
- 1/2 cup unsweetened cocoa powder
- 1 cup granulated sugar
- 1/2 cup brown sugar (packed)
- 2 large eggs (room temperature)
- 1 tsp vanilla extract
- 1/2 cup all-purpose flour
- 1/4 tsp salt
For the Cookie Layer
- 1/2 cup unsalted butter (softened)
- 1/4 cup granulated sugar
- 1/4 cup brown sugar (packed)
- 1 large egg
- 1 tsp vanilla extract
- 1 1/2 cups all-purpose flour
- 1/2 tsp baking soda
- 1 cup semi-sweet chocolate chips
Instructions
- Preheat the oven to 350°F (175°C). Line an 8×8-inch square baking pan with parchment paper or grease it lightly.
- Prepare the Brownie Layer:
- In a saucepan or microwave, melt the butter and cocoa powder together, stirring until smooth.
- In a large bowl, whisk together the granulated sugar, brown sugar, and eggs. Add the vanilla extract and melted chocolate mixture.
- Sift the flour and salt together, then fold into the wet ingredients until just combined. Set aside.
- Prepare the Cookie Dough:
- In a medium bowl, beat the softened butter, granulated sugar, and brown sugar together until light and fluffy.
- Add the egg and vanilla extract, mixing until smooth.
- In a separate bowl, whisk together the flour and baking soda, then fold into the wet ingredients. Stir in the chocolate chips.
- Assemble the Browkies:
- Pour the brownie batter into the prepared pan, spreading it evenly.
- Drop spoonfuls of cookie dough on top of the brownie batter, and gently spread it out. Don’t worry if it’s not perfectly even—some brownie batter will show through.
- Optionally, use a knife to swirl the two batters together for a marbled effect.
- Bake the Browkies:
- Bake for 30-35 minutes, or until a toothpick inserted into the center comes out with a few moist crumbs (not wet batter).
- Allow the browkies to cool in the pan for at least 15 minutes before cutting them into squares.
Notes
- For a marbled look, swirl the brownie and cookie layers together with a knife before baking.
- Adjust the baking time depending on your oven and pan size. Start checking for doneness at the 30-minute mark.
- Browkies store well at room temperature for up to 3-4 days, or refrigerate them for up to a week. They also freeze well for up to 3 months.
- Prep Time: 15 minutes
- Cook Time: 30-35 minutes
- Category: Dessert
Nutrition
- Serving Size: Per Serving
- Calories: 295