
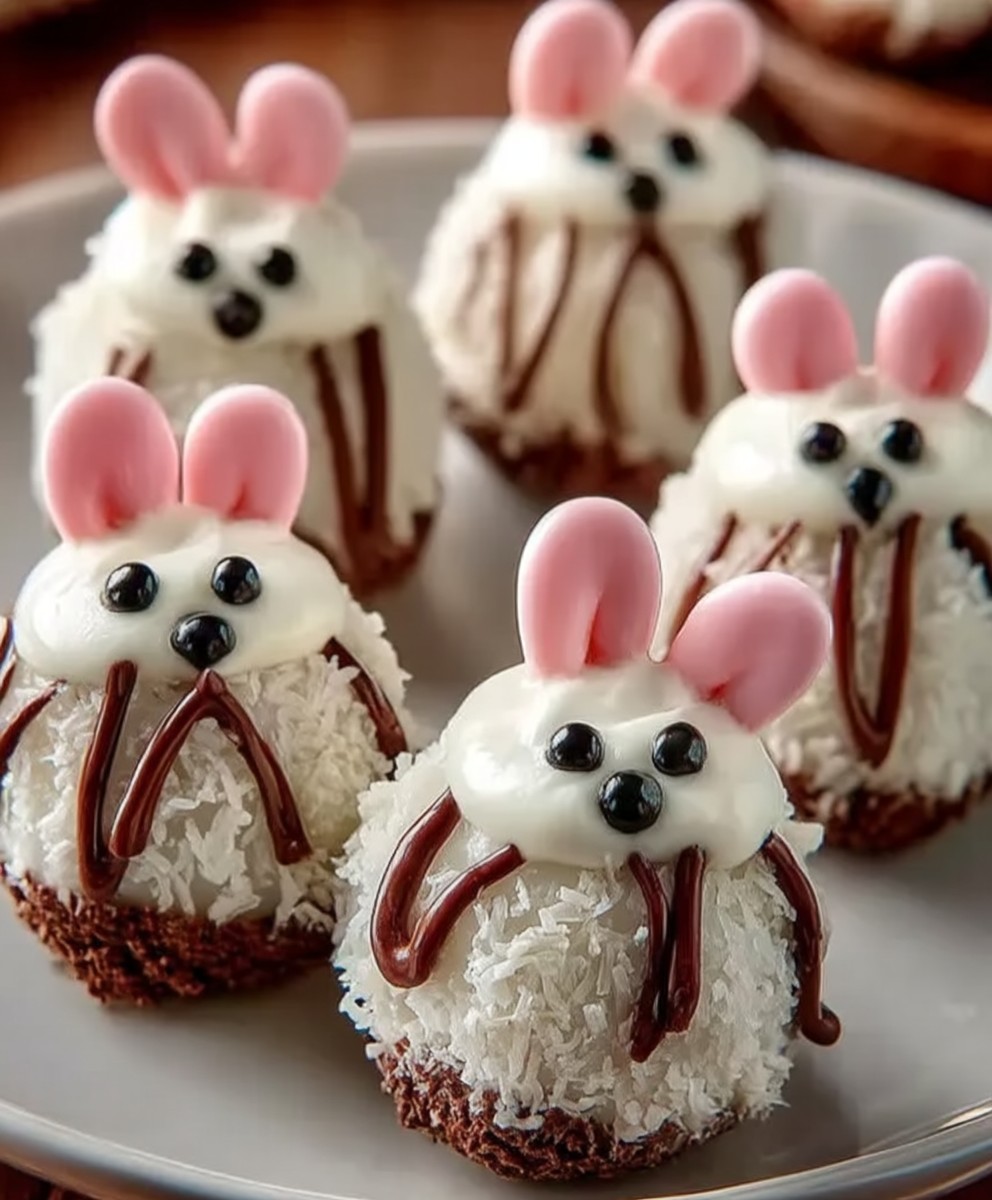
Bunny Butt Oreo Balls: Get ready to hop into Easter with the cutest, most delicious treat imaginable! These adorable, no-bake delights are guaranteed to be the star of your dessert table and a fun activity to make with kids. Imagine sinking your teeth into a creamy, chocolatey Oreo center, perfectly formed into a whimsical bunny bottom, complete with fluffy coconut tails and candy feet. It’s pure Easter magic in every bite!
While the exact origins of Oreo balls are shrouded in delicious mystery, their popularity exploded in the early 2000s, quickly becoming a go-to treat for holidays and gatherings. The beauty of these little spheres of joy lies in their simplicity and versatility. They require minimal baking skills, making them accessible to everyone, and the flavor combinations are endless. But these Bunny Butt Oreo Balls take the classic treat to a whole new level of festive fun!
People adore Oreo balls for their irresistible combination of textures and flavors. The smooth, rich cream cheese perfectly complements the crunchy, chocolatey Oreo cookies. Plus, they’re incredibly convenient to make ahead of time, freeing you up to focus on other holiday preparations. These Bunny Butt Oreo Balls are not only visually appealing but also offer a delightful sensory experience that will have everyone reaching for seconds (and maybe even thirds!). So, let’s get started and create some Easter cheer!

Ingredients:
- 1 package (14.3 ounces) Oreo cookies, finely crushed
- 8 ounces cream cheese, softened
- 1 package (16 ounces) white chocolate melting wafers
- Pink candy melts
- Large marshmallows
- Pink sanding sugar
- Black edible marker
- Toothpicks
Preparing the Oreo Mixture
Okay, let’s get started! First, we need to create the base for our adorable bunny butts. This involves combining the crushed Oreos with softened cream cheese. Trust me, this is the most important step for achieving that perfect, melt-in-your-mouth texture.
- Crush the Oreos: The key here is to get the Oreos as finely crushed as possible. You can use a food processor for this, pulsing until they’re a fine crumb. If you don’t have a food processor, no worries! Just place the Oreos in a large zip-top bag, seal it tightly, and use a rolling pin to crush them. Make sure to get all those big chunks out! We want a smooth mixture.
- Soften the Cream Cheese: This is crucial! Make sure your cream cheese is properly softened. Take it out of the refrigerator at least an hour before you plan to start. If you’re short on time, you can microwave it in 15-second intervals, checking and stirring each time, until it’s soft but not melted. Lumpy cream cheese will make it difficult to get a smooth, even mixture.
- Combine Oreos and Cream Cheese: In a large bowl, combine the crushed Oreos and softened cream cheese. Use a sturdy spoon or your hands (my personal favorite!) to mix them together thoroughly. You want to make sure the cream cheese is evenly distributed throughout the Oreo crumbs. The mixture should be moist and hold its shape when you squeeze it. If it’s too dry, add a tablespoon of cream cheese at a time until it reaches the right consistency. If it’s too wet, add a few more crushed Oreos.
Forming the Bunny Butts
Now comes the fun part shaping our bunny butts! This is where your creativity can really shine. Don’t worry about being perfect; each bunny butt will be unique and adorable in its own way.
- Roll into Balls: Take about a tablespoon of the Oreo mixture and roll it into a ball. Aim for a size that’s slightly smaller than a golf ball. Place the rolled balls on a baking sheet lined with parchment paper or wax paper. This will prevent them from sticking.
- Shape into Ovals: Gently flatten each ball slightly and shape it into an oval. This will give you that classic bunny butt shape. Don’t press too hard, or they’ll become too flat.
- Chill the Oreo Balls: Place the baking sheet with the Oreo balls in the freezer for at least 30 minutes. This will help them firm up and make them easier to dip in the melted chocolate. Trust me, this step is essential! Trying to dip soft Oreo balls is a recipe for disaster.
Melting the White Chocolate
Melting the white chocolate can be a bit tricky, but don’t worry, I’ll walk you through it. The key is to melt it slowly and gently to prevent it from seizing up or burning.
- Prepare the Melting Wafers: Place the white chocolate melting wafers in a microwave-safe bowl.
- Microwave in Intervals: Microwave the wafers in 30-second intervals, stirring well after each interval. Continue microwaving and stirring until the chocolate is completely melted and smooth. Be careful not to overheat the chocolate, as it can burn easily. If you prefer, you can melt the chocolate in a double boiler over low heat, stirring constantly until melted.
- Maintain the Chocolate’s Consistency: If the melted chocolate is too thick, you can add a teaspoon of vegetable shortening or coconut oil to thin it out. Stir until smooth.
Dipping and Decorating the Bunny Butts
This is where the magic happens! Get ready to transform those chilled Oreo ovals into adorable bunny butts. We’ll be dipping them in white chocolate and adding all the cute details.
- Dip the Oreo Balls: Remove the Oreo balls from the freezer. One at a time, dip each ball into the melted white chocolate, making sure it’s completely coated. You can use a fork or dipping tools to help with this. Gently tap off any excess chocolate.
- Place on Parchment Paper: Place the dipped Oreo balls back on the parchment-lined baking sheet.
- Add Marshmallow Tails: While the white chocolate is still wet, attach a large marshmallow to the top of each Oreo ball to create the bunny tail. Gently press the marshmallow into the chocolate so it adheres securely.
- Prepare the Pink Candy Melts: Melt the pink candy melts according to the package directions. You can use the same method as you did for the white chocolate.
- Attach Pink Feet: Dip the bottom of each marshmallow into the melted pink candy melts and then immediately dip it into the pink sanding sugar. This will create the cute little bunny feet.
- Draw Paw Prints: Use the black edible marker to draw paw prints on the bottom of the pink feet. Get creative with your paw print designs!
- Chill to Set: Place the baking sheet back in the refrigerator for about 15-20 minutes, or until the white chocolate and pink candy melts are completely set.
Adding the Final Touches
Almost there! Now for those final details that will really make your bunny butts stand out. We’ll be using toothpicks to secure the feet and adding any other embellishments you desire.
- Secure the Feet (Optional): If you find that the marshmallow feet are not staying securely attached, you can use a toothpick to secure them. Insert the toothpick through the marshmallow and into the Oreo ball. Be careful not to poke yourself!
- Add Additional Decorations (Optional): Get creative with your decorations! You can add sprinkles, edible glitter, or even small candy flowers to make your bunny butts even more festive.
And there you have it! Adorable Bunny Butt Oreo Balls that are sure to be a hit at any party or gathering. Enjoy!
Conclusion:
So there you have it! These Bunny Butt Oreo Balls are more than just a cute treat; they’re a guaranteed crowd-pleaser, a conversation starter, and a delicious way to celebrate spring (or any time you need a little bit of whimsy!). I truly believe this recipe is a must-try for anyone looking for an easy, no-bake dessert that’s both adorable and incredibly tasty. The combination of the rich, chocolatey Oreo filling and the sweet, creamy coating is simply irresistible, and the little bunny feet add that extra touch of charm that makes them perfect for Easter gatherings, kids’ parties, or even just a fun weekend baking project.
But the best part? This recipe is incredibly versatile! Feel free to experiment with different variations to make it your own. For a richer, more decadent flavor, try using double-stuffed Oreos. Or, if you’re feeling adventurous, you could even use a different flavor of Oreo altogether think golden Oreos for a vanilla twist, or mint Oreos for a refreshing springtime treat. You could also swap out the white chocolate for milk chocolate or dark chocolate, depending on your preference. And don’t be afraid to get creative with the decorations! Instead of pink candy melts for the feet, you could use different colors to match your party theme, or even add a little bit of edible glitter for some extra sparkle.
As for serving suggestions, these Bunny Butt Oreo Balls are perfect on their own as a sweet treat, but they also pair well with other desserts. Try serving them alongside a platter of fresh fruit, a scoop of vanilla ice cream, or a slice of carrot cake for a truly decadent dessert spread. They also make a wonderful addition to Easter baskets or party favors. And if you’re looking for a fun activity to do with kids, these Oreo balls are a great option! They’ll love helping you crush the Oreos, roll the balls, and decorate the bunny feet.
I’ve poured my heart into perfecting this recipe, and I’m confident that you’ll love it as much as I do. It’s simple enough for even beginner bakers to master, yet impressive enough to wow your guests. The key is to have fun with it and don’t be afraid to get a little messy! Remember to chill the Oreo balls thoroughly before dipping them in the melted chocolate this will help them hold their shape and prevent the chocolate from melting too quickly. And most importantly, don’t forget to add those adorable bunny feet! They’re what make these Oreo balls so special.
So, what are you waiting for? Gather your ingredients, put on your apron, and get ready to create some seriously cute and delicious Bunny Butt Oreo Balls! I’m so excited for you to try this recipe and experience the joy of sharing these adorable treats with your loved ones. Once you’ve made them, I’d absolutely love to hear about your experience! Did you make any variations? Did your family and friends enjoy them? Please share your photos and stories in the comments below. I can’t wait to see your creations and hear all about your baking adventures. Happy baking!
Bunny Butt Oreo Balls: A Deliciously Cute Easter Treat
Oreo balls shaped like bunny butts, perfect for Easter or spring!
Ingredients
- 1 package (14.3 ounces) Oreo cookies, finely crushed
- 8 ounces cream cheese, softened
- 1 package (16 ounces) white chocolate melting wafers
- Pink candy melts
- Large marshmallows
- Pink sanding sugar
- Black edible marker
- Toothpicks (optional)
Instructions
- Crush the Oreos: Crush the Oreos as finely as possible using a food processor or by placing them in a zip-top bag and crushing with a rolling pin.
- Soften the Cream Cheese: Ensure the cream cheese is properly softened by leaving it out at room temperature for at least an hour or microwaving in 15-second intervals until soft.
- Combine Oreos and Cream Cheese: In a large bowl, combine the crushed Oreos and softened cream cheese. Mix thoroughly until the cream cheese is evenly distributed. The mixture should be moist and hold its shape. If too dry, add cream cheese; if too wet, add crushed Oreos.
- Roll into Balls: Take about a tablespoon of the Oreo mixture and roll it into a ball. Aim for a size that’s slightly smaller than a golf ball. Place the rolled balls on a baking sheet lined with parchment paper or wax paper.
- Shape into Ovals: Gently flatten each ball slightly and shape it into an oval.
- Chill the Oreo Balls: Place the baking sheet with the Oreo balls in the freezer for at least 30 minutes.
- Prepare the Melting Wafers: Place the white chocolate melting wafers in a microwave-safe bowl.
- Microwave in Intervals: Microwave the wafers in 30-second intervals, stirring well after each interval. Continue microwaving and stirring until the chocolate is completely melted and smooth.
- Maintain the Chocolate’s Consistency: If the melted chocolate is too thick, you can add a teaspoon of vegetable shortening or coconut oil to thin it out. Stir until smooth.
- Dip the Oreo Balls: Remove the Oreo balls from the freezer. One at a time, dip each ball into the melted white chocolate, making sure it’s completely coated. You can use a fork or dipping tools to help with this. Gently tap off any excess chocolate.
- Place on Parchment Paper: Place the dipped Oreo balls back on the parchment-lined baking sheet.
- Add Marshmallow Tails: While the white chocolate is still wet, attach a large marshmallow to the top of each Oreo ball to create the bunny tail. Gently press the marshmallow into the chocolate so it adheres securely.
- Prepare the Pink Candy Melts: Melt the pink candy melts according to the package directions. You can use the same method as you did for the white chocolate.
- Attach Pink Feet: Dip the bottom of each marshmallow into the melted pink candy melts and then immediately dip it into the pink sanding sugar.
- Draw Paw Prints: Use the black edible marker to draw paw prints on the bottom of the pink feet.
- Chill to Set: Place the baking sheet back in the refrigerator for about 15-20 minutes, or until the white chocolate and pink candy melts are completely set.
- Secure the Feet (Optional): If you find that the marshmallow feet are not staying securely attached, you can use a toothpick to secure them. Insert the toothpick through the marshmallow and into the Oreo ball.
- Add Additional Decorations (Optional): Get creative with your decorations! You can add sprinkles, edible glitter, or even small candy flowers to make your bunny butts even more festive.
Notes
- Make sure cream cheese is fully softened for a smooth mixture.
- Chilling the Oreo balls before dipping is essential for easier handling.
- Melt white chocolate slowly and gently to prevent burning.
- Use toothpicks to secure marshmallow feet if needed.