
Butternut Squash Instant Pot: Craving a creamy, comforting side dish that’s both healthy and incredibly easy to make? Look no further! Imagine tender, perfectly cooked butternut squash melting in your mouth, infused with subtle sweetness and a hint of warmth. This isn’t just a recipe; it’s a culinary shortcut to autumn flavors, ready in a fraction of the time thanks to the magic of the Instant Pot.
Butternut squash has been a staple in indigenous diets for centuries, a testament to its nutritional value and versatility. From soups and stews to roasted sides and even desserts, this vibrant orange vegetable has graced tables around the world. But let’s be honest, peeling and cubing a butternut squash can be a bit of a workout! That’s where the Instant Pot comes to the rescue.
People adore butternut squash for its naturally sweet and nutty flavor, its smooth and creamy texture when cooked, and its impressive nutritional profile. It’s packed with vitamins, minerals, and antioxidants, making it a guilt-free indulgence. And with this Butternut Squash Instant Pot recipe, you can enjoy all those benefits without spending hours in the kitchen. The Instant Pot ensures that the squash cooks evenly and quickly, retaining its vibrant color and delicious flavor. Get ready to experience butternut squash like never before fast, flavorful, and fuss-free!

Ingredients:
- 1 medium butternut squash (about 2-3 pounds)
- 1 cup vegetable broth (or chicken broth)
- 1 tablespoon olive oil
- 1 small onion, chopped
- 2 cloves garlic, minced
- 1 teaspoon dried sage
- 1/2 teaspoon dried thyme
- 1/4 teaspoon ground nutmeg
- Salt and pepper to taste
- Optional toppings: toasted pumpkin seeds, chopped parsley, a swirl of cream or coconut milk
Preparing the Butternut Squash:
Okay, let’s get started! The first thing we need to do is tackle that butternut squash. Now, I know peeling and cutting a butternut squash can seem daunting, but don’t worry, I’ll walk you through it. There are a couple of ways to approach this, depending on your preference and how sharp your knife is.
- Softening the Squash (Optional but Recommended): If your squash is particularly hard, you can microwave it for a few minutes to soften the skin. Puncture the squash several times with a fork (this is important to prevent explosions!). Microwave on high for 3-5 minutes, depending on the size of the squash. This will make it much easier to cut. Be careful when handling it after microwaving, as it will be hot!
- Cutting the Squash: Place the squash on a stable cutting board. Using a large, sharp knife, carefully cut off both the stem and the blossom end. This will give you a flat surface to work with.
- Peeling the Squash: Now, for the peeling. You can use a vegetable peeler, but I find it easier to use the knife. Stand the squash upright on one of the flat ends. Carefully slice off the skin from top to bottom, following the curve of the squash. Work your way around until all the skin is removed. Don’t worry if you take off a little bit of the flesh it’s better to be safe than to leave bits of skin behind.
- Seeding and Cubing: Once the squash is peeled, cut it in half lengthwise. Use a spoon to scoop out the seeds and stringy pulp. Discard the seeds (or save them for roasting later!). Now, cut each half into 1-inch cubes. Try to keep the cubes relatively uniform in size so they cook evenly.
Sautéing the Aromatics:
While the Instant Pot is great for pressure cooking, sautéing the aromatics beforehand really deepens the flavor of the dish. This step is optional, but I highly recommend it!
- Heat the Oil: Turn on your Instant Pot and select the “Sauté” function. Add the olive oil to the pot.
- Sauté the Onion: Once the oil is heated, add the chopped onion and cook for about 3-5 minutes, or until softened and translucent. Stir occasionally to prevent burning.
- Add the Garlic: Add the minced garlic and cook for another minute, or until fragrant. Be careful not to burn the garlic, as it can become bitter.
- Turn off Sauté Function: Press “Cancel” to turn off the “Sauté” function.
Pressure Cooking the Butternut Squash:
Now for the magic! This is where the Instant Pot really shines. Pressure cooking the squash makes it incredibly tender and flavorful in a fraction of the time it would take to roast it.
- Add the Squash and Broth: Add the cubed butternut squash, vegetable broth (or chicken broth), dried sage, dried thyme, and ground nutmeg to the Instant Pot. Season with salt and pepper to taste.
- Secure the Lid: Close the Instant Pot lid and make sure the pressure release valve is set to the “Sealing” position.
- Pressure Cook: Select the “Manual” or “Pressure Cook” function and set the cooking time to 8 minutes.
- Natural Pressure Release: Once the cooking time is up, let the pressure release naturally for 10 minutes. This means you don’t touch the pressure release valve and let the pressure dissipate on its own. After 10 minutes, carefully release any remaining pressure by moving the pressure release valve to the “Venting” position. Be careful of the steam!
- Open the Lid: Once all the pressure is released, carefully open the Instant Pot lid.
Pureeing the Squash:
At this point, the butternut squash should be incredibly tender and easily mashed. You have a few options for pureeing it, depending on your desired consistency.
- Using an Immersion Blender: This is my preferred method because it’s quick and easy. Simply insert an immersion blender into the Instant Pot and blend until smooth. Be careful not to splash the hot squash!
- Using a Regular Blender: If you don’t have an immersion blender, you can use a regular blender. Carefully transfer the cooked squash and some of the cooking liquid to the blender. Blend until smooth. You may need to do this in batches to avoid overfilling the blender. Be very careful when blending hot liquids, as they can create pressure and cause the lid to pop off. Start on a low speed and gradually increase to high.
- Using a Food Processor: A food processor can also be used to puree the squash. Follow the same instructions as for a regular blender, working in batches if necessary.
- Mashing by Hand: For a chunkier texture, you can simply mash the squash with a potato masher. This will leave some pieces of squash intact, which can be nice if you prefer a less smooth puree.
Adjusting the Consistency and Seasoning:
Now that the squash is pureed, it’s time to adjust the consistency and seasoning to your liking.
- Adjusting the Consistency: If the puree is too thick, add a little more vegetable broth (or water) until it reaches your desired consistency. If it’s too thin, you can simmer it on the “Sauté” function for a few minutes to allow some of the liquid to evaporate.
- Adjusting the Seasoning: Taste the puree and adjust the seasoning as needed. You may want to add more salt, pepper, sage, thyme, or nutmeg. A pinch of brown sugar or maple syrup can also add a touch of sweetness.
Serving Suggestions:
This Instant Pot butternut squash puree is incredibly versatile and can be used in a variety of ways. Here are a few of my favorite serving suggestions:
- As a Side Dish: Serve it as a simple and healthy side dish alongside roasted chicken, pork, or fish.
- As a Soup: Add more vegetable broth to create a creamy butternut squash soup. You can also add a swirl of cream or coconut milk for extra richness.
- As a Pasta Sauce: Toss it with cooked pasta for a delicious and easy vegetarian meal. Add some sautéed spinach or kale for extra nutrients.
- As a Filling: Use it as a filling for ravioli, lasagna, or stuffed shells.
- As a Base for Dips: Blend it with cream cheese, sour cream, or yogurt to create a flavorful dip for vegetables or crackers.
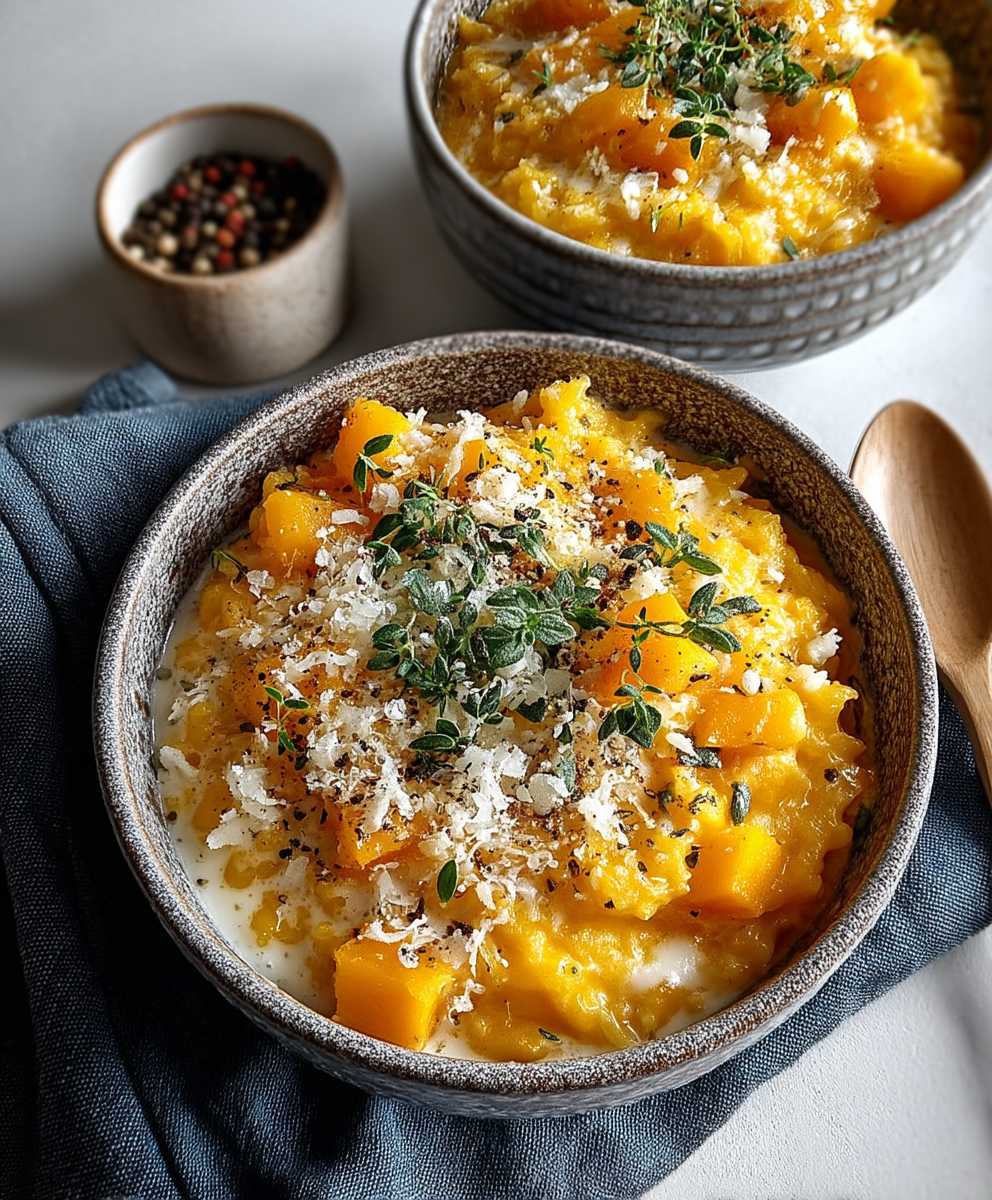
- Toppings: Don’t forget the toppings! Toasted pumpkin seeds, chopped parsley, a swirl of cream or coconut milk, a sprinkle of chili flakes, or a drizzle of olive oil can all add extra flavor and visual appeal.
Enjoy your delicious and easy Instant Pot butternut squash puree! I hope you love it as much as I do.
Conclusion:
So, there you have it! This Instant Pot Butternut Squash recipe is truly a game-changer, and I wholeheartedly believe it deserves a spot in your regular meal rotation. Why? Because it delivers perfectly cooked, tender butternut squash in a fraction of the time compared to traditional roasting or baking. We’re talking about saving precious minutes (and energy!) without sacrificing any of that delicious, naturally sweet flavor. It’s a win-win!
But more than just speed, this method unlocks a creamy, almost melt-in-your-mouth texture that’s simply divine. Forget about wrestling with a hard squash and spending ages waiting for it to soften. The Instant Pot transforms this sometimes-intimidating vegetable into a culinary dream. And let’s be honest, who doesn’t love a little kitchen magic?
This recipe is a must-try because it’s quick, easy, and yields incredibly flavorful and perfectly cooked butternut squash every single time. Plus, it’s incredibly versatile!
Now, let’s talk about serving suggestions. The possibilities are truly endless! For a simple and satisfying side dish, toss the cooked squash with a little butter, salt, pepper, and a sprinkle of fresh sage or thyme. It’s the perfect accompaniment to roasted chicken, pork chops, or even a hearty vegetarian lentil loaf.
But don’t stop there! This Instant Pot Butternut Squash is also fantastic mashed with a touch of maple syrup and cinnamon for a cozy autumn treat. Or, puree it into a creamy and comforting soup just add some vegetable broth, a splash of cream (or coconut milk for a vegan option), and your favorite spices. You can even use it as a filling for ravioli or as a base for a delicious butternut squash risotto.
Feeling adventurous? Try roasting the cooked squash with a drizzle of olive oil and some chili flakes for a spicy kick. Or, add it to your favorite fall salad with some cranberries, pecans, and goat cheese. The sweetness of the squash pairs beautifully with savory and tangy flavors.
And for those with little ones, this recipe is a lifesaver! The soft texture makes it perfect for baby food or as a healthy and delicious addition to toddler meals. You can even sneak it into smoothies for an extra boost of vitamins and nutrients.
Variations are also encouraged! Feel free to experiment with different spices and herbs to customize the flavor to your liking. A pinch of nutmeg, a dash of ginger, or a sprinkle of smoked paprika can all add a unique twist. You can also add other vegetables to the Instant Pot along with the squash, such as apples, carrots, or sweet potatoes, for a more complex flavor profile.
I truly believe that once you try this Instant Pot Butternut Squash recipe, you’ll be hooked. It’s a simple, healthy, and delicious way to enjoy this seasonal favorite all year round.
So, what are you waiting for? Dust off your Instant Pot, grab a butternut squash, and get cooking! I’m confident that you’ll love the results. And more importantly, I’d love to hear about your experience! Please, share your photos, tips, and variations in the comments below. Let’s create a community of butternut squash enthusiasts! Happy cooking!
Butternut Squash Instant Pot: Easy Recipe & Cooking Guide
Creamy, flavorful Instant Pot butternut squash puree. Versatile as a side, soup base, pasta sauce, or filling.
Ingredients
- 1 medium butternut squash (about 2-3 pounds)
- 1 cup vegetable broth (or chicken broth)
- 1 tablespoon olive oil
- 1 small onion, chopped
- 2 cloves garlic, minced
- 1 teaspoon dried sage
- 1/2 teaspoon dried thyme
- 1/4 teaspoon ground nutmeg
- Salt and pepper to taste
- Optional toppings: toasted pumpkin seeds, chopped parsley, a swirl of cream or coconut milk
Instructions
- Prepare the Butternut Squash:
- (Optional) Soften the squash by microwaving it for 3-5 minutes after puncturing it several times with a fork.
- Cut off the stem and blossom end of the squash.
- Peel the squash using a vegetable peeler or a knife.
- Cut the squash in half lengthwise and scoop out the seeds and pulp.
- Cut each half into 1-inch cubes.
- Sauté the Aromatics (Optional but Recommended):
- Turn on the Instant Pot and select the “Sauté” function. Add the olive oil.
- Add the chopped onion and cook for 3-5 minutes, until softened and translucent.
- Add the minced garlic and cook for another minute, until fragrant.
- Press “Cancel” to turn off the “Sauté” function.
- Pressure Cook the Butternut Squash:
- Add the cubed butternut squash, vegetable broth, dried sage, dried thyme, and ground nutmeg to the Instant Pot. Season with salt and pepper to taste.
- Close the Instant Pot lid and set the pressure release valve to the “Sealing” position.
- Select the “Manual” or “Pressure Cook” function and set the cooking time to 8 minutes.
- Let the pressure release naturally for 10 minutes, then carefully release any remaining pressure.
- Open the Instant Pot lid.
- Puree the Squash:
- Using an immersion blender, blend the squash until smooth.
- Alternatively, transfer the squash to a regular blender or food processor and blend until smooth (in batches if necessary).
- For a chunkier texture, mash the squash with a potato masher.
- Adjust Consistency and Seasoning:
- If the puree is too thick, add more broth or water. If it’s too thin, simmer on “Sauté” to evaporate some liquid.
- Taste and adjust seasoning as needed. Add more salt, pepper, sage, thyme, nutmeg, or a pinch of brown sugar/maple syrup.
- Serve:
- Serve as a side dish, soup base, pasta sauce, or filling.
- Top with toasted pumpkin seeds, chopped parsley, a swirl of cream or coconut milk, chili flakes, or a drizzle of olive oil.
Notes
- Softening the squash in the microwave before cutting makes it easier to handle.
- Sautéing the onion and garlic before pressure cooking enhances the flavor.
- Natural pressure release helps prevent the squash from becoming watery.
- Be careful when blending hot liquids to avoid splattering.
- Adjust the consistency and seasoning to your personal preference.