
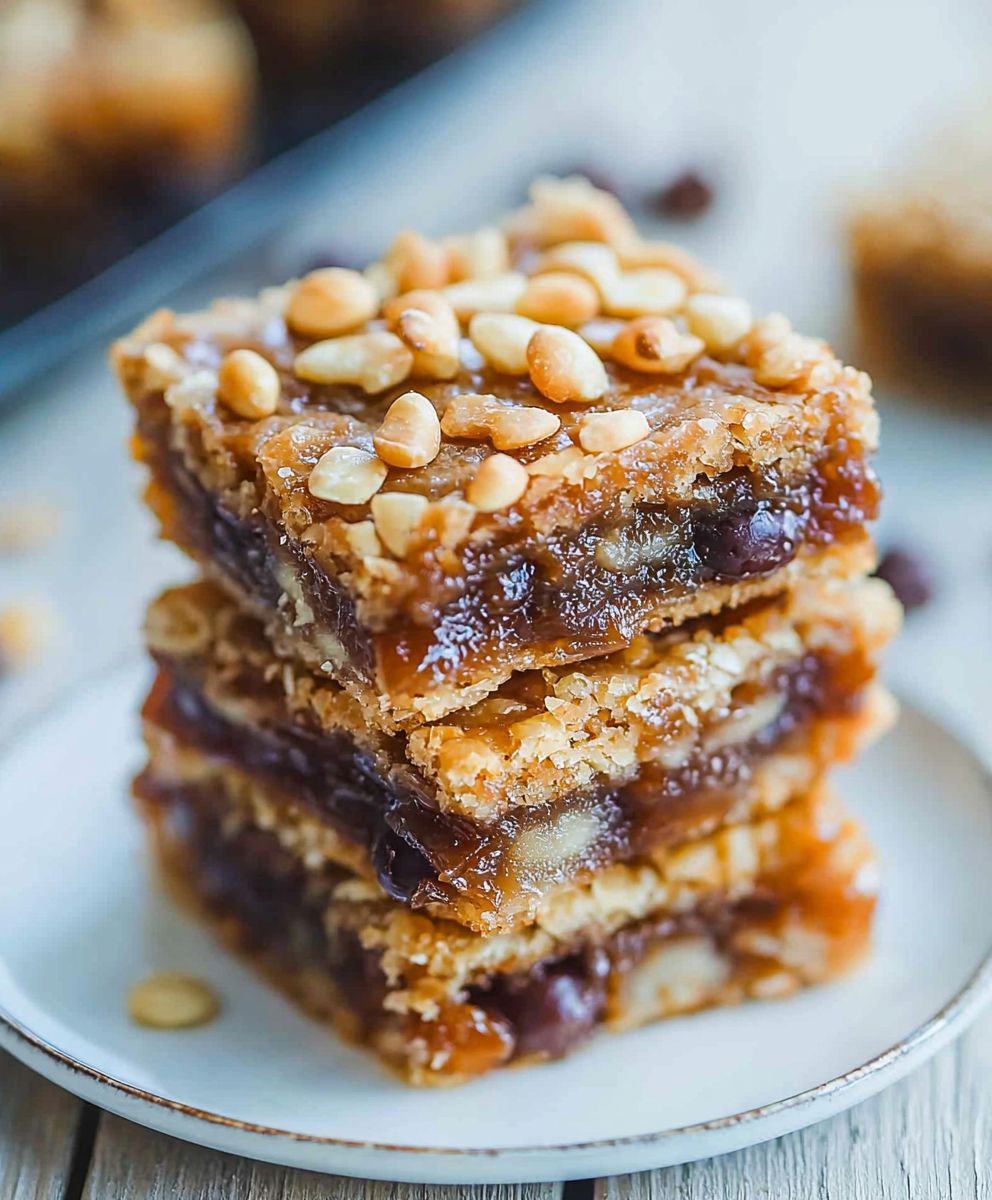
Carmelitas bars: just the name conjures up images of gooey caramel, rich chocolate, and a satisfyingly crumbly oat topping. Have you ever bitten into a dessert that just feels like a warm hug? That’s exactly the experience you get with these delightful treats. I remember the first time I tasted a Carmelita; it was at a school bake sale, and one bite transported me to dessert heaven.
While the exact origins of Carmelitas bars are a bit of a mystery, they’ve become a beloved staple in potlucks, bake sales, and family gatherings across America. Their popularity likely stems from their incredible flavor profile and relatively easy preparation. The combination of chewy caramel, decadent chocolate, and the slightly nutty, oaty base is simply irresistible.
What makes these bars so special? It’s the perfect balance of textures and flavors. The soft, yielding caramel contrasts beautifully with the slightly crisp oat topping and the smooth, melting chocolate. Plus, they’re incredibly convenient to make ahead of time, making them ideal for parties or when you just need a sweet treat ready to go. Get ready to bake up a batch of these crowd-pleasing bars you won’t regret it!

Ingredients:
- For the Crust:
- 1 cup (2 sticks) unsalted butter, softened
- 1 cup packed light brown sugar
- 1 large egg
- 1 teaspoon vanilla extract
- 2 cups all-purpose flour
- 1 teaspoon baking soda
- 1/2 teaspoon salt
- For the Caramel Filling:
- 1 cup (2 sticks) unsalted butter
- 1 cup packed light brown sugar
- 1 cup light corn syrup
- 1 (14 ounce) can sweetened condensed milk
- 1 teaspoon vanilla extract
- 1/2 teaspoon salt
- For the Chocolate Topping:
- 1 1/2 cups semi-sweet chocolate chips
- 1/2 cup chopped pecans or walnuts (optional)
Preparing the Crust:
- Cream the butter and sugar: In a large bowl, cream together the softened butter and brown sugar until light and fluffy. I like to use an electric mixer for this, but you can definitely do it by hand if you’re feeling ambitious! Make sure the butter is properly softened, but not melted, for the best results.
- Add the egg and vanilla: Beat in the egg and vanilla extract until well combined. Scrape down the sides of the bowl to ensure everything is evenly mixed.
- Combine dry ingredients: In a separate bowl, whisk together the flour, baking soda, and salt. This helps to evenly distribute the baking soda and salt throughout the flour, which is important for the texture of the crust.
- Gradually add dry ingredients to wet ingredients: Gradually add the dry ingredients to the wet ingredients, mixing until just combined. Be careful not to overmix, as this can result in a tough crust. I usually add the dry ingredients in two or three additions, mixing on low speed until just incorporated.
- Press half of the dough into the pan: Press half of the dough into the bottom of a greased and lightly floured 9×13 inch baking pan. I find it easiest to use my fingers to press the dough evenly into the pan. You can also use the bottom of a measuring cup to help smooth it out. Make sure the crust is evenly distributed and covers the entire bottom of the pan.
- Bake the crust: Bake the crust in a preheated oven at 350°F (175°C) for 10-12 minutes, or until lightly golden brown. Keep a close eye on it, as it can burn easily. You want it to be set but not overly browned. Remove from the oven and let cool slightly while you prepare the caramel filling.
Making the Caramel Filling:
- Combine butter, sugar, and corn syrup: In a medium saucepan, combine the butter, brown sugar, and corn syrup. Cook over medium heat, stirring constantly, until the butter is melted and the sugar is dissolved.
- Add sweetened condensed milk: Stir in the sweetened condensed milk. Continue to cook, stirring constantly, until the mixture comes to a boil.
- Boil and stir: Reduce the heat to low and simmer, stirring constantly, for 5-7 minutes, or until the caramel is thickened and golden brown. It’s crucial to stir constantly to prevent the caramel from burning or sticking to the bottom of the pan. The caramel should be thick enough to coat the back of a spoon.
- Remove from heat and add vanilla and salt: Remove the caramel from the heat and stir in the vanilla extract and salt. This will enhance the flavor of the caramel and balance the sweetness.
Assembling and Baking the Carmelitas:
- Pour caramel over the crust: Pour the caramel filling evenly over the partially baked crust. Make sure the caramel is spread evenly to ensure every bite is delicious.
- Sprinkle with chocolate chips: Sprinkle the chocolate chips evenly over the caramel filling.
- Crumble remaining dough over the chocolate chips: Crumble the remaining dough evenly over the chocolate chips. I find it easiest to break the dough into small pieces and sprinkle them over the top. Don’t worry about covering every single chocolate chip; a little peek-a-boo is perfectly fine!
- Add nuts (optional): If desired, sprinkle the chopped pecans or walnuts over the top of the crumbled dough. This adds a nice crunch and nutty flavor to the bars.
- Bake the Carmelitas: Bake in the preheated oven at 350°F (175°C) for 20-25 minutes, or until the topping is golden brown and the caramel is bubbly. The topping should be set and the caramel should be bubbling around the edges.
- Cool completely: Remove from the oven and let cool completely in the pan before cutting into bars. This is crucial! If you try to cut them while they’re still warm, the caramel will be too soft and the bars will fall apart. I usually let them cool for at least 2-3 hours, or even overnight, for the best results.
Cutting and Serving:
- Cut into bars: Once the Carmelitas are completely cool, cut them into bars. I like to use a sharp knife and wipe it clean between each cut to prevent the caramel from sticking. You can cut them into any size you like, depending on your preference.
- Serve and enjoy: Serve the Carmelitas and enjoy! They are delicious served at room temperature or slightly chilled. They can be stored in an airtight container at room temperature for up to 3 days, or in the refrigerator for up to a week.
Tips for Perfect Carmelitas:
- Don’t overbake the crust: Overbaking the crust will result in a dry and crumbly base. Keep a close eye on it and remove it from the oven when it’s lightly golden brown.
- Stir the caramel constantly: Stirring the caramel constantly is essential to prevent it from burning or sticking to the bottom of the pan.
- Let the Carmelitas cool completely: Letting the Carmelitas cool completely before cutting them is crucial for preventing them from falling apart.
- Use high-quality ingredients: Using high-quality ingredients will result in the best-tasting Carmelitas. I recommend using real butter, pure vanilla extract, and good-quality chocolate chips.
- Add a pinch of sea salt: A sprinkle of sea salt on top of the baked Carmelitas will enhance the flavor and balance the sweetness.
Variations:
- Add different nuts: Try using different types of nuts, such as almonds, walnuts, or macadamia nuts.
- Use different chocolate: Experiment with different types of chocolate, such as milk chocolate, dark chocolate, or white chocolate.
- Add a layer of peanut butter: Spread a layer of peanut butter over the partially baked crust before adding the caramel filling.
- Add a sprinkle of coconut: Sprinkle shredded coconut over the chocolate chips before baking.
- Make them gluten-free: Use a gluten-free flour blend in place of the all-purpose flour.
Troubleshooting:
- Caramel is too runny: If the caramel is too runny, it may not have been cooked long enough. Continue to cook it over low heat, stirring constantly, until it thickens.
- Crust is too dry: If the crust is too dry, you may have overbaked it. Next time, try baking it for a shorter amount of time.
- Carmelitas are falling apart: If the Carmelitas are falling apart, they may not have cooled completely before cutting. Let them cool completely before cutting them into bars.
I hope you enjoy making these delicious Carmelitas! They are a family favorite and I’m sure they will be a hit with your friends and family too. Happy baking!
Conclusion:
And there you have it! These Carmelitas bars are truly something special, and I wholeheartedly believe they deserve a spot in your regular baking rotation. Why? Because they’re the perfect trifecta of textures and flavors: the chewy oat base, the gooey caramel center, and the decadent chocolate topping all come together in a symphony of deliciousness. They’re not just good; they’re unforgettable.
But beyond the incredible taste, these bars are surprisingly easy to make. Seriously! Don’t let the layers intimidate you. The recipe is straightforward, and even if you’re a baking novice, I’m confident you can pull these off with flying colors. Plus, the aroma that fills your kitchen while they’re baking is worth the effort alone. It’s pure comfort food bliss.
Why are these Carmelitas bars a must-try? Because they’re the ultimate crowd-pleaser. Whether you’re baking for a potluck, a holiday gathering, or simply a cozy night in, these bars are guaranteed to disappear in a flash. They’re also incredibly versatile.
Serving Suggestions and Variations:
* Warm with Ice Cream: Serve them warm with a scoop of vanilla ice cream for an extra indulgent dessert. The contrast of the warm, gooey bar with the cold, creamy ice cream is simply divine.
* Drizzle with Chocolate: For an even richer chocolate experience, drizzle melted dark or milk chocolate over the top after they’ve cooled.
* Add Nuts: Sprinkle chopped pecans or walnuts over the caramel layer before baking for added crunch and nutty flavor.
* Salted Caramel: A sprinkle of flaky sea salt on top of the caramel before baking elevates the flavor profile and adds a delightful salty-sweet contrast.
* Espresso Powder: Add a teaspoon of espresso powder to the oat mixture for a subtle coffee flavor that complements the chocolate and caramel beautifully.
* Different Chocolate Chips: Experiment with different types of chocolate chips, such as semi-sweet, dark chocolate, or even white chocolate, to customize the flavor to your liking.
* Gluten-Free Option: Use gluten-free oat flour and gluten-free all-purpose flour to make these bars gluten-free.
I’ve made these Carmelitas bars countless times, and I’m always amazed at how quickly they disappear. They’re the perfect treat to share with friends and family, or to simply enjoy all by yourself (I won’t judge!).
So, what are you waiting for? Preheat your oven, gather your ingredients, and get ready to experience the magic of these incredible bars. I promise you won’t be disappointed.
And now for the most important part: I want to hear about your experience! Did you try the recipe? Did you make any variations? What did you think? Share your photos and stories in the comments below. I can’t wait to see your creations and hear your feedback. Happy baking! Let me know if you have any questions, and I’ll do my best to help. I’m confident that these Carmelitas bars will become a new favorite in your household, just as they have in mine. Enjoy!
Carmelitas Bars: The Ultimate Guide to This Delicious Treat
Layers of buttery crust, gooey caramel, chocolate chips, and crumbly topping create these decadent Carmelitas. A guaranteed crowd-pleaser!
Ingredients
- 1 cup (2 sticks) unsalted butter, softened
- 1 cup packed light brown sugar
- 1 large egg
- 1 teaspoon vanilla extract
- 2 cups all-purpose flour
- 1 teaspoon baking soda
- 1/2 teaspoon salt
- 1 cup (2 sticks) unsalted butter
- 1 cup packed light brown sugar
- 1 cup light corn syrup
- 1 (14 ounce) can sweetened condensed milk
- 1 teaspoon vanilla extract
- 1/2 teaspoon salt
- 1 1/2 cups semi-sweet chocolate chips
- 1/2 cup chopped pecans or walnuts (optional)
Instructions
- Cream the butter and sugar: In a large bowl, cream together the softened butter and brown sugar until light and fluffy. Use an electric mixer or do it by hand. Ensure the butter is softened, not melted.
- Add the egg and vanilla: Beat in the egg and vanilla extract until well combined. Scrape down the sides of the bowl.
- Combine dry ingredients: In a separate bowl, whisk together the flour, baking soda, and salt.
- Gradually add dry ingredients to wet ingredients: Gradually add the dry ingredients to the wet ingredients, mixing until just combined. Be careful not to overmix.
- Press half of the dough into the pan: Press half of the dough into the bottom of a greased and lightly floured 9×13 inch baking pan. Use your fingers or the bottom of a measuring cup to smooth it out.
- Bake the crust: Bake in a preheated oven at 350°F (175°C) for 10-12 minutes, or until lightly golden brown. Remove from the oven and let cool slightly.
- Combine butter, sugar, and corn syrup: In a medium saucepan, combine the butter, brown sugar, and corn syrup. Cook over medium heat, stirring constantly, until the butter is melted and the sugar is dissolved.
- Add sweetened condensed milk: Stir in the sweetened condensed milk. Continue to cook, stirring constantly, until the mixture comes to a boil.
- Boil and stir: Reduce the heat to low and simmer, stirring constantly, for 5-7 minutes, or until the caramel is thickened and golden brown.
- Remove from heat and add vanilla and salt: Remove the caramel from the heat and stir in the vanilla extract and salt.
- Pour caramel over the crust: Pour the caramel filling evenly over the partially baked crust.
- Sprinkle with chocolate chips: Sprinkle the chocolate chips evenly over the caramel filling.
- Crumble remaining dough over the chocolate chips: Crumble the remaining dough evenly over the chocolate chips.
- Add nuts (optional): If desired, sprinkle the chopped pecans or walnuts over the top of the crumbled dough.
- Bake the Carmelitas: Bake in the preheated oven at 350°F (175°C) for 20-25 minutes, or until the topping is golden brown and the caramel is bubbly.
- Cool completely: Remove from the oven and let cool completely in the pan before cutting into bars.
- Cut into bars: Once the Carmelitas are completely cool, cut them into bars.
- Serve and enjoy: Serve the Carmelitas and enjoy!
Notes
- Don’t overbake the crust.
- Stir the caramel constantly to prevent burning.
- Let the Carmelitas cool completely before cutting.
- Use high-quality ingredients for the best flavor.
- Add a pinch of sea salt on top for enhanced flavor.
- Variations: Try different nuts, chocolate, peanut butter, coconut, or gluten-free flour.
- Troubleshooting:
- If the caramel is too runny, cook it longer.
- If the crust is too dry, bake it for less time.
- If the Carmelitas are falling apart, let them cool completely.