
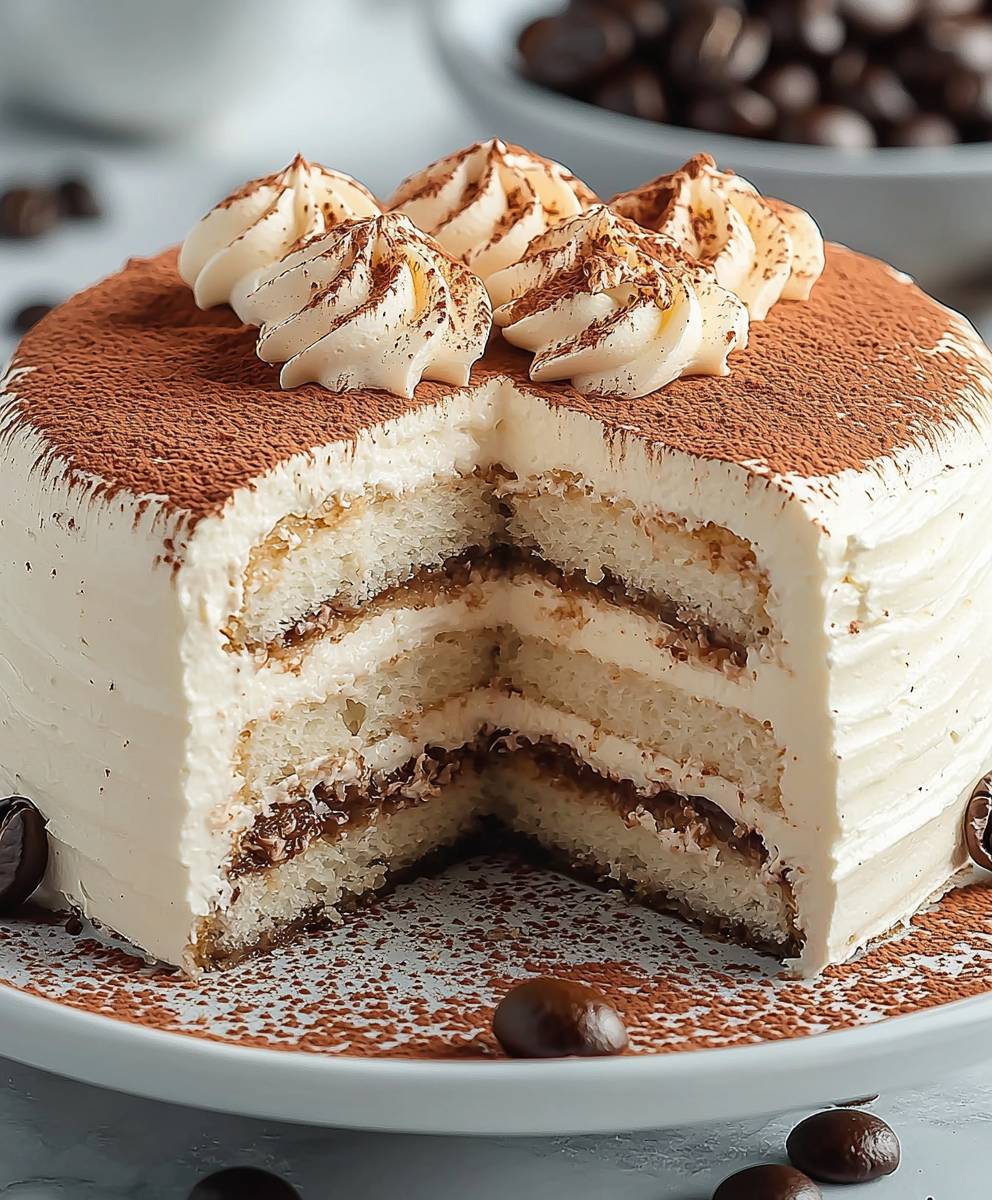
Coffee Tiramisu Cake: Prepare to be transported to dessert heaven! Imagine the rich, creamy indulgence of classic tiramisu, but in the form of a show-stopping cake. This isn’t just a dessert; it’s an experience, a symphony of flavors and textures that will leave your guests begging for more.
Tiramisu, meaning “pick me up” or “cheer me up” in Italian, has a relatively recent history, believed to have originated in the Veneto region of Italy in the latter half of the 20th century. While its exact origins are debated, its popularity is undeniable. The traditional dessert layers coffee-soaked ladyfingers with mascarpone cream and cocoa powder, creating a delightful combination of bitter and sweet. Our Coffee Tiramisu Cake takes this beloved concept and elevates it to a whole new level.
Why do people adore tiramisu? It’s the perfect balance of flavors the bold bitterness of coffee, the smooth sweetness of mascarpone, and the subtle hint of cocoa. The textures are equally captivating, with the soft, sponge-like ladyfingers contrasting beautifully with the creamy filling. This cake captures all of those elements and presents them in a stunning, shareable format. It’s easier to serve than individual tiramisu portions, making it ideal for parties and gatherings. Get ready to impress with this decadent and surprisingly simple recipe!

Ingredients:
- For the Coffee-Soaked Sponge Cake:
- 2 cups all-purpose flour
- 2 teaspoons baking powder
- 1/2 teaspoon baking soda
- 1/4 teaspoon salt
- 1 cup granulated sugar
- 1/2 cup (1 stick) unsalted butter, softened
- 2 large eggs
- 1 teaspoon vanilla extract
- 1 cup strong brewed coffee, cooled
- 1/2 cup buttermilk
- For the Mascarpone Cream:
- 16 ounces (2 cups) mascarpone cheese, softened
- 1 1/2 cups heavy cream, cold
- 3/4 cup powdered sugar
- 1 teaspoon vanilla extract
- 1/4 cup coffee liqueur (such as Kahlua), optional
- For the Coffee Syrup:
- 1 cup strong brewed coffee
- 1/4 cup granulated sugar
- 2 tablespoons coffee liqueur (such as Kahlua), optional
- For Dusting:
- Unsweetened cocoa powder
Preparing the Coffee-Soaked Sponge Cake:
- Preheat and Prep: First things first, let’s get that oven ready! Preheat your oven to 350°F (175°C). Grease and flour two 9-inch round cake pans. I like to use parchment paper rounds at the bottom for extra insurance against sticking.
- Dry Ingredients: In a large bowl, whisk together the flour, baking powder, baking soda, and salt. Make sure everything is evenly distributed. This helps with even rising!
- Cream Butter and Sugar: In a separate bowl (or using a stand mixer), cream together the softened butter and granulated sugar until light and fluffy. This usually takes about 3-5 minutes. Don’t rush this step; it’s crucial for a tender cake.
- Add Eggs and Vanilla: Beat in the eggs one at a time, then stir in the vanilla extract. Make sure each egg is fully incorporated before adding the next.
- Alternate Wet and Dry: Gradually add the dry ingredients to the wet ingredients, alternating with the coffee and buttermilk, beginning and ending with the dry ingredients. So, it’s dry-wet-dry-wet-dry. Mix until just combined. Be careful not to overmix, as this can lead to a tough cake.
- Divide and Bake: Divide the batter evenly between the prepared cake pans. Bake for 25-30 minutes, or until a wooden skewer inserted into the center comes out clean.
- Cool Completely: Let the cakes cool in the pans for 10 minutes before inverting them onto a wire rack to cool completely. This prevents them from sticking and allows them to cool evenly.
Making the Coffee Syrup:
- Combine Ingredients: In a small saucepan, combine the strong brewed coffee and granulated sugar.
- Simmer: Bring the mixture to a simmer over medium heat, stirring until the sugar is dissolved.
- Add Liqueur (Optional): Remove from heat and stir in the coffee liqueur, if using.
- Cool: Let the syrup cool completely before using. This is important so it doesn’t melt the mascarpone cream later.
Preparing the Mascarpone Cream:
- Whip Heavy Cream: In a large bowl (or using a stand mixer), whip the cold heavy cream until stiff peaks form. Be careful not to overwhip, or you’ll end up with butter!
- Combine Mascarpone, Sugar, and Vanilla: In a separate bowl, beat the softened mascarpone cheese, powdered sugar, and vanilla extract until smooth and creamy.
- Add Liqueur (Optional): Stir in the coffee liqueur, if using.
- Fold in Whipped Cream: Gently fold the whipped cream into the mascarpone mixture until just combined. Be careful not to deflate the whipped cream. This keeps the cream light and airy.
Assembling the Coffee Tiramisu Cake:
- Level the Cakes: If the cakes have a dome, use a serrated knife to level them. This will make stacking easier and more visually appealing.
- Soak the First Layer: Place one cake layer on a serving plate or cake stand. Generously brush the top of the cake with half of the cooled coffee syrup. Don’t be shy; you want it nice and soaked!
- Spread Mascarpone Cream: Spread half of the mascarpone cream evenly over the soaked cake layer.
- Soak the Second Layer: Place the second cake layer on top of the cream. Brush the top of this layer with the remaining coffee syrup.
- Frost the Cake: Frost the entire cake with the remaining mascarpone cream. Make it as smooth or rustic as you like!
- Chill: Cover the cake and refrigerate for at least 4 hours, or preferably overnight. This allows the flavors to meld together and the cake to become nice and moist.
- Dust with Cocoa: Just before serving, dust the top of the cake generously with unsweetened cocoa powder. This adds a beautiful finishing touch and a hint of bitterness that complements the sweetness of the cake.
- Serve and Enjoy! Slice and serve your Coffee Tiramisu Cake. It’s best enjoyed cold.
Conclusion:
This Coffee Tiramisu Cake is truly a showstopper, and I wholeheartedly believe it deserves a place in your baking repertoire. It’s not just a cake; it’s an experience, a delightful journey through layers of coffee-soaked ladyfingers, creamy mascarpone, and rich cocoa. The combination of textures and flavors is simply irresistible, making it the perfect dessert for any occasion, from a casual weeknight treat to a sophisticated dinner party. Why is this a must-try? Because it captures the essence of classic tiramisu in a convenient and impressive cake form. You get all the familiar flavors you love, but with a presentation that’s sure to wow your guests. Plus, it’s surprisingly easier to make than you might think! The steps are straightforward, and the result is a cake that tastes like it came straight from a fancy Italian bakery. Trust me, the aroma alone while it’s chilling in the fridge is enough to make your mouth water! But the best part? It’s incredibly versatile! While I’ve shared my favorite version, feel free to get creative with it. For a boozier kick, add a splash of coffee liqueur or rum to the coffee mixture for soaking the ladyfingers. If you’re not a fan of ladyfingers, you could experiment with using slices of sponge cake instead, although I highly recommend sticking with the traditional ladyfingers for that authentic tiramisu texture. Serving suggestions? A simple dusting of cocoa powder is all you need for a classic finish. However, you could also garnish it with chocolate shavings, fresh berries, or even a drizzle of chocolate sauce for an extra touch of indulgence. A scoop of vanilla ice cream or a dollop of whipped cream on the side would also be a fantastic addition. And of course, a cup of strong coffee is the perfect accompaniment to this decadent dessert. For a fun variation, consider making individual Coffee Tiramisu Cake parfaits in glasses. Simply layer the coffee-soaked ladyfingers, mascarpone cream, and cocoa powder in individual serving dishes for an elegant and easy-to-serve treat. This is a great option for parties or when you want to control portion sizes. You could even add a layer of crushed biscotti for extra crunch! Another idea is to experiment with different coffee flavors. Try using a flavored coffee, such as hazelnut or vanilla, to infuse the ladyfingers with a unique twist. Or, for a richer coffee flavor, use espresso instead of regular brewed coffee. The possibilities are endless! I’m so excited for you to try this recipe and experience the magic of this Coffee Tiramisu Cake for yourself. I truly believe it will become a new favorite in your household. Don’t be intimidated by the layers; each step is simple and rewarding. So, what are you waiting for? Grab your ingredients, preheat your oven (well, actually, no oven needed!), and get ready to create a dessert masterpiece. And most importantly, don’t forget to share your creations with me! I’d love to see your photos and hear about your experiences. Tag me on social media and let me know what variations you tried. Happy baking (or rather, chilling!) and enjoy every delicious bite! I can’t wait to hear what you think! Print
Coffee Tiramisu Cake: A Delicious Recipe & Baking Guide
- Total Time: 285 minutes
- Yield: 10–12 servings 1x
Description
Coffee-soaked sponge cake layered with luscious mascarpone cream and dusted with cocoa powder. A decadent tiramisu-inspired cake perfect for coffee lovers.
Ingredients
- 2 cups all-purpose flour
- 2 teaspoons baking powder
- 1/2 teaspoon baking soda
- 1/4 teaspoon salt
- 1 cup granulated sugar
- 1/2 cup (1 stick) unsalted butter, softened
- 2 large eggs
- 1 teaspoon vanilla extract
- 1 cup strong brewed coffee, cooled
- 1/2 cup buttermilk
- 16 ounces (2 cups) mascarpone cheese, softened
- 1 1/2 cups heavy cream, cold
- 3/4 cup powdered sugar
- 1 teaspoon vanilla extract
- 1/4 cup coffee liqueur (such as Kahlua), optional
- 1 cup strong brewed coffee
- 1/4 cup granulated sugar
- 2 tablespoons coffee liqueur (such as Kahlua), optional
- Unsweetened cocoa powder
Instructions
- Preheat your oven to 350°F (175°C). Grease and flour two 9-inch round cake pans. Use parchment paper rounds at the bottom for extra insurance against sticking.
- In a large bowl, whisk together the flour, baking powder, baking soda, and salt.
- In a separate bowl (or using a stand mixer), cream together the softened butter and granulated sugar until light and fluffy (3-5 minutes).
- Beat in the eggs one at a time, then stir in the vanilla extract.
- Gradually add the dry ingredients to the wet ingredients, alternating with the coffee and buttermilk, beginning and ending with the dry ingredients. Mix until just combined. Be careful not to overmix.
- Divide the batter evenly between the prepared cake pans. Bake for 25-30 minutes, or until a wooden skewer inserted into the center comes out clean.
- Let the cakes cool in the pans for 10 minutes before inverting them onto a wire rack to cool completely.
- In a small saucepan, combine the strong brewed coffee and granulated sugar.
- Bring the mixture to a simmer over medium heat, stirring until the sugar is dissolved.
- Remove from heat and stir in the coffee liqueur, if using.
- Let the syrup cool completely before using.
- In a large bowl (or using a stand mixer), whip the cold heavy cream until stiff peaks form.
- In a separate bowl, beat the softened mascarpone cheese, powdered sugar, and vanilla extract until smooth and creamy.
- Stir in the coffee liqueur, if using.
- Gently fold the whipped cream into the mascarpone mixture until just combined.
- If the cakes have a dome, use a serrated knife to level them.
- Place one cake layer on a serving plate or cake stand. Generously brush the top of the cake with half of the cooled coffee syrup.
- Spread half of the mascarpone cream evenly over the soaked cake layer.
- Place the second cake layer on top of the cream. Brush the top of this layer with the remaining coffee syrup.
- Frost the entire cake with the remaining mascarpone cream.
- Cover the cake and refrigerate for at least 4 hours, or preferably overnight.
- Just before serving, dust the top of the cake generously with unsweetened cocoa powder.
- Slice and serve your Coffee Tiramisu Cake. It’s best enjoyed cold.
Notes
- Make sure your butter and mascarpone cheese are softened for easy creaming.
- Don’t overmix the cake batter or overwhip the heavy cream.
- Cool the coffee syrup completely before using to prevent melting the mascarpone cream.
- Chilling the cake for at least 4 hours (or overnight) is crucial for the flavors to meld and the cake to become moist.
- Adjust the amount of coffee liqueur to your preference.
- For a stronger coffee flavor, use espresso instead of brewed coffee.
- Prep Time: 45 minutes
- Cook Time: 30 minutes