Description
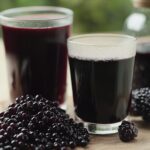
Homemade elderberry syrup, a natural remedy packed with antioxidants, traditionally used to support the immune system and ease cold and flu symptoms.
Ingredients
Scale
- 4 cups fresh elderberries, stemmed (or 2 cups dried elderberries)
- 4 cups water
- 1 cup raw honey (or maple syrup for a vegan option)
- 1 cinnamon stick
- 1 tablespoon fresh ginger, sliced
- ½ teaspoon cloves (whole or ground)
- Optional: ¼ cup brandy or vodka (as a preservative)
Instructions
- Rinse the Elderberries: Carefully rinse the elderberries under cool running water. Remove any remaining stems or unripe berries. It’s important to only use ripe, dark purple elderberries, as unripe berries can cause nausea.
- Combine Ingredients in a Pot: In a large saucepan or pot, combine the rinsed elderberries, water, cinnamon stick, ginger slices, and cloves.
- Bring to a Boil: Place the pot over medium-high heat and bring the mixture to a rolling boil.
- Simmer: Once boiling, reduce the heat to low, cover the pot, and let the mixture simmer for at least 45 minutes to 1 hour. The longer it simmers, the more potent the syrup will be. Stir occasionally to prevent sticking. The berries should become very soft and release their juices.
- Mash the Berries: After simmering, use a potato masher or the back of a spoon to gently mash the elderberries. This will help to extract even more of their beneficial compounds.
- Strain the Mixture: Place a fine-mesh sieve or cheesecloth-lined colander over a large bowl. Carefully pour the elderberry mixture into the sieve, allowing the liquid to drain through. Use a spoon to gently press on the solids to extract as much juice as possible. Discard the solids (berries, cinnamon stick, ginger, and cloves). You can also use a jelly bag for this step, which will result in a clearer syrup.
- Measure the Liquid: Measure the amount of elderberry juice you have. This will help you determine the amount of honey or maple syrup to add.
- Add Sweetener: Return the strained elderberry juice to the saucepan. For every 4 cups of juice, add 1 cup of raw honey (or maple syrup). Adjust the amount of sweetener to your taste preference. Remember that honey also has its own beneficial properties.
- Heat Gently: Place the saucepan over low heat and gently warm the mixture, stirring constantly until the honey or maple syrup is completely dissolved. Do not boil the mixture at this stage, as boiling can destroy some of the beneficial properties of the honey.
- Optional: Add Preservative: If you want to extend the shelf life of your elderberry syrup, you can add ¼ cup of brandy or vodka. Stir it in well. The alcohol acts as a preservative and will help prevent spoilage. This step is optional, especially if you plan to store the syrup in the refrigerator and use it within a few weeks.
- Sterilize Bottles: While the syrup is simmering, sterilize your bottles. You can do this by boiling them in water for 10 minutes, or by running them through a hot cycle in your dishwasher. Make sure the bottles are completely dry before filling them.
- Fill the Bottles: Carefully pour the hot elderberry syrup into the sterilized bottles, leaving about ½ inch of headspace at the top. Use a funnel to prevent spills.
- Seal the Bottles: If you are using canning jars, wipe the rims clean with a damp cloth and place the lids and rings on the jars. Tighten the rings finger-tight. If you are using other types of bottles, make sure they are properly sealed.
- Process for Shelf Stability (Optional): If you want to make the syrup shelf-stable, you can process the filled jars in a boiling water bath for 10 minutes. This will create a vacuum seal and help prevent spoilage. However, this step is not necessary if you plan to store the syrup in the refrigerator.
- Cool and Store: Let the bottles cool completely. If you processed them in a boiling water bath, you should hear a “pop” as the lids seal. Store the sealed bottles in a cool, dark place. Unopened bottles of elderberry syrup can last for up to a year. Once opened, store the syrup in the refrigerator, where it will last for several weeks. If you did not add alcohol, it is especially important to refrigerate the syrup.
Notes
- Important: Raw elderberries are toxic and must be cooked.
- Adjust sweetness to your preference.
- Consult your doctor if pregnant, breastfeeding, have an autoimmune disorder, or are taking medications.
- Use high-quality ingredients, especially raw honey.
- Proper storage is essential to prevent spoilage.
- Dosage: Adults: 1 tablespoon, 2-3 times per day for symptoms. Children (over 1 year): 1 teaspoon, 2-3 times per day for symptoms. Consult a pediatrician for infants under 1 year.
- Preventative Use: Adults: 1 teaspoon per day. Children: ½ teaspoon per day.
- Variations: Spiced, Lemon, Echinacea, Gummies.
- Prep Time: 15 minutes
- Cook Time: 45 minutes