
Homemade Pie Crust: the very foundation of countless delectable desserts! Have you ever bitten into a slice of pie and thought, “This is heaven”? Chances are, the secret wasn’t just the filling, but the perfectly flaky, buttery crust cradling it. For generations, the art of pie-making has been passed down, a cherished tradition connecting us to our grandmothers and their grandmothers before them. From humble beginnings as a simple way to encase savory meats, the pie has evolved into a symbol of comfort, celebration, and, of course, deliciousness.
What is it about a good pie crust that captivates us so? Perhaps it’s the satisfying crunch that gives way to a tender interior, or the way it complements both sweet and savory fillings with equal grace. Maybe it’s the sheer versatility; a homemade pie crust can be transformed into everything from a classic apple pie to a savory quiche. Whatever the reason, mastering the art of pie crust is a skill worth cultivating. It elevates any pie from ordinary to extraordinary. And while store-bought crusts may offer convenience, nothing compares to the taste and texture of a crust made with your own two hands. So, let’s embark on this culinary adventure together, and unlock the secrets to creating the perfect pie crust every time!

Ingredients:
- 2 ½ cups all-purpose flour, plus more for dusting
- 1 teaspoon salt
- 1 cup (2 sticks) unsalted butter, very cold and cut into ½-inch cubes
- ½ cup ice water, plus more if needed
- 1 tablespoon apple cider vinegar (optional, but recommended for flakiness)
Preparing the Dough: The Foundation of Flaky Goodness
Alright, let’s get started on making the best homemade pie crust you’ve ever tasted! The key to a truly flaky crust is keeping everything cold, cold, cold. So, make sure your butter is straight from the fridge and your water is icy.
- Combine Dry Ingredients: In a large bowl, whisk together the flour and salt. This ensures the salt is evenly distributed throughout the dough, which is crucial for flavor. Don’t skip this step!
- Cut in the Butter: Add the cold, cubed butter to the flour mixture. Now, you have a few options here. You can use a pastry blender, which is specifically designed for this task. Press down and twist the blender to cut the butter into the flour until the mixture resembles coarse crumbs. Alternatively, you can use two knives, cutting the butter into the flour with a crisscrossing motion. Or, if you’re feeling adventurous (and have a food processor), you can pulse the butter and flour together until you reach the same coarse crumb consistency. Just be careful not to over-process! You want to see small pieces of butter still visible these are what create those flaky layers. The butter should be no larger than pea-sized.
- Add the Ice Water and Vinegar: Gradually add the ice water, one tablespoon at a time, mixing gently after each addition. If you’re using apple cider vinegar, add it along with the first tablespoon of water. The vinegar helps to tenderize the gluten in the flour, resulting in a more tender and flaky crust. Mix until the dough just begins to come together. Be careful not to overmix! Overmixing develops the gluten, which will make your crust tough. You’re aiming for a shaggy dough that’s still a bit crumbly.
- Form the Dough into Discs: Turn the dough out onto a lightly floured surface. Gently gather the dough together and divide it in half. Form each half into a disc, about 1 inch thick. Wrap each disc tightly in plastic wrap.
- Chill the Dough: Refrigerate the dough for at least 2 hours, or preferably overnight. This allows the gluten to relax and the butter to firm up, making the dough easier to roll out and preventing it from shrinking during baking. Don’t skip this step! It’s essential for a successful pie crust. You can even freeze the dough for later use. Just thaw it in the refrigerator overnight before rolling it out.
Rolling Out the Dough: Patience is Key
Now that your dough has chilled, it’s time to roll it out. This can be a bit tricky, but with a little patience and practice, you’ll get the hang of it. Remember to keep everything cold!
- Prepare Your Work Surface: Lightly flour a clean, flat surface. I like to use a pastry mat with measurements on it, which helps me roll out the dough to the correct size.
- Roll Out the First Disc: Remove one disc of dough from the refrigerator. Let it sit at room temperature for a few minutes to soften slightly, but not too much! If it gets too warm, the butter will melt, and your crust won’t be flaky. Place the dough on the floured surface and lightly flour the top of the dough as well.
- Roll Out the Dough: Using a rolling pin, start rolling from the center of the disc outwards, rotating the dough a quarter turn after each roll. This helps to ensure that the dough is rolled out evenly and doesn’t stick to the surface. Roll the dough into a circle about 12 inches in diameter and about 1/8 inch thick. You should be able to see the surface underneath slightly through the dough.
- Transfer to the Pie Plate: Gently fold the dough in half, then in half again. Carefully lift the folded dough and place it in your pie plate, with the point of the folded dough in the center of the plate. Unfold the dough and gently press it into the bottom and sides of the pie plate.
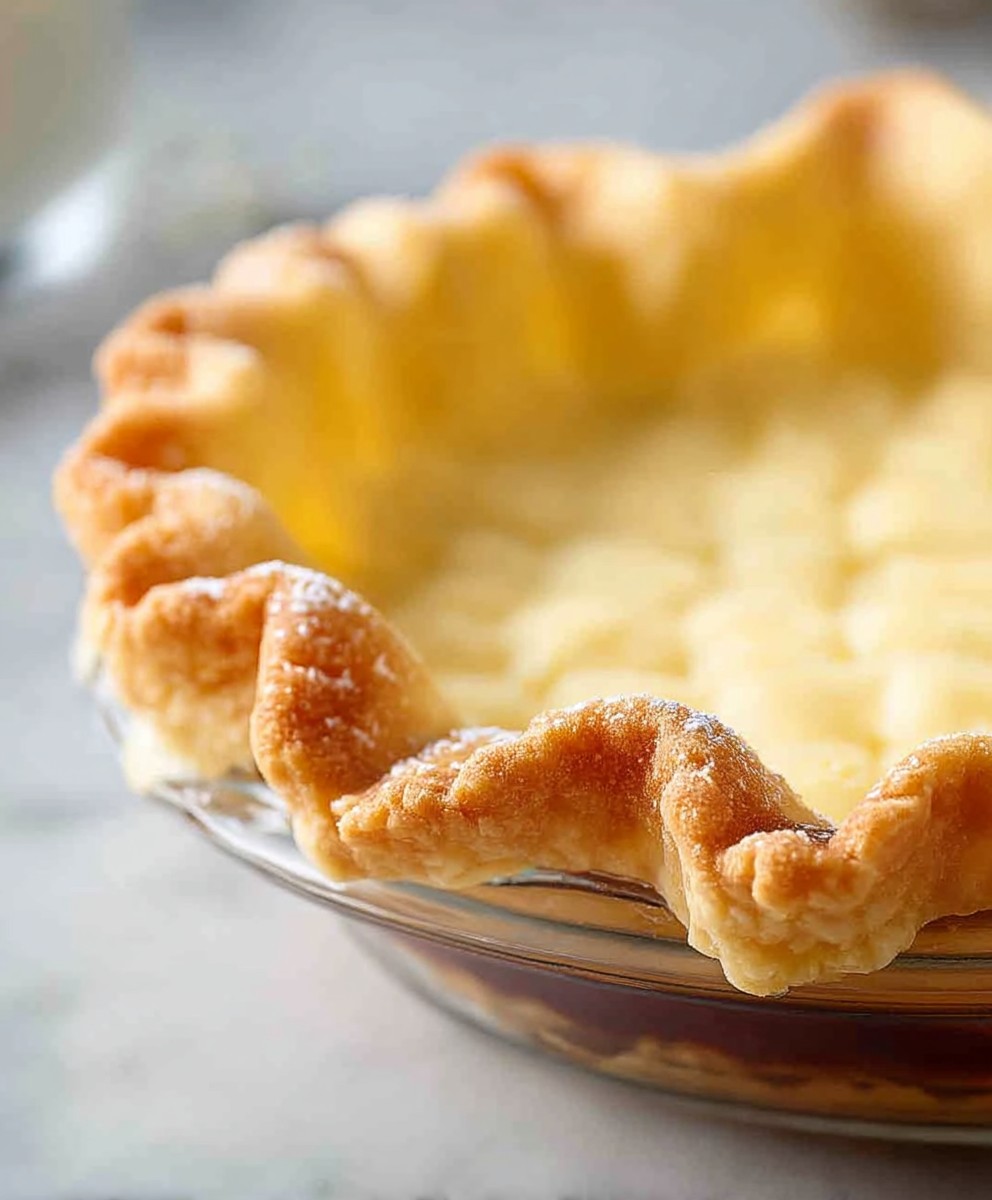
- Trim and Crimp the Edges: Trim the excess dough around the edges of the pie plate, leaving about 1 inch of overhang. Fold the overhang under and crimp the edges using your fingers or a fork. There are many different ways to crimp a pie crust, so feel free to get creative! You can use a fork to press down on the edges, or you can pinch the dough between your fingers to create a decorative pattern.
- Prepare the Second Disc (if needed): If your recipe calls for a top crust, repeat steps 2-5 with the second disc of dough.
Blind Baking (if needed): Pre-Baking for a Perfect Crust
Blind baking is when you pre-bake the pie crust before adding the filling. This is necessary for pies with fillings that don’t require baking, such as cream pies or chocolate pies. It also helps to prevent the crust from becoming soggy when using a wet filling.
- Prepare the Crust: After crimping the edges of the pie crust, prick the bottom of the crust several times with a fork. This will prevent the crust from puffing up during baking.
- Line the Crust: Line the crust with parchment paper or aluminum foil. Make sure the paper or foil covers the entire crust, including the edges.
- Add Pie Weights: Fill the lined crust with pie weights, dried beans, or rice. This will help to weigh down the crust and prevent it from shrinking or puffing up.
- Bake the Crust: Bake the crust in a preheated oven at 375°F (190°C) for 15-20 minutes, or until the edges are lightly golden brown.
- Remove the Pie Weights: Carefully remove the parchment paper or foil and pie weights.
- Continue Baking (if needed): If the bottom of the crust is still pale, return it to the oven and bake for another 5-10 minutes, or until it’s golden brown.
- Cool the Crust: Let the crust cool completely before adding the filling.
Baking with Filling: The Grand Finale
If your pie recipe requires baking the filling along with the crust, follow these steps:
- Prepare the Filling: Prepare your pie filling according to your recipe.
- Pour in the Filling: Pour the filling into the prepared pie crust.
- Top Crust (if using): If you’re using a top crust, place it over the filling. Cut slits in the top crust to allow steam to escape. This will prevent the crust from puffing up and cracking. You can also brush the top crust with an egg wash (1 egg beaten with 1 tablespoon of water) for a golden brown finish.
- Bake the Pie: Bake the pie in a preheated oven according to your recipe. The baking time will vary depending on the type of filling.
- Check for Doneness: The pie is done when the crust is golden brown and the filling is set. If the crust is browning too quickly, you can cover the edges with aluminum foil.
- Cool the Pie: Let the pie cool completely on a wire rack before serving. This will allow the filling to set properly.
Tips for Success:
- Keep everything cold! This is the most important tip for making a flaky pie crust.
- Don’t overmix the dough! Overmixing develops the gluten, which will make your crust tough.
- Chill the dough! Chilling the dough allows the gluten to relax and the butter to firm up, making the dough easier to roll out and preventing it from shrinking during baking.
- Use a pastry blender or two knives to cut in the butter! This will help to create those flaky layers.
- Don’t be afraid to experiment! There are many different ways to make a pie crust, so find what works best for you.
Troubleshooting:
- Crust is tough: You probably overmixed the dough. Next time, be more gentle and mix only until the dough just comes together.
- Crust is shrinking: You probably didn’t chill the dough long enough. Make sure to chill the dough for at least 2 hours, or preferably overnight.
- Crust is soggy: You probably didn’t
Conclusion:
And there you have it! This homemade pie crust recipe isn’t just another recipe; it’s a gateway to pie perfection. I know, I know, making your own pie crust can seem intimidating, but trust me, the results are absolutely worth the (minimal!) effort. The flaky, buttery texture you achieve simply can’t be replicated with store-bought versions. It’s the kind of crust that makes people ask for seconds, and maybe even thirds!
Why is this a must-try? Because it elevates any pie you make. Imagine biting into a warm apple pie, the sweet filling perfectly complemented by a crust that practically melts in your mouth. Or picture a savory quiche, the rich custard nestled in a golden-brown, perfectly crisp shell. This crust is the foundation for all your pie dreams, whether sweet or savory. It’s also incredibly versatile. You can use it for everything from classic fruit pies to pot pies, tarts, and even hand pies. Once you master this recipe, you’ll never go back to store-bought again. I promise!
Now, let’s talk serving suggestions and variations. For a classic apple pie, try pairing this crust with a filling made with Granny Smith and Honeycrisp apples, a touch of cinnamon, and a squeeze of lemon juice. For a savory option, consider a chicken pot pie with a creamy vegetable filling. Or, for something a little different, try making mini quiches with various fillings like spinach and feta, or bacon and Gruyere.
If you’re feeling adventurous, you can experiment with different flours. Whole wheat flour will add a nutty flavor and a slightly denser texture, while pastry flour will result in an even more tender crust. You can also add herbs or spices to the dough for a unique twist. Imagine a rosemary-infused crust for a savory pie, or a hint of cinnamon in a crust for a pumpkin pie. The possibilities are endless!
Another great tip is to blind bake the crust if you’re using a wet filling, like a custard or pumpkin pie. This will prevent the crust from becoming soggy. Simply prick the bottom of the crust with a fork, line it with parchment paper, and fill it with pie weights or dried beans. Bake for about 15-20 minutes, or until the edges are lightly golden brown. Then, remove the weights and parchment paper and bake for another 5-10 minutes, or until the bottom is set.
I truly believe that everyone can make a fantastic homemade pie crust. Don’t be afraid to experiment and find what works best for you. The most important thing is to have fun and enjoy the process. Baking should be a joyful experience, and I hope this recipe helps you create some delicious memories in the kitchen.
So, what are you waiting for? Grab your ingredients, preheat your oven, and get ready to bake the best pie crust of your life! I’m so excited for you to try this recipe and experience the magic of homemade pie.
And finally, I’d absolutely love to hear about your experience! Did you try any variations? What fillings did you use? What tips and tricks did you discover along the way? Please share your photos and stories in the comments below. I can’t wait to see what you create! Happy baking!
Homemade Pie Crust: The Ultimate Guide to Perfecting Your Recipe
Flaky, homemade pie crust made from scratch. Perfect for sweet or savory pies.
Ingredients
- 2 ½ cups all-purpose flour, plus more for dusting
- 1 teaspoon salt
- 1 cup (2 sticks) unsalted butter, very cold and cut into ½-inch cubes
- ½ cup ice water, plus more if needed
- 1 tablespoon apple cider vinegar (optional, but recommended for flakiness)
Instructions
- Combine Dry Ingredients: In a large bowl, whisk together the flour and salt.
- Cut in the Butter: Add the cold, cubed butter to the flour mixture. Use a pastry blender, two knives, or a food processor to cut the butter into the flour until the mixture resembles coarse crumbs with pea-sized butter pieces.
- Add the Ice Water and Vinegar: Gradually add the ice water (and vinegar, if using), one tablespoon at a time, mixing gently after each addition, until the dough just begins to come together. Be careful not to overmix.
- Form the Dough into Discs: Turn the dough out onto a lightly floured surface. Gently gather the dough together and divide it in half. Form each half into a disc, about 1 inch thick. Wrap each disc tightly in plastic wrap.
- Chill the Dough: Refrigerate the dough for at least 2 hours, or preferably overnight.
- Prepare Your Work Surface: Lightly flour a clean, flat surface.
- Roll Out the First Disc: Remove one disc of dough from the refrigerator. Let it sit at room temperature for a few minutes to soften slightly, but not too much! Place the dough on the floured surface and lightly flour the top of the dough as well.
- Roll Out the Dough: Using a rolling pin, start rolling from the center of the disc outwards, rotating the dough a quarter turn after each roll. Roll the dough into a circle about 12 inches in diameter and about 1/8 inch thick.
- Transfer to the Pie Plate: Gently fold the dough in half, then in half again. Carefully lift the folded dough and place it in your pie plate, with the point of the folded dough in the center of the plate. Unfold the dough and gently press it into the bottom and sides of the pie plate.
- Trim and Crimp the Edges: Trim the excess dough around the edges of the pie plate, leaving about 1 inch of overhang. Fold the overhang under and crimp the edges using your fingers or a fork.
- Prepare the Second Disc (if needed): If your recipe calls for a top crust, repeat steps 2-5 with the second disc of dough.
- Blind Baking (if needed): After crimping the edges of the pie crust, prick the bottom of the crust several times with a fork. Line the crust with parchment paper or aluminum foil. Fill the lined crust with pie weights, dried beans, or rice. Bake the crust in a preheated oven at 375°F (190°C) for 15-20 minutes, or until the edges are lightly golden brown. Carefully remove the parchment paper or foil and pie weights. If the bottom of the crust is still pale, return it to the oven and bake for another 5-10 minutes, or until it’s golden brown. Let the crust cool completely before adding the filling.
- Baking with Filling (if needed): Prepare your pie filling according to your recipe. Pour the filling into the prepared pie crust. If you’re using a top crust, place it over the filling. Cut slits in the top crust to allow steam to escape. You can also brush the top crust with an egg wash (1 egg beaten with 1 tablespoon of water) for a golden brown finish. Bake the pie in a preheated oven according to your recipe. The baking time will vary depending on the type of filling. The pie is done when the crust is golden brown and the filling is set. If the crust is browning too quickly, you can cover the edges with aluminum foil. Let the pie cool completely on a wire rack before serving.
Notes
- Keep all ingredients as cold as possible for the flakiest crust.
- Don’t overmix the dough, as this will develop the gluten and result in a tough crust.
- Chilling the dough is essential for gluten relaxation and butter firming.
- Apple cider vinegar is optional but recommended for a more tender and flaky crust.
- Blind baking is necessary for pies with fillings that don’t require baking or to prevent a soggy crust with wet fillings.