
Homemade Pierogi, those delightful little pockets of dough filled with savory goodness, are more than just a meal; they’re a culinary hug from the past. Imagine biting into a tender, slightly chewy dumpling, bursting with creamy potatoes and tangy cheese a flavor combination that’s both comforting and incredibly satisfying. Have you ever wondered how to recreate this magic in your own kitchen?
Pierogi boast a rich history, deeply rooted in the culinary traditions of Eastern Europe, particularly Poland and Ukraine. Passed down through generations, these dumplings were often prepared for special occasions and holidays, symbolizing family, tradition, and the warmth of home. Each family held their own secret recipe, tweaking the fillings and dough to create a unique and cherished version.
But what is it about homemade pierogi that makes them so universally loved? It’s the perfect balance of textures and flavors. The soft, yielding dough gives way to a creamy, savory filling, creating a symphony of sensations in your mouth. They’re also incredibly versatile! While the classic potato and cheese filling is a crowd-pleaser, you can experiment with endless variations, from sauerkraut and mushrooms to sweet fruit fillings. Plus, they can be boiled, pan-fried, or even baked, offering a range of textures and flavors to suit your preference. Join me as we embark on a journey to create these delectable dumplings from scratch, bringing a taste of tradition and homemade goodness to your table.

Ingredients:
- For the Dough:
- 4 cups all-purpose flour, plus more for dusting
- 1 teaspoon salt
- 1 large egg
- 1 cup warm water (approximately, may need a little more or less)
- 4 tablespoons unsalted butter, melted
- For the Potato and Cheese Filling:
- 2 pounds russet potatoes, peeled and quartered
- 1/2 cup milk
- 4 tablespoons unsalted butter
- 1 cup shredded cheddar cheese (or farmer’s cheese, if preferred)
- 1/2 cup grated Parmesan cheese
- 1 medium onion, finely chopped
- 2 tablespoons vegetable oil
- Salt and pepper to taste
- For Serving (Optional):
- Sour cream
- Caramelized onions
- Bacon bits
- Melted butter
Preparing the Potato and Cheese Filling:
- Boil the Potatoes: Place the peeled and quartered potatoes in a large pot. Cover them with cold water and add a pinch of salt. Bring the water to a boil over high heat, then reduce the heat to medium and simmer until the potatoes are fork-tender, about 15-20 minutes. You should be able to easily pierce them with a fork.
- Drain and Mash the Potatoes: Once the potatoes are cooked, drain them thoroughly in a colander. Return the drained potatoes to the pot. Add the milk and butter. Using a potato masher or an electric mixer, mash the potatoes until they are smooth and creamy. Be careful not to overmix, as this can make them gummy.
- Add the Cheese: Stir in the cheddar cheese and Parmesan cheese until they are melted and evenly distributed throughout the mashed potatoes. The heat from the potatoes should melt the cheese nicely.
- Sauté the Onion: While the potatoes are cooking, heat the vegetable oil in a skillet over medium heat. Add the finely chopped onion and cook until it is softened and lightly golden brown, about 8-10 minutes. Stir frequently to prevent burning. The onions should be sweet and fragrant.
- Combine and Season: Add the sautéed onions to the mashed potato and cheese mixture. Stir well to combine. Season the filling generously with salt and pepper to taste. Remember that the dough itself is not heavily seasoned, so the filling needs to be flavorful. Taste and adjust the seasoning as needed. Let the filling cool slightly before using it to fill the pierogi. This will make it easier to handle.
Making the Pierogi Dough:
- Combine Dry Ingredients: In a large bowl, whisk together the flour and salt. This ensures that the salt is evenly distributed throughout the flour.
- Add Wet Ingredients: Make a well in the center of the flour mixture. Add the egg, warm water, and melted butter to the well.
- Mix the Dough: Gradually incorporate the flour into the wet ingredients, starting from the center and working your way outwards. Use a wooden spoon or your hands to mix the dough until it comes together. The dough should be soft and slightly sticky, but not overly wet. If the dough is too dry, add a tablespoon of water at a time until it reaches the desired consistency. If it’s too sticky, add a tablespoon of flour at a time.
- Knead the Dough: Turn the dough out onto a lightly floured surface. Knead the dough for 5-7 minutes, or until it is smooth and elastic. Kneading develops the gluten in the flour, which gives the pierogi dough its structure and chewiness. If you have a stand mixer with a dough hook attachment, you can use it to knead the dough for about 5 minutes.
- Rest the Dough: Form the dough into a ball. Place it in a lightly oiled bowl, turning to coat. Cover the bowl with plastic wrap or a clean kitchen towel. Let the dough rest for at least 30 minutes, or up to an hour, at room temperature. This allows the gluten to relax, making the dough easier to roll out.
Assembling the Pierogi:
- Divide the Dough: After the dough has rested, divide it in half. Keep one half covered while you work with the other half. This prevents the dough from drying out.
- Roll Out the Dough: On a lightly floured surface, roll out the dough to about 1/8 inch thickness. You want the dough to be thin enough to be tender, but not so thin that it tears easily.
- Cut Out Circles: Use a cookie cutter, a drinking glass, or a biscuit cutter to cut out circles of dough. The circles should be about 3 inches in diameter. You can re-roll the scraps of dough to cut out more circles.
- Fill the Pierogi: Place a spoonful (about 1-2 teaspoons) of the potato and cheese filling in the center of each dough circle. Don’t overfill the pierogi, as this can make them difficult to seal.
- Seal the Pierogi: Fold the dough circle in half over the filling to form a half-moon shape. Pinch the edges of the dough together tightly to seal. Make sure the seal is secure to prevent the filling from leaking out during cooking. You can also use a fork to crimp the edges for a decorative touch and to further ensure a good seal.
- Repeat: Repeat the rolling, cutting, filling, and sealing process with the remaining dough and filling. As you assemble the pierogi, place them on a lightly floured baking sheet to prevent them from sticking.
Cooking the Pierogi:
- Boil the Pierogi: Bring a large pot of salted water to a rolling boil. Gently drop the pierogi into the boiling water, a few at a time. Do not overcrowd the pot, as this can lower the water temperature and cause the pierogi to stick together.
- Cook Until They Float: Cook the pierogi until they float to the surface of the water and are cooked through, about 3-5 minutes. Once they float, let them cook for another minute or two to ensure they are heated through.
- Remove and Drain: Use a slotted spoon to remove the cooked pierogi from the boiling water. Drain them well.
Searing or Pan-Frying the Pierogi (Optional but Recommended):
- Melt Butter: In a large skillet, melt a few tablespoons of butter over medium heat. You can also use a combination of butter and oil to prevent the butter from burning.
- Sear the Pierogi: Add the boiled pierogi to the skillet in a single layer. Cook until they are golden brown and slightly crispy on both sides, about 2-3 minutes per side. Searing the pierogi adds a delicious flavor and texture.
- Serve: Remove the seared pierogi from the skillet and serve immediately.
Serving Suggestions:
Serve the pierogi hot, topped with your favorite toppings. Some popular options include:
- Sour cream
- Caramelized onions
- Bacon bits
- Melted butter
Enjoy your homemade pierogi! They are a labor of love, but the delicious results are well worth the effort.
Conclusion:
And there you have it! I truly believe this homemade pierogi recipe is a must-try, not just because it’s delicious, but because it’s an experience. It’s about connecting with tradition, creating something special with your own hands, and sharing that love with family and friends. The soft, pillowy dough, the savory filling, and the satisfying feeling of biting into a perfectly cooked pierogi it’s simply unmatched.
But why is this recipe so special? Well, beyond the incredible flavor, it’s the versatility. You’re not just stuck with one type of pierogi. Think of this recipe as a blank canvas for your culinary creativity!
Serving Suggestions and Variations:
* Classic Comfort: Serve your pierogi with a generous dollop of sour cream and crispy fried onions. This is the traditional way, and it’s a classic for a reason!
* Buttered Bliss: Toss your cooked pierogi in melted butter and sprinkle with fresh dill. Simple, elegant, and utterly delicious.
* Savory Sauté: Sauté your pierogi with bacon, mushrooms, and onions for a hearty and flavorful meal. This is a great way to add some extra protein and depth of flavor.
* Sweet Treat: For a sweet variation, fill your pierogi with farmer’s cheese and a touch of sugar. Serve with a dollop of fruit preserves or a dusting of powdered sugar.
* Potato and Cheese Perfection: While this recipe focuses on a specific filling, don’t hesitate to experiment! A classic potato and cheese filling is always a winner. You can even add some caramelized onions or bacon to the potato mixture for an extra layer of flavor.
* Sauce it Up: Experiment with different sauces! A creamy mushroom sauce, a tangy tomato sauce, or even a simple brown butter sauce can elevate your pierogi to a whole new level.
* Freezing for Future Feasts: This recipe makes a generous batch, which is perfect for freezing! Simply lay the uncooked pierogi on a baking sheet lined with parchment paper and freeze until solid. Then, transfer them to a freezer bag for long-term storage. When you’re ready to cook them, simply boil them from frozen no need to thaw!
I know making pierogi from scratch might seem a little daunting at first, but trust me, it’s worth the effort. The process itself is therapeutic, and the end result is something you can be truly proud of. Plus, once you get the hang of it, you’ll be surprised at how easy it is to whip up a batch of these delicious dumplings.
So, what are you waiting for? Gather your ingredients, roll up your sleeves, and get ready to embark on a pierogi-making adventure! I’m confident that you’ll love this recipe as much as I do.
And most importantly, I want to hear about your experience! Did you try a different filling? Did you come up with a creative serving suggestion? Share your photos and stories in the comments below. I can’t wait to see what you create! Happy cooking, and enjoy your homemade pierogi!
Homemade Pierogi: The Ultimate Guide to Making Perfect Pierogi
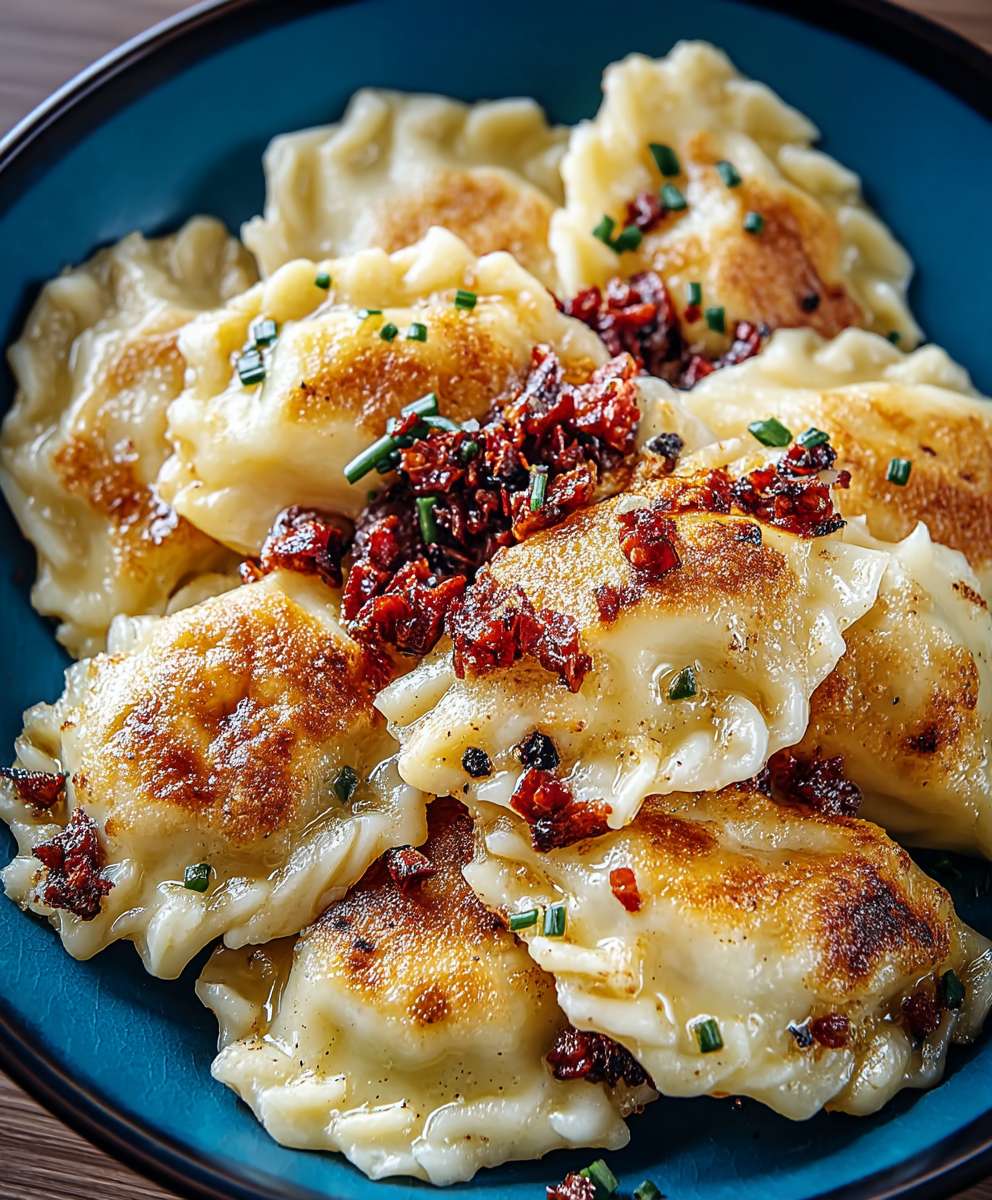
Homemade pierogi filled with creamy potato and cheese, boiled then pan-fried to golden perfection.
Ingredients
- 4 cups all-purpose flour, plus more for dusting
- 1 teaspoon salt
- 1 large egg
- 1 cup warm water (approximately, may need a little more or less)
- 4 tablespoons unsalted butter, melted
- 2 pounds russet potatoes, peeled and quartered
- 1/2 cup milk
- 4 tablespoons unsalted butter
- 1 cup shredded cheddar cheese (or farmer’s cheese, if preferred)
- 1/2 cup grated Parmesan cheese
- 1 medium onion, finely chopped
- 2 tablespoons vegetable oil
- Salt and pepper to taste
- Sour cream
- Caramelized onions
- Bacon bits
- Melted butter
Instructions
- Place the peeled and quartered potatoes in a large pot. Cover them with cold water and add a pinch of salt. Bring the water to a boil over high heat, then reduce the heat to medium and simmer until the potatoes are fork-tender, about 15-20 minutes. You should be able to easily pierce them with a fork.
- Once the potatoes are cooked, drain them thoroughly in a colander. Return the drained potatoes to the pot. Add the milk and butter. Using a potato masher or an electric mixer, mash the potatoes until they are smooth and creamy. Be careful not to overmix, as this can make them gummy.
- Stir in the cheddar cheese and Parmesan cheese until they are melted and evenly distributed throughout the mashed potatoes. The heat from the potatoes should melt the cheese nicely.
- While the potatoes are cooking, heat the vegetable oil in a skillet over medium heat. Add the finely chopped onion and cook until it is softened and lightly golden brown, about 8-10 minutes. Stir frequently to prevent burning. The onions should be sweet and fragrant.
- Add the sautéed onions to the mashed potato and cheese mixture. Stir well to combine. Season the filling generously with salt and pepper to taste. Remember that the dough itself is not heavily seasoned, so the filling needs to be flavorful. Taste and adjust the seasoning as needed. Let the filling cool slightly before using it to fill the pierogi. This will make it easier to handle.
- In a large bowl, whisk together the flour and salt. This ensures that the salt is evenly distributed throughout the flour.
- Make a well in the center of the flour mixture. Add the egg, warm water, and melted butter to the well.
- Gradually incorporate the flour into the wet ingredients, starting from the center and working your way outwards. Use a wooden spoon or your hands to mix the dough until it comes together. The dough should be soft and slightly sticky, but not overly wet. If the dough is too dry, add a tablespoon of water at a time until it reaches the desired consistency. If it’s too sticky, add a tablespoon of flour at a time.
- Turn the dough out onto a lightly floured surface. Knead the dough for 5-7 minutes, or until it is smooth and elastic. Kneading develops the gluten in the flour, which gives the pierogi dough its structure and chewiness. If you have a stand mixer with a dough hook attachment, you can use it to knead the dough for about 5 minutes.
- Form the dough into a ball. Place it in a lightly oiled bowl, turning to coat. Cover the bowl with plastic wrap or a clean kitchen towel. Let the dough rest for at least 30 minutes, or up to an hour, at room temperature. This allows the gluten to relax, making the dough easier to roll out.
- After the dough has rested, divide it in half. Keep one half covered while you work with the other half. This prevents the dough from drying out.
- On a lightly floured surface, roll out the dough to about 1/8 inch thickness. You want the dough to be thin enough to be tender, but not so thin that it tears easily.
- Use a cookie cutter, a drinking glass, or a biscuit cutter to cut out circles of dough. The circles should be about 3 inches in diameter. You can re-roll the scraps of dough to cut out more circles.
- Place a spoonful (about 1-2 teaspoons) of the potato and cheese filling in the center of each dough circle. Don’t overfill the pierogi, as this can make them difficult to seal.
- Fold the dough circle in half over the filling to form a half-moon shape. Pinch the edges of the dough together tightly to seal. Make sure the seal is secure to prevent the filling from leaking out during cooking. You can also use a fork to crimp the edges for a decorative touch and to further ensure a good seal.
- Repeat the rolling, cutting, filling, and sealing process with the remaining dough and filling. As you assemble the pierogi, place them on a lightly floured baking sheet to prevent them from sticking.
- Bring a large pot of salted water to a rolling boil. Gently drop the pierogi into the boiling water, a few at a time. Do not overcrowd the pot, as this can lower the water temperature and cause the pierogi to stick together.
- Cook the pierogi until they float to the surface of the water and are cooked through, about 3-5 minutes. Once they float, let them cook for another minute or two to ensure they are heated through.
- Use a slotted spoon to remove the cooked pierogi from the boiling water. Drain them well.
- In a large skillet, melt a few tablespoons of butter over medium heat. You can also use a combination of butter and oil to prevent the butter from burning.
- Add the boiled pierogi to the skillet in a single layer. Cook until they are golden brown and slightly crispy on both sides, about 2-3 minutes per side. Searing the pierogi adds a delicious flavor and texture.
- Remove the seared pierogi from the skillet and serve immediately.
Notes
- The dough should be soft and slightly sticky, but not overly wet. Adjust the water or flour as needed to achieve the right consistency.
- Don’t overfill the pierogi, as this can make them difficult to seal.
- Make sure the seal is secure to prevent the filling from leaking out during cooking.
- Searing the pierogi in butter adds a delicious flavor and texture.
- Serve hot with your favorite toppings, such as sour cream, caramelized onions, bacon bits, or melted butter.