
Seared Scallops: Just the name conjures images of elegant dinners and sophisticated palates, doesn’t it? But what if I told you that achieving restaurant-quality seared scallops at home is not only possible, but surprisingly simple? Forget the intimidation factor; with a few key techniques, you can transform these delicate morsels into a culinary masterpiece in your own kitchen.
Scallops have been a prized delicacy for centuries, enjoyed by cultures around the globe. From the ancient Romans, who associated them with Venus, the goddess of love, to their prominent place in coastal cuisines worldwide, scallops boast a rich history. Their sweet, slightly briny flavor and tender texture have captivated food lovers for generations.
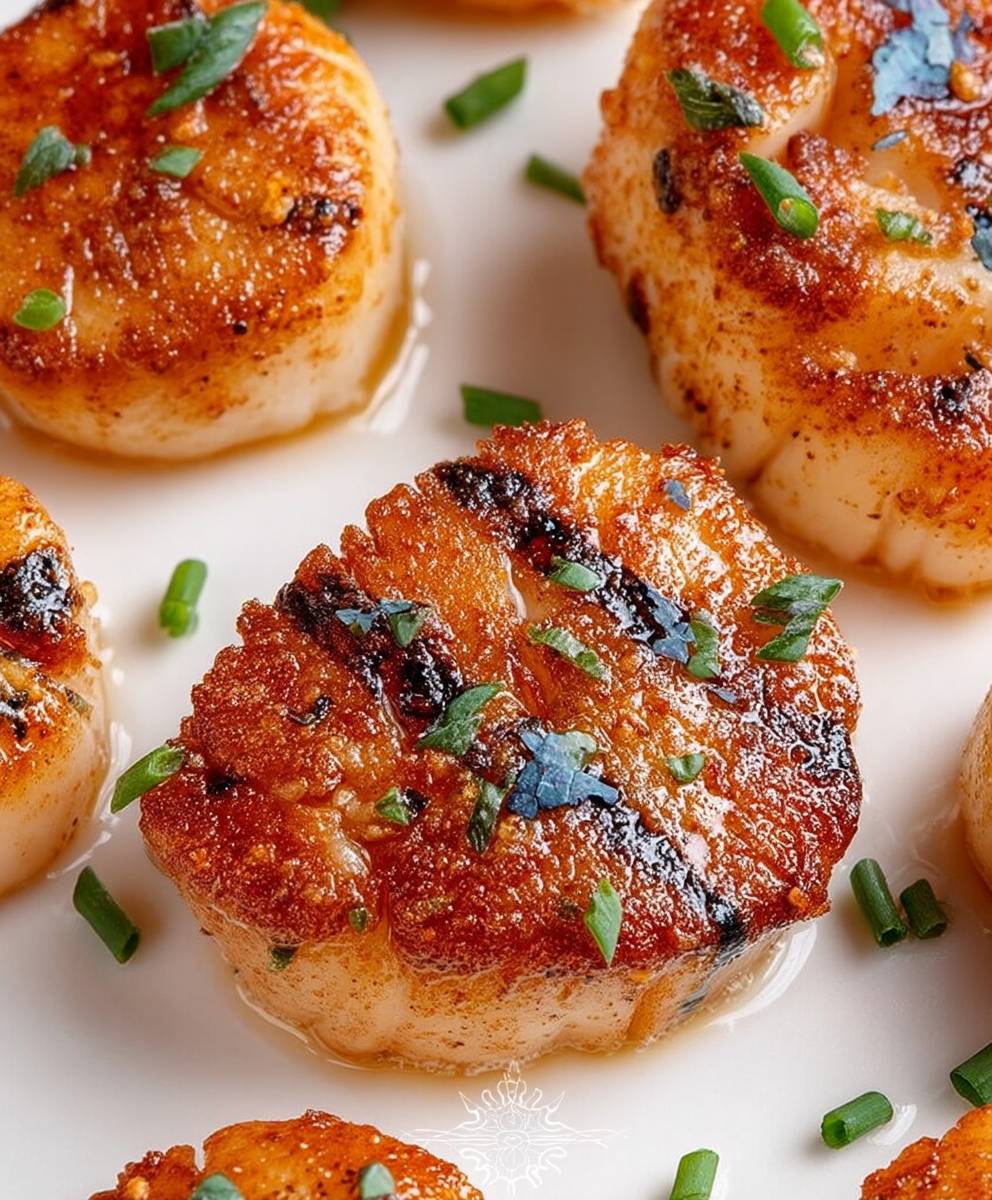
What is it about seared scallops that makes them so irresistible? It’s the perfect marriage of textures a beautifully caramelized, crisp exterior giving way to a succulent, melt-in-your-mouth interior. The subtle sweetness of the scallop is enhanced by the searing process, creating a depth of flavor that’s both satisfying and refined. Plus, they cook in mere minutes, making them an ideal choice for a quick yet impressive weeknight meal or an elegant appetizer for your next dinner party. So, are you ready to learn how to perfectly sear scallops like a pro? Let’s get started!

Ingredients:
- 1 pound large sea scallops (about 16-20 scallops), patted very dry
- 2 tablespoons olive oil, divided
- 2 tablespoons unsalted butter, divided
- 2 cloves garlic, minced
- 1/4 cup dry white wine (such as Sauvignon Blanc or Pinot Grigio)
- 2 tablespoons lemon juice, freshly squeezed
- 1 tablespoon chopped fresh parsley
- Salt and freshly ground black pepper, to taste
- Optional: Pinch of red pepper flakes
- Optional Garnish: Lemon wedges
Preparing the Scallops:
The key to perfectly seared scallops is to ensure they are incredibly dry before they hit the pan. This allows them to develop a beautiful golden-brown crust instead of steaming. Trust me, this step is crucial!
- Pat the scallops dry: Remove the scallops from their packaging and place them on a plate lined with several layers of paper towels. Gently pat them dry with more paper towels, pressing down to absorb as much moisture as possible. Flip the scallops and repeat on the other side. You might need to use several paper towels to get them completely dry.
- Season the scallops: Once the scallops are dry, season them generously with salt and freshly ground black pepper. Don’t be shy with the seasoning! This is your chance to build flavor. If you like a little heat, add a pinch of red pepper flakes.
Searing the Scallops:
Now for the fun part! Searing the scallops is quick, so make sure you have all your ingredients prepped and ready to go. You’ll want to use a heavy-bottomed skillet, preferably stainless steel or cast iron, to ensure even heat distribution.
- Heat the pan: Place the skillet over medium-high heat. Add 1 tablespoon of olive oil and 1 tablespoon of butter to the pan. Let the butter melt completely and swirl the pan to coat the bottom evenly. The pan should be hot enough that the oil shimmers, but not smoking.
- Sear the scallops: Carefully place the scallops in the hot pan, making sure not to overcrowd them. If you overcrowd the pan, the scallops will steam instead of sear. You may need to sear them in batches. Leave about an inch of space between each scallop.
- Sear for 2-3 minutes per side: Let the scallops sear undisturbed for 2-3 minutes on the first side, or until they develop a golden-brown crust. Resist the urge to move them around! This is key to getting that perfect sear.
- Flip the scallops: Using tongs, carefully flip the scallops and sear for another 2-3 minutes on the second side, or until they are cooked through and opaque. The internal temperature should reach 120-125°F (49-52°C). Be careful not to overcook them, as they will become rubbery.
- Remove from pan: Once the scallops are cooked through, remove them from the pan and set them aside on a clean plate.
Making the Garlic Butter Sauce:
This simple garlic butter sauce elevates the seared scallops to another level. It’s quick, easy, and packed with flavor!
- Sauté the garlic: In the same skillet (don’t wipe it out!), add the remaining 1 tablespoon of olive oil and 1 tablespoon of butter. Reduce the heat to medium. Add the minced garlic and sauté for about 30 seconds, or until fragrant. Be careful not to burn the garlic, as it will become bitter.
- Deglaze the pan: Pour in the dry white wine and scrape up any browned bits from the bottom of the pan. This is where all the flavor is! Let the wine simmer for about 1-2 minutes, or until it has reduced slightly.
- Add lemon juice and parsley: Stir in the lemon juice and chopped fresh parsley. Season with salt and pepper to taste.
- Simmer the sauce: Let the sauce simmer for another minute or two, or until it has thickened slightly.
Serving the Seared Scallops:
Now it’s time to enjoy your perfectly seared scallops! There are many ways to serve them, but here’s my favorite:
- Plate the scallops: Arrange the seared scallops on a plate.
- Drizzle with sauce: Spoon the garlic butter sauce over the scallops. Make sure each scallop gets a generous coating of the delicious sauce.
- Garnish and serve: Garnish with lemon wedges and serve immediately.
Serving Suggestions:
Seared scallops are delicious on their own, but they also pair well with a variety of sides. Here are a few of my favorites:
- Pasta: Serve the scallops over linguine or fettuccine tossed with the garlic butter sauce.
- Risotto: Creamy risotto is a perfect complement to the delicate flavor of the scallops.
- Vegetables: Roasted asparagus, sautéed spinach, or grilled zucchini are all great choices.
- Salad: A simple green salad with a light vinaigrette provides a refreshing contrast to the richness of the scallops.
Tips for Perfect Seared Scallops:
Here are a few extra tips to ensure your seared scallops turn out perfectly every time:
- Buy high-quality scallops: Look for dry-packed scallops, which haven’t been treated with phosphates. These scallops will sear better and have a more natural flavor.
- Don’t overcrowd the pan: As mentioned earlier, overcrowding the pan will cause the scallops to steam instead of sear. Sear them in batches if necessary.
- Use a hot pan: A hot pan is essential for getting a good sear. Make sure the oil is shimmering before adding the scallops.
- Don’t move the scallops around: Let the scallops sear undisturbed for 2-3 minutes per side to develop a golden-brown crust.
- Don’t overcook the scallops: Overcooked scallops will be rubbery and tough. Cook them just until they are opaque and the internal temperature reaches 120-125°F (49-52°C).
- Serve immediately: Seared scallops are best served immediately, while they are still hot and juicy.
Variations:
Want to mix things up a bit? Here are a few variations you can try:
- Add herbs: Experiment with different herbs, such as thyme, rosemary, or oregano. Add them to the pan along with the garlic.
- Use different wine: Try using a different type of white wine, such as Chardonnay or Pinot Blanc.
- Add a splash of cream: For a richer sauce, add a splash of heavy cream to the pan after deglazing with wine.
- Make it spicy: Add more red pepper flakes or a pinch of cayenne pepper to the sauce for a spicy kick.
- Citrus Burst: Add a little orange zest to the sauce for a brighter, citrusy flavor.
Troubleshooting:
Even with the best instructions, things can sometimes go wrong. Here are a few common problems and how to fix them:
- Scallops are not searing: This is usually caused by not drying the scallops thoroughly enough or not using a hot enough pan. Make sure the scallops are completely dry and the oil is shimmering before adding them to the pan.
- Scallops are sticking to the pan: This can be caused by not using enough oil or not letting the scallops sear undisturbed. Make sure the pan is well-oiled and let the scallops sear for 2-3 minutes per side before flipping them.
- Scallops are rubbery: This is usually caused by overcooking the scallops. Cook them just until they are opaque and the internal temperature reaches 120-125°F (49-52°C).
- Sauce is too thin: Let the sauce simmer for a longer period of time to allow it to thicken. You can also add a small amount of cornstarch slurry (1 teaspoon cornstarch mixed with 1 tablespoon cold water) to the sauce to help it thicken.
- Sauce is too thick: Add a little more white wine or lemon juice to thin the sauce.
Enjoy your delicious seared scallops! I hope these tips and tricks help you create a restaurant-quality dish at home.
Conclusion:
And there you have it! I truly believe this recipe for perfectly seared scallops is a must-try for anyone looking to impress with minimal effort. The combination of the sweet, delicate scallop with the rich, buttery sauce is simply divine. It’s a dish that feels incredibly elegant, yet it’s surprisingly easy to master, even for beginner cooks. Forget those rubbery, bland scallops you might have had in the past; this method guarantees a beautifully caramelized crust and a tender, juicy interior every single time.
But why is this recipe so special? It’s all about the technique. The high heat and quick sear are key to achieving that perfect golden-brown crust without overcooking the scallop. And the simple pan sauce, made with just a few ingredients, elevates the dish to restaurant-quality. Plus, it’s incredibly versatile!
Serving Suggestions and Variations
Don’t be afraid to get creative with your serving suggestions! I personally love serving these seared scallops over a bed of creamy risotto, the richness of the risotto complementing the sweetness of the scallops perfectly. Alternatively, you could pair them with a light and refreshing salad for a lighter meal. A simple arugula salad with a lemon vinaigrette would be a fantastic choice.
For a more substantial meal, consider serving the scallops alongside some roasted vegetables. Asparagus, Brussels sprouts, or even sweet potatoes would all be delicious accompaniments. And if you’re feeling adventurous, you could even try adding a sprinkle of crumbled bacon or pancetta to the pan sauce for an extra layer of flavor.
Looking for variations? You can easily adapt this recipe to suit your own taste preferences. Try adding a squeeze of lemon juice to the pan sauce for a brighter, more citrusy flavor. Or, if you’re a fan of spice, add a pinch of red pepper flakes to the sauce for a little kick. You could also experiment with different herbs. Fresh thyme, rosemary, or even sage would all be delicious additions.
Another variation I enjoy is using different types of fat for searing. While butter is classic, you could also use olive oil or even coconut oil for a slightly different flavor profile. Just be sure to use a fat with a high smoke point to avoid burning the scallops.
Ready to Give it a Try?
I’m confident that you’ll absolutely love this recipe for seared scallops. It’s a guaranteed crowd-pleaser, perfect for a romantic dinner, a special occasion, or even just a weeknight treat. The key is to not be intimidated! Follow the instructions carefully, and don’t be afraid to experiment with different flavors and variations.
I’m so excited for you to try this recipe and experience the magic of perfectly seared scallops for yourself. Once you’ve made it, I’d absolutely love to hear about your experience! Did you try any of the variations I suggested? What did you serve them with? What did your family and friends think?
Please, don’t hesitate to leave a comment below and share your thoughts and photos. Your feedback is invaluable, and it helps me to continue creating delicious and easy-to-follow recipes that you’ll love. Happy cooking, and I can’t wait to hear from you! Let me know if you have any questions, and I’ll do my best to help. Enjoy your culinary adventure with these amazing seared scallops!
Seared Scallops: The Ultimate Guide to Perfectly Cooked Scallops
Perfectly seared scallops with a flavorful garlic butter sauce. A restaurant-quality dish you can easily make at home!
Ingredients
- 1 pound large sea scallops (about 16-20 scallops), patted very dry
- 2 tablespoons olive oil, divided
- 2 tablespoons unsalted butter, divided
- 2 cloves garlic, minced
- 1/4 cup dry white wine (such as Sauvignon Blanc or Pinot Grigio)
- 2 tablespoons lemon juice, freshly squeezed
- 1 tablespoon chopped fresh parsley
- Salt and freshly ground black pepper, to taste
- Optional: Pinch of red pepper flakes
- Optional Garnish: Lemon wedges
Instructions
- Pat the scallops dry: Remove the scallops from their packaging and place them on a plate lined with several layers of paper towels. Gently pat them dry with more paper towels, pressing down to absorb as much moisture as possible. Flip the scallops and repeat on the other side. You might need to use several paper towels to get them completely dry.
- Season the scallops: Once the scallops are dry, season them generously with salt and freshly ground black pepper. Don’t be shy with the seasoning! This is your chance to build flavor. If you like a little heat, add a pinch of red pepper flakes.
- Heat the pan: Place the skillet over medium-high heat. Add 1 tablespoon of olive oil and 1 tablespoon of butter to the pan. Let the butter melt completely and swirl the pan to coat the bottom evenly. The pan should be hot enough that the oil shimmers, but not smoking.
- Sear the scallops: Carefully place the scallops in the hot pan, making sure not to overcrowd them. If you overcrowd the pan, the scallops will steam instead of sear. You may need to sear them in batches. Leave about an inch of space between each scallop.
- Sear for 2-3 minutes per side: Let the scallops sear undisturbed for 2-3 minutes on the first side, or until they develop a golden-brown crust. Resist the urge to move them around! This is key to getting that perfect sear.
- Flip the scallops: Using tongs, carefully flip the scallops and sear for another 2-3 minutes on the second side, or until they are cooked through and opaque. The internal temperature should reach 120-125°F (49-52°C). Be careful not to overcook them, as they will become rubbery.
- Remove from pan: Once the scallops are cooked through, remove them from the pan and set them aside on a clean plate.
- Sauté the garlic: In the same skillet (don’t wipe it out!), add the remaining 1 tablespoon of olive oil and 1 tablespoon of butter. Reduce the heat to medium. Add the minced garlic and sauté for about 30 seconds, or until fragrant. Be careful not to burn the garlic, as it will become bitter.
- Deglaze the pan: Pour in the dry white wine and scrape up any browned bits from the bottom of the pan. This is where all the flavor is! Let the wine simmer for about 1-2 minutes, or until it has reduced slightly.
- Add lemon juice and parsley: Stir in the lemon juice and chopped fresh parsley. Season with salt and pepper to taste.
- Simmer the sauce: Let the sauce simmer for another minute or two, or until it has thickened slightly.
- Plate the scallops: Arrange the seared scallops on a plate.
- Drizzle with sauce: Spoon the garlic butter sauce over the scallops. Make sure each scallop gets a generous coating of the delicious sauce.
- Garnish and serve: Garnish with lemon wedges and serve immediately.
Notes
- The key to perfectly seared scallops is to ensure they are incredibly dry before they hit the pan. This allows them to develop a beautiful golden-brown crust instead of steaming.
- Buy high-quality, dry-packed scallops for the best results.
- Don’t overcrowd the pan when searing the scallops. Sear them in batches if necessary.
- Use a heavy-bottomed skillet, preferably stainless steel or cast iron, to ensure even heat distribution.
- Serve immediately for the best flavor and texture.
- Seared scallops are delicious on their own, but they also pair well with pasta, risotto, vegetables, or a simple green salad.