
Smoked East Coast Pastrami, oh, where do I even begin? Imagine sinking your teeth into a slice of tender, smoky, and perfectly spiced beef that practically melts in your mouth. That, my friends, is the magic of homemade pastrami, and trust me, it’s an experience you won’t soon forget. Forget the deli counter we’re about to embark on a culinary adventure that will elevate your sandwich game to legendary status.
Pastrami, with its roots firmly planted in the Jewish communities of Eastern Europe and later, the bustling delis of New York City, is more than just a cured meat; it’s a symbol of tradition, comfort, and culinary ingenuity. Originally created as a way to preserve meat before refrigeration, pastrami has evolved into a beloved delicacy enjoyed worldwide. The brining, smoking, and steaming process transforms a humble cut of beef brisket into something truly extraordinary.
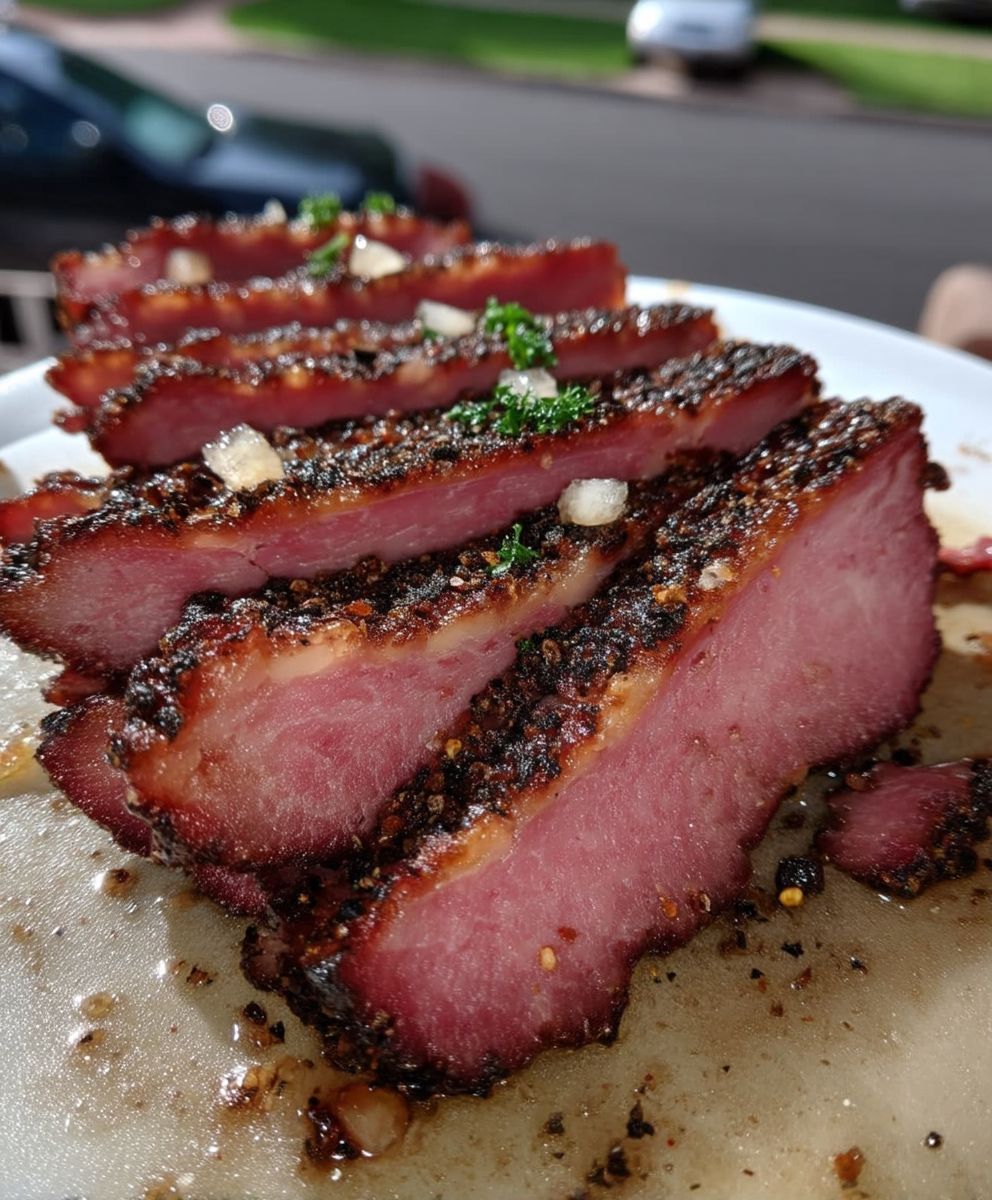
What makes Smoked East Coast Pastrami so irresistible? It’s the symphony of flavors, the perfect balance of salty, savory, and smoky notes. The texture is equally captivating a delightful combination of tenderness and a slight chewiness that keeps you coming back for more. And while it requires some time and patience, the reward of crafting your own pastrami from scratch is immeasurable. The aroma alone, as it smokes low and slow, will have your neighbors peeking over the fence, wondering what deliciousness you’re conjuring up. So, are you ready to roll up your sleeves and create a pastrami masterpiece? Let’s get started!

Ingredients:
- For the Brine:
- 1 gallon water, divided
- 1 cup kosher salt
- 1 cup brown sugar, packed
- 1/2 cup pink curing salt (Prague Powder #1) – Important: Do not omit!
- 1/4 cup pickling spice
- 1 tablespoon black peppercorns, crushed
- 6 cloves garlic, smashed
- 2 bay leaves, crushed
- 1 teaspoon juniper berries, crushed (optional, but highly recommended)
- For the Pastrami Rub:
- 1/4 cup coarsely ground black pepper
- 1/4 cup coriander seeds, toasted and coarsely ground
- 2 tablespoons smoked paprika
- 2 tablespoons granulated garlic
- 1 tablespoon onion powder
- 1 tablespoon mustard powder
- 1 tablespoon brown sugar
- 1 teaspoon red pepper flakes (optional, for a little heat)
- The Star of the Show:
- 5-6 pound beef brisket, point cut (also known as the deckle)
Brining the Brisket: The Foundation of Flavor
Okay, let’s get started! The first, and arguably most crucial, step is brining the brisket. This process infuses the meat with flavor and helps it retain moisture during the long smoking process. Trust me, you don’t want to skip this!
- Prepare the Brine: In a large, food-safe container (a 2-gallon bucket or a large stockpot works well), combine 1/2 gallon of the water with the kosher salt, brown sugar, pink curing salt, pickling spice, black peppercorns, garlic, bay leaves, and juniper berries (if using). Stir vigorously until the salt and sugar are completely dissolved.
- Cool the Brine: Add the remaining 1/2 gallon of cold water to the brine. This will help cool it down quickly. You want the brine to be cold before adding the brisket.
- Submerge the Brisket: Place the brisket in the brine, making sure it’s completely submerged. If necessary, use a plate or a weight to keep it submerged. This is super important! Any part of the brisket exposed to air will not cure properly.
- Refrigerate: Cover the container and refrigerate the brisket for 7-10 days. I usually go for 10 days to ensure maximum flavor penetration. Turn the brisket over every couple of days to ensure even brining.
- Rinse and Soak: After brining, remove the brisket from the brine and rinse it thoroughly under cold running water. Then, place it in a large bowl or container filled with fresh, cold water. Soak the brisket for 1-2 hours, changing the water every 30 minutes. This helps to remove excess salt from the surface. Don’t skip this step, or your pastrami will be too salty!
- Pat Dry: After soaking, remove the brisket from the water and pat it completely dry with paper towels. This is important for the rub to adhere properly.
Crafting the Pastrami Rub: A Symphony of Spices
While the brisket is brining, you can prepare the pastrami rub. This is where you get to customize the flavor profile to your liking. I personally love a bold, peppery rub, but feel free to adjust the spices to your taste.
- Toast the Coriander Seeds: In a dry skillet over medium heat, toast the coriander seeds for 2-3 minutes, or until fragrant. Be careful not to burn them!
- Grind the Spices: In a spice grinder or using a mortar and pestle, coarsely grind the toasted coriander seeds.
- Combine the Spices: In a bowl, combine the ground coriander seeds with the black pepper, smoked paprika, granulated garlic, onion powder, mustard powder, brown sugar, and red pepper flakes (if using). Mix well to ensure all the spices are evenly distributed.
Applying the Rub: The Flavor Armor
Now that the brisket is brined and the rub is ready, it’s time to coat the meat in that delicious spice mixture. This step is crucial for creating that signature pastrami crust.
- Generously Coat the Brisket: Liberally apply the pastrami rub to all sides of the brisket, pressing it firmly into the meat. Make sure every nook and cranny is covered. Don’t be shy!
- Wrap and Refrigerate: Wrap the rubbed brisket tightly in plastic wrap and refrigerate it for at least 24 hours, or up to 48 hours. This allows the flavors of the rub to penetrate the meat even further.
Smoking the Pastrami: Low and Slow is the Way to Go
Alright, the moment we’ve all been waiting for! It’s time to fire up the smoker and transform that brisket into glorious pastrami. Remember, patience is key here. Low and slow is the name of the game.
- Prepare the Smoker: Preheat your smoker to 225-250°F (107-121°C). I prefer using a combination of oak and cherry wood for smoking pastrami, but feel free to experiment with your favorite wood chips or chunks.
- Smoke the Brisket: Place the brisket directly on the smoker grate, fat side up. Maintain a consistent temperature throughout the smoking process.
- Monitor the Internal Temperature: Smoke the brisket for approximately 6-8 hours, or until the internal temperature reaches 165°F (74°C). Use a reliable meat thermometer to monitor the temperature.
- The Texas Crutch (Optional but Recommended): Once the brisket reaches 165°F (74°C), remove it from the smoker and wrap it tightly in butcher paper or aluminum foil. This step, known as the “Texas Crutch,” helps to prevent the brisket from drying out and speeds up the cooking process.
- Continue Smoking: Return the wrapped brisket to the smoker and continue smoking for another 4-6 hours, or until the internal temperature reaches 203°F (95°C). The brisket should be probe-tender, meaning a thermometer or probe should slide into the meat with little to no resistance.
- Rest the Pastrami: Once the brisket reaches 203°F (95°C), remove it from the smoker and let it rest, still wrapped, for at least 2 hours, or preferably longer. I often let it rest in a cooler wrapped in towels for 4-6 hours. This allows the juices to redistribute throughout the meat, resulting in a more tender and flavorful pastrami. This is a critical step! Don’t skip the rest!
Steaming the Pastrami: The Final Touch
While smoking imparts incredible flavor, steaming is what truly transforms the brisket into classic pastrami. This step tenderizes the meat even further and gives it that signature moistness.
- Prepare the Steamer: Fill a large pot with a few inches of water and bring it to a boil. Place a steamer basket or colander inside the pot, making sure the bottom of the basket doesn’t touch the water.
- Steam the Pastrami: Place the rested pastrami in the steamer basket, cover the pot, and steam for 2-3 hours, or until the internal temperature reaches 190-200°F (88-93°C). The pastrami should be incredibly tender and easily shreddable.
Slicing and Serving: The Grand Finale
Finally, the moment of truth! It’s time to slice that beautiful pastrami and enjoy the fruits of your labor. Remember to slice against the grain for maximum tenderness.
- Slice Against the Grain: Locate the grain of the meat and slice the pastrami thinly, against the grain. This is crucial for ensuring a tender and enjoyable eating experience.
- Serve and Enjoy: Serve the pastrami on rye bread with mustard, pickles, and maybe even some Swiss cheese. Or, get creative and use it in sandwiches, salads, or even as a topping for pizza. The possibilities are endless!
Conclusion:
So there you have it! This Smoked East Coast Pastrami recipe isn’t just another sandwich filling; it’s a culinary journey, a testament to patience, and an explosion of flavor that will redefine your understanding of what pastrami can be. From the initial brining to the final, smoky slice, every step is a labor of love that culminates in a truly unforgettable experience. Trust me, once you’ve tasted homemade pastrami, you’ll never look at the store-bought stuff the same way again.
Why is this a must-try? Because it’s more than just food; it’s an experience. It’s the satisfaction of creating something incredible with your own two hands. It’s the aroma that fills your kitchen for days, teasing your senses and building anticipation. It’s the look on your friends’ and family’s faces when they take that first bite pure, unadulterated joy. And let’s be honest, who doesn’t love a good pastrami sandwich?
But the fun doesn’t stop there! The possibilities are endless. Of course, the classic Reuben is a no-brainer: piled high on rye bread with sauerkraut, Swiss cheese, and Russian dressing. But don’t be afraid to get creative! Try slicing it thin and adding it to a breakfast hash with potatoes and peppers. Or dice it up and use it as a topping for pizza or a filling for pierogies. You could even create a pastrami-spiced dry rub for other meats, bringing that signature flavor to everything you grill. For a lighter option, consider a pastrami salad with a tangy vinaigrette. The richness of the pastrami pairs beautifully with crisp greens and a bright dressing.
And speaking of variations, feel free to experiment with the spice blend. Want a little more heat? Add a pinch of cayenne pepper or a dash of hot sauce to the rub. Prefer a sweeter flavor? Increase the amount of brown sugar. You can also adjust the smoking time to achieve your desired level of smokiness. Just remember to keep a close eye on the internal temperature to ensure the pastrami is cooked to perfection.
Serving Suggestions:
- Classic Reuben Sandwich: Rye bread, sauerkraut, Swiss cheese, Russian dressing.
- Pastrami on Rye: Simple and delicious with mustard.
- Pastrami Hash: Diced pastrami with potatoes, peppers, and onions.
- Pastrami Pizza: Topped with pastrami, mozzarella, and your favorite veggies.
- Pastrami Pierogies: Filled with pastrami, potatoes, and cheese.
- Pastrami Salad: Sliced pastrami with mixed greens and a tangy vinaigrette.
I know this recipe might seem a little daunting at first, but I promise you, it’s worth the effort. Take your time, follow the instructions carefully, and don’t be afraid to ask questions. And most importantly, have fun! Cooking should be an enjoyable experience, and this Smoked East Coast Pastrami recipe is a chance to create something truly special.
So, what are you waiting for? Grab your brisket, gather your spices, and fire up that smoker! I can’t wait to hear about your experiences. Did you make any modifications to the recipe? What were your favorite serving suggestions? Share your photos and stories in the comments below. Let’s build a community of pastrami enthusiasts and celebrate the art of homemade deliciousness!
Happy smoking!
Smoked East Coast Pastrami: The Ultimate Guide to Deliciousness
Homemade pastrami: Brined, spiced, smoked, and steamed for tender, flavorful results. A true labor of love.
Ingredients
- 1 gallon water, divided
- 1 cup kosher salt
- 1 cup brown sugar, packed
- 1/2 cup pink curing salt (Prague Powder #1)
- 1/4 cup pickling spice
- 1 tablespoon black peppercorns, crushed
- 6 cloves garlic, smashed
- 2 bay leaves, crushed
- 1 teaspoon juniper berries, crushed (optional, but highly recommended)
- 1/4 cup coarsely ground black pepper
- 1/4 cup coriander seeds, toasted and coarsely ground
- 2 tablespoons smoked paprika
- 2 tablespoons granulated garlic
- 1 tablespoon onion powder
- 1 tablespoon mustard powder
- 1 tablespoon brown sugar
- 1 teaspoon red pepper flakes (optional, for a little heat)
- 5-6 pound beef brisket, point cut (also known as the deckle)
Instructions
- In a large, food-safe container (a 2-gallon bucket or a large stockpot works well), combine 1/2 gallon of the water with the kosher salt, brown sugar, pink curing salt, pickling spice, black peppercorns, garlic, bay leaves, and juniper berries (if using). Stir vigorously until the salt and sugar are completely dissolved.
- Add the remaining 1/2 gallon of cold water to the brine. This will help cool it down quickly. You want the brine to be cold before adding the brisket.
- Place the brisket in the brine, making sure it’s completely submerged. If necessary, use a plate or a weight to keep it submerged. This is super important! Any part of the brisket exposed to air will not cure properly.
- Cover the container and refrigerate the brisket for 7-10 days. I usually go for 10 days to ensure maximum flavor penetration. Turn the brisket over every couple of days to ensure even brining.
- After brining, remove the brisket from the brine and rinse it thoroughly under cold running water. Then, place it in a large bowl or container filled with fresh, cold water. Soak the brisket for 1-2 hours, changing the water every 30 minutes. This helps to remove excess salt from the surface. Don’t skip this step, or your pastrami will be too salty!
- After soaking, remove the brisket from the water and pat it completely dry with paper towels. This is important for the rub to adhere properly.
- In a dry skillet over medium heat, toast the coriander seeds for 2-3 minutes, or until fragrant. Be careful not to burn them!
- In a spice grinder or using a mortar and pestle, coarsely grind the toasted coriander seeds.
- In a bowl, combine the ground coriander seeds with the black pepper, smoked paprika, granulated garlic, onion powder, mustard powder, brown sugar, and red pepper flakes (if using). Mix well to ensure all the spices are evenly distributed.
- Liberally apply the pastrami rub to all sides of the brisket, pressing it firmly into the meat. Make sure every nook and cranny is covered. Don’t be shy!
- Wrap the rubbed brisket tightly in plastic wrap and refrigerate it for at least 24 hours, or up to 48 hours. This allows the flavors of the rub to penetrate the meat even further.
- Preheat your smoker to 225-250°F (107-121°C). I prefer using a combination of oak and cherry wood for smoking pastrami, but feel free to experiment with your favorite wood chips or chunks.
- Place the brisket directly on the smoker grate, fat side up. Maintain a consistent temperature throughout the smoking process.
- Smoke the brisket for approximately 6-8 hours, or until the internal temperature reaches 165°F (74°C). Use a reliable meat thermometer to monitor the temperature.
- Once the brisket reaches 165°F (74°C), remove it from the smoker and wrap it tightly in butcher paper or aluminum foil. This step, known as the “Texas Crutch,” helps to prevent the brisket from drying out and speeds up the cooking process.
- Return the wrapped brisket to the smoker and continue smoking for another 4-6 hours, or until the internal temperature reaches 203°F (95°C). The brisket should be probe-tender, meaning a thermometer or probe should slide into the meat with little to no resistance.
- Once the brisket reaches 203°F (95°C), remove it from the smoker and let it rest, still wrapped, for at least 2 hours, or preferably longer. I often let it rest in a cooler wrapped in towels for 4-6 hours. This allows the juices to redistribute throughout the meat, resulting in a more tender and flavorful pastrami. This is a critical step! Don’t skip the rest!
- Fill a large pot with a few inches of water and bring it to a boil. Place a steamer basket or colander inside the pot, making sure the bottom of the basket doesn’t touch the water.
- Place the rested pastrami in the steamer basket, cover the pot, and steam for 2-3 hours, or until the internal temperature reaches 190-200°F (88-93°C). The pastrami should be incredibly tender and easily shreddable.
- Locate the grain of the meat and slice the pastrami thinly, against the grain. This is crucial for ensuring a tender and enjoyable eating experience.
- Serve the pastrami on rye bread with mustard, pickles, and maybe even some Swiss cheese. Or, get creative and use it in sandwiches, salads, or even as a topping for pizza. The possibilities are endless!
Notes
- Pink curing salt (Prague Powder #1) is essential for curing the meat and preventing botulism. Do not omit it.
- Juniper berries are optional but highly recommended for a more authentic pastrami flavor.
- Soaking the brisket after brining is crucial to remove excess salt.
- Resting the pastrami after smoking is essential for a tender and juicy final product.
- Slicing against the grain is crucial for tenderness.
- The Texas Crutch (wrapping in butcher paper or foil) is optional but helps prevent the brisket from drying out.