
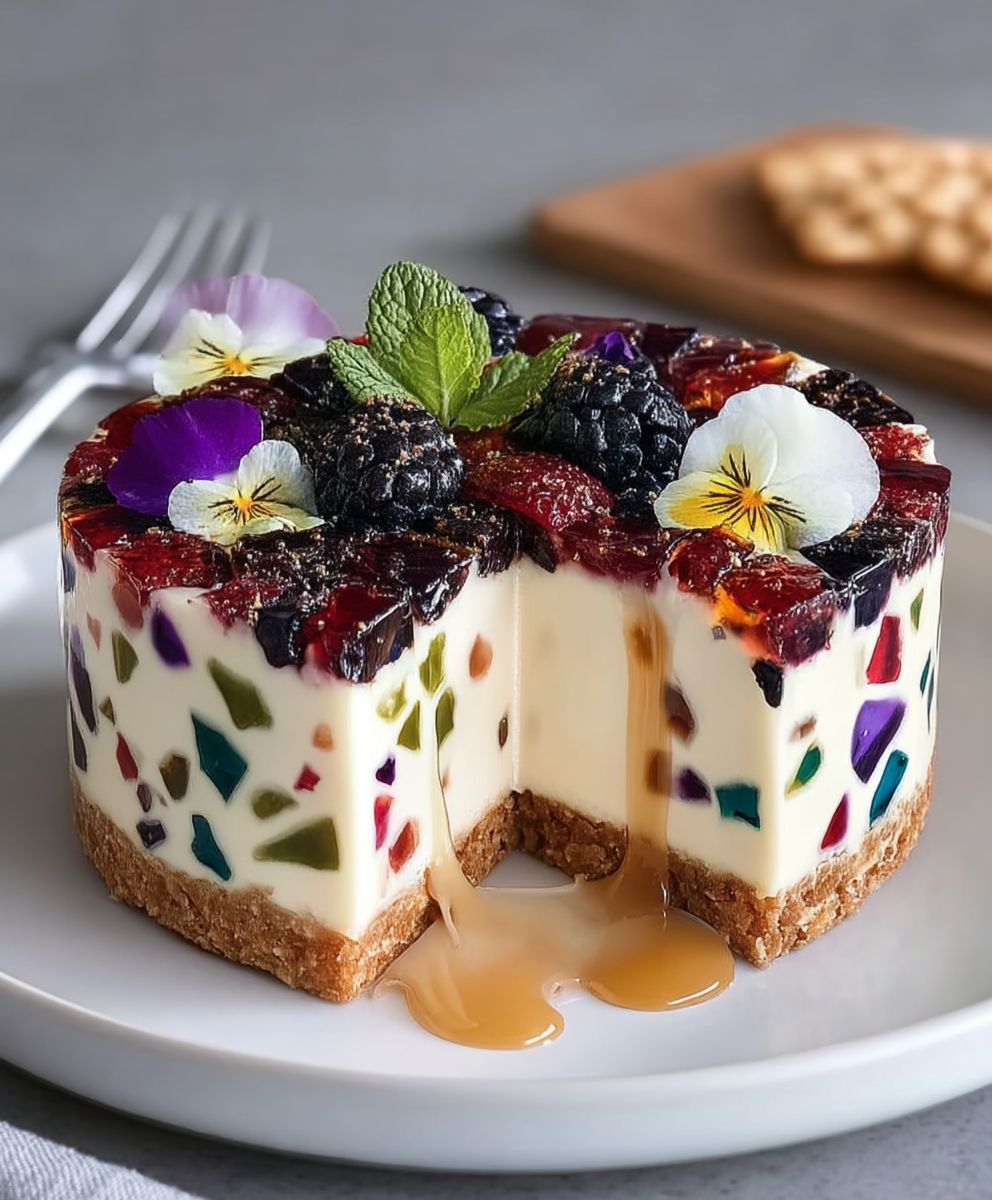
Terrazzo Cheesecake: Prepare to be amazed by this show-stopping dessert that’s as delightful to look at as it is to eat! Have you ever seen a dessert that resembles a work of art? This Terrazzo Cheesecake is exactly that a stunning mosaic of colorful, fruity flavors suspended in a creamy, dreamy cheesecake base. It’s the perfect centerpiece for any celebration, guaranteed to impress your guests and leave them begging for the recipe.
While the exact origins of the “terrazzo” dessert style are a bit hazy, the inspiration clearly comes from the beautiful terrazzo flooring found in Italian architecture. Just as those floors are made of carefully arranged fragments, this cheesecake features a playful arrangement of fruit jellies, creating a visually stunning and texturally exciting experience.
People adore this Terrazzo Cheesecake for so many reasons. First, there’s the visual appeal it’s simply gorgeous! But beyond the aesthetics, the combination of creamy cheesecake and chewy, fruity jelly pieces is a textural masterpiece. The bright, refreshing flavors of the fruit perfectly complement the rich, tangy cheesecake, creating a balanced and utterly irresistible treat. Plus, it can be made ahead of time, making it a convenient option for entertaining. So, if you’re looking for a dessert that’s both impressive and delicious, look no further than this stunning Terrazzo Cheesecake!

Ingredients:
- For the Crust:
- 1 1/2 cups graham cracker crumbs
- 5 tablespoons unsalted butter, melted
- 1/4 cup granulated sugar
- 1/4 teaspoon ground cinnamon (optional)
- For the Cheesecake Filling:
- 32 ounces cream cheese, softened to room temperature
- 1 1/2 cups granulated sugar
- 1 teaspoon vanilla extract
- 1/2 teaspoon almond extract (optional, but adds a lovely depth)
- 4 large eggs, room temperature
- 1/2 cup heavy cream
- For the Terrazzo “Chips”:
- 1 box (3 ounces) flavored gelatin (different colors and flavors – I like a mix of raspberry, lime, and orange)
- 1 1/2 cups boiling water, divided (1/2 cup per gelatin flavor)
- For the Sour Cream Topping (Optional):
- 1 cup sour cream
- 2 tablespoons granulated sugar
- 1 teaspoon vanilla extract
Making the Terrazzo “Chips”:
Okay, let’s get started with the fun part creating our colorful terrazzo “chips”! This needs to be done ahead of time, as the gelatin needs ample time to set completely. I usually do this the day before I plan to make the cheesecake.
- Prepare the Gelatin Mixtures: In three separate bowls, dissolve each flavor of gelatin in 1/2 cup of boiling water. Stir well until the gelatin is completely dissolved and the mixture is clear.
- Set the Gelatin: Pour each gelatin mixture into a separate 8×8 inch baking dish (or similar sized container). You want a relatively thin layer, about 1/4 to 1/2 inch thick. This will make it easier to cut into smaller pieces later.
- Chill Until Firm: Cover the dishes with plastic wrap and refrigerate for at least 4 hours, or preferably overnight, until the gelatin is completely firm and set. It should be jiggly but hold its shape when you gently press it.
- Cut into Cubes: Once the gelatin is set, remove it from the refrigerator. Using a sharp knife, cut each color of gelatin into small cubes, about 1/4 to 1/2 inch in size. Don’t worry about them being perfectly uniform; the variation adds to the terrazzo effect!
- Keep Chilled: Place the cut gelatin cubes in separate containers and keep them refrigerated until you’re ready to add them to the cheesecake filling. This prevents them from melting and bleeding their colors into the batter.
Preparing the Graham Cracker Crust:
Now, let’s move on to the foundation of our cheesecake the graham cracker crust. This is a simple step, but it’s crucial for a delicious and sturdy base.
- Combine Dry Ingredients: In a medium bowl, combine the graham cracker crumbs, granulated sugar, and ground cinnamon (if using). Mix well to ensure the sugar and cinnamon are evenly distributed.
- Add Melted Butter: Pour the melted butter into the dry ingredients. Stir until the mixture is evenly moistened and resembles wet sand. It should hold its shape when you press it together.
- Press into Pan: Press the graham cracker mixture firmly into the bottom of a 9-inch springform pan. You can use the bottom of a measuring cup or a flat-bottomed glass to help create an even and compact crust. Make sure to press it firmly against the bottom and slightly up the sides of the pan.
- Pre-Bake the Crust (Optional): For a crispier crust, you can pre-bake it in a preheated oven at 350°F (175°C) for about 8-10 minutes. This step is optional, but I find it helps prevent the crust from becoming soggy. If you choose to pre-bake, let the crust cool completely before adding the filling.
Making the Cheesecake Filling:
This is where the magic happens! The cheesecake filling is rich, creamy, and the perfect canvas for our terrazzo “chips.”
- Beat Cream Cheese: In a large bowl (or the bowl of a stand mixer), beat the softened cream cheese on medium speed until smooth and creamy. This is a crucial step make sure there are no lumps! Scrape down the sides of the bowl as needed.
- Add Sugar: Gradually add the granulated sugar to the cream cheese, beating on medium speed until well combined. Continue to scrape down the sides of the bowl to ensure everything is evenly incorporated.
- Add Extracts: Stir in the vanilla extract and almond extract (if using). These extracts add depth and complexity to the flavor of the cheesecake.
- Add Eggs: Add the eggs one at a time, beating on low speed after each addition until just combined. Be careful not to overmix the batter at this stage, as this can incorporate too much air and cause the cheesecake to crack.
- Add Heavy Cream: Gently stir in the heavy cream until the batter is smooth and creamy. Again, avoid overmixing.
- Fold in Terrazzo “Chips”: Gently fold in the prepared gelatin cubes into the cheesecake batter. Distribute them evenly throughout the batter, being careful not to break them apart too much.
Baking the Cheesecake:
Baking a cheesecake can be a little tricky, but with a few tips and tricks, you can achieve a perfectly creamy and crack-free result. I prefer a water bath for even baking and to prevent cracking.
- Prepare the Water Bath: Wrap the bottom of the springform pan tightly with heavy-duty aluminum foil. This will prevent water from seeping into the cheesecake. Place the wrapped pan inside a larger roasting pan.
- Pour in the Batter: Pour the cheesecake batter into the prepared graham cracker crust. Smooth the top of the batter with a spatula.
- Add Hot Water: Carefully pour hot water into the roasting pan, filling it about halfway up the sides of the springform pan. The water bath helps to create a moist and even baking environment.
- Bake: Bake in a preheated oven at 325°F (160°C) for 70-80 minutes, or until the edges of the cheesecake are set but the center still has a slight jiggle. The jiggle should be very slight, almost like a wobbly pudding.
- Turn Off Oven and Let Cool: Turn off the oven and crack the oven door slightly. Let the cheesecake cool in the oven for 1 hour. This slow cooling process helps to prevent cracking.
- Refrigerate: After 1 hour, remove the cheesecake from the water bath and let it cool completely on a wire rack. Once cooled, cover the cheesecake with plastic wrap and refrigerate for at least 6 hours, or preferably overnight. This allows the cheesecake to fully set and develop its flavor.
Adding the Sour Cream Topping (Optional):
A sour cream topping adds a tangy and creamy layer to the cheesecake, complementing the richness of the filling. It’s totally optional, but I highly recommend it!
- Combine Ingredients: In a small bowl, combine the sour cream, granulated sugar, and vanilla extract. Mix well until smooth and creamy.
- Spread on Cheesecake: Once the cheesecake has chilled completely, spread the sour cream topping evenly over the top.
- Chill Again: Refrigerate the cheesecake for another 30 minutes to allow the sour cream topping to set slightly.
Serving and Storing:
Finally, the moment we’ve all been waiting for serving and enjoying our beautiful Terrazzo Cheesecake!
- Remove from Pan: Carefully remove the cheesecake from the springform pan. Run a thin knife around the edges of the cheesecake to loosen it from the pan before releasing the sides.
- Slice and Serve: Slice the cheesecake with a sharp knife. For clean slices, you can dip the knife in hot water and wipe it clean between each slice.
- Garnish (Optional): You can garnish the cheesecake with fresh berries, whipped cream, or a dusting of powdered sugar for an extra touch of elegance.
- Storage: Store leftover cheesecake in an airtight container in the refrigerator for up to 5 days.
Conclusion:
This Terrazzo Cheesecake isn’t just a dessert; it’s a showstopper, a conversation starter, and a guaranteed crowd-pleaser. I know, I know, I might be biased, but trust me on this one! The creamy, dreamy cheesecake filling, studded with those vibrant, colorful “terrazzo” pieces, creates a textural and visual masterpiece that’s unlike anything you’ve probably ever tasted. It’s the perfect balance of sweet and tangy, rich and refreshing, making it an ideal treat for any occasion, from a casual weeknight dessert to a fancy dinner party.
But what truly makes this recipe a must-try is its versatility. While I’ve provided a base recipe that I absolutely adore, the possibilities for customization are endless! Feel free to experiment with different flavors and colors for your “terrazzo” pieces. Try using different types of cookies, candies, or even chopped fruit to create a unique and personalized cheesecake that reflects your own taste and style.
Serving Suggestions and Variations:
* For a classic touch, serve each slice with a dollop of freshly whipped cream and a sprinkle of colorful sprinkles.
* Want to add a bit of zing? A drizzle of raspberry sauce or a few fresh berries will complement the cheesecake’s richness perfectly.
* Feeling adventurous? Try incorporating a layer of chocolate ganache or caramel sauce into the cheesecake for an extra decadent treat.
* For a lighter option, use a reduced-fat cream cheese and a sugar substitute in the filling.
* Consider making mini Terrazzo Cheesecakes in individual ramekins for a fun and elegant presentation. These are perfect for parties and gatherings!
* If you’re short on time, you can even use a pre-made graham cracker crust to simplify the process.
I truly believe that this Terrazzo Cheesecake recipe is a winner. It’s relatively easy to make, incredibly impressive to look at, and absolutely delicious to eat. It’s the kind of dessert that will have everyone asking for seconds (and the recipe!).
So, what are you waiting for? Gather your ingredients, preheat your oven, and get ready to embark on a cheesecake adventure! I promise you won’t regret it. And most importantly, don’t be afraid to get creative and have fun with it! Baking should be an enjoyable experience, so let your imagination run wild and create a Terrazzo Cheesecake that’s uniquely yours.
I’m so excited for you to try this recipe and experience the joy of creating this stunning dessert. Once you’ve made it, I would absolutely love to hear about your experience! Share your photos, tips, and variations in the comments below. Let me know what you thought of the recipe, what changes you made, and how your Terrazzo Cheesecake turned out. Your feedback is invaluable, and it helps me to continue creating recipes that you’ll love. Happy baking! I can’t wait to see your creations!
Terrazzo Cheesecake: A Stunning Dessert Recipe & Guide
A stunning Terrazzo Cheesecake with creamy filling, colorful gelatin "chips," and a classic graham cracker crust.
Ingredients
- 1 1/2 cups graham cracker crumbs
- 5 tablespoons unsalted butter, melted
- 1/4 cup granulated sugar
- 1/4 teaspoon ground cinnamon (optional)
- 32 ounces cream cheese, softened to room temperature
- 1 1/2 cups granulated sugar
- 1 teaspoon vanilla extract
- 1/2 teaspoon almond extract (optional)
- 4 large eggs, room temperature
- 1/2 cup heavy cream
- 1 box (3 ounces) flavored gelatin (different colors and flavors – raspberry, lime, and orange recommended)
- 1 1/2 cups boiling water, divided (1/2 cup per gelatin flavor)
- 1 cup sour cream
- 2 tablespoons granulated sugar
- 1 teaspoon vanilla extract
Instructions
- In three separate bowls, dissolve each flavor of gelatin in 1/2 cup of boiling water. Stir well until completely dissolved.
- Pour each gelatin mixture into a separate 8×8 inch baking dish (or similar) to create a 1/4 to 1/2 inch thick layer.
- Cover and refrigerate for at least 4 hours, or preferably overnight, until completely firm.
- Cut each color of gelatin into small cubes (1/4 to 1/2 inch).
- Keep chilled in separate containers until ready to use.
- In a medium bowl, combine graham cracker crumbs, sugar, and cinnamon (if using).
- Add melted butter and stir until evenly moistened and resembling wet sand.
- Press firmly into the bottom of a 9-inch springform pan, pressing slightly up the sides.
- (Optional) Pre-bake at 350°F (175°C) for 8-10 minutes for a crispier crust. Let cool completely.
- In a large bowl, beat softened cream cheese until smooth and creamy. Scrape down the sides as needed.
- Gradually add sugar, beating until well combined. Scrape down the sides.
- Stir in vanilla and almond extract (if using).
- Add eggs one at a time, beating on low speed after each addition until just combined. Do not overmix.
- Gently stir in heavy cream until smooth. Avoid overmixing.
- Gently fold in the prepared gelatin cubes, distributing evenly.
- Wrap the bottom of the springform pan tightly with heavy-duty aluminum foil. Place inside a larger roasting pan.
- Pour the cheesecake batter into the prepared crust. Smooth the top.
- Carefully pour hot water into the roasting pan, filling it halfway up the sides of the springform pan.
- Bake at 325°F (160°C) for 70-80 minutes, or until the edges are set but the center still has a slight jiggle.
- Turn off the oven, crack the door slightly, and let cool in the oven for 1 hour.
- Remove from the water bath and let cool completely on a wire rack.
- Cover and refrigerate for at least 6 hours, or preferably overnight.
- In a small bowl, combine sour cream, sugar, and vanilla extract. Mix well.
- Spread evenly over the chilled cheesecake.
- Refrigerate for another 30 minutes to allow the topping to set slightly.
- Carefully remove the cheesecake from the springform pan.
- Slice with a sharp knife (dip in hot water and wipe clean between slices for best results).
- Garnish as desired.
- Store leftovers in an airtight container in the refrigerator for up to 5 days.
Notes
- Making the gelatin “chips” ahead of time is crucial, as they need ample time to set completely. I usually do this the day before I plan to make the cheesecake.
- Room temperature ingredients are important for a smooth cheesecake batter.
- Avoid overmixing the batter, especially after adding the eggs, to prevent cracking.
- A water bath is highly recommended for even baking and to prevent cracking.
- The slow cooling process in the oven also helps to prevent cracking.